Intro
This article explains how to wire a custom Domo App to DataSets and AppDB Collections on the Wiring screen, how themanifest.json file controls which DataSets and Collections the App expects, and how rewiring an App to different data changes its layout and behavior.
Wiring is the link between an App and the data that powers it. A well-wired App reads the right DataSet columns, writes to the correct AppDB Collection, and stays in sync with the field definitions declared in its manifest.
Definitions
Before you wire an App, it helps to be clear on the terms used on the Wiring screen and in the manifest.- AppDB — A wrapper around a MongoDB database that adds document-level security Filters and ensures tight integration with Domo instances. You can use AppDB as your web application’s database. It enables real-time, read/write functionality in your App.
- Collection — An AppDB container that stores the documents an App reads and writes at runtime. Unlike a DataSet, a Collection is dynamic and updates as users interact with the App.
- DataSet — The data extracted from a data source and stored in Domo, used to power your App. DataSets are static from the App’s perspective — the App reads from them but does not write back to them.
- Manifest — The
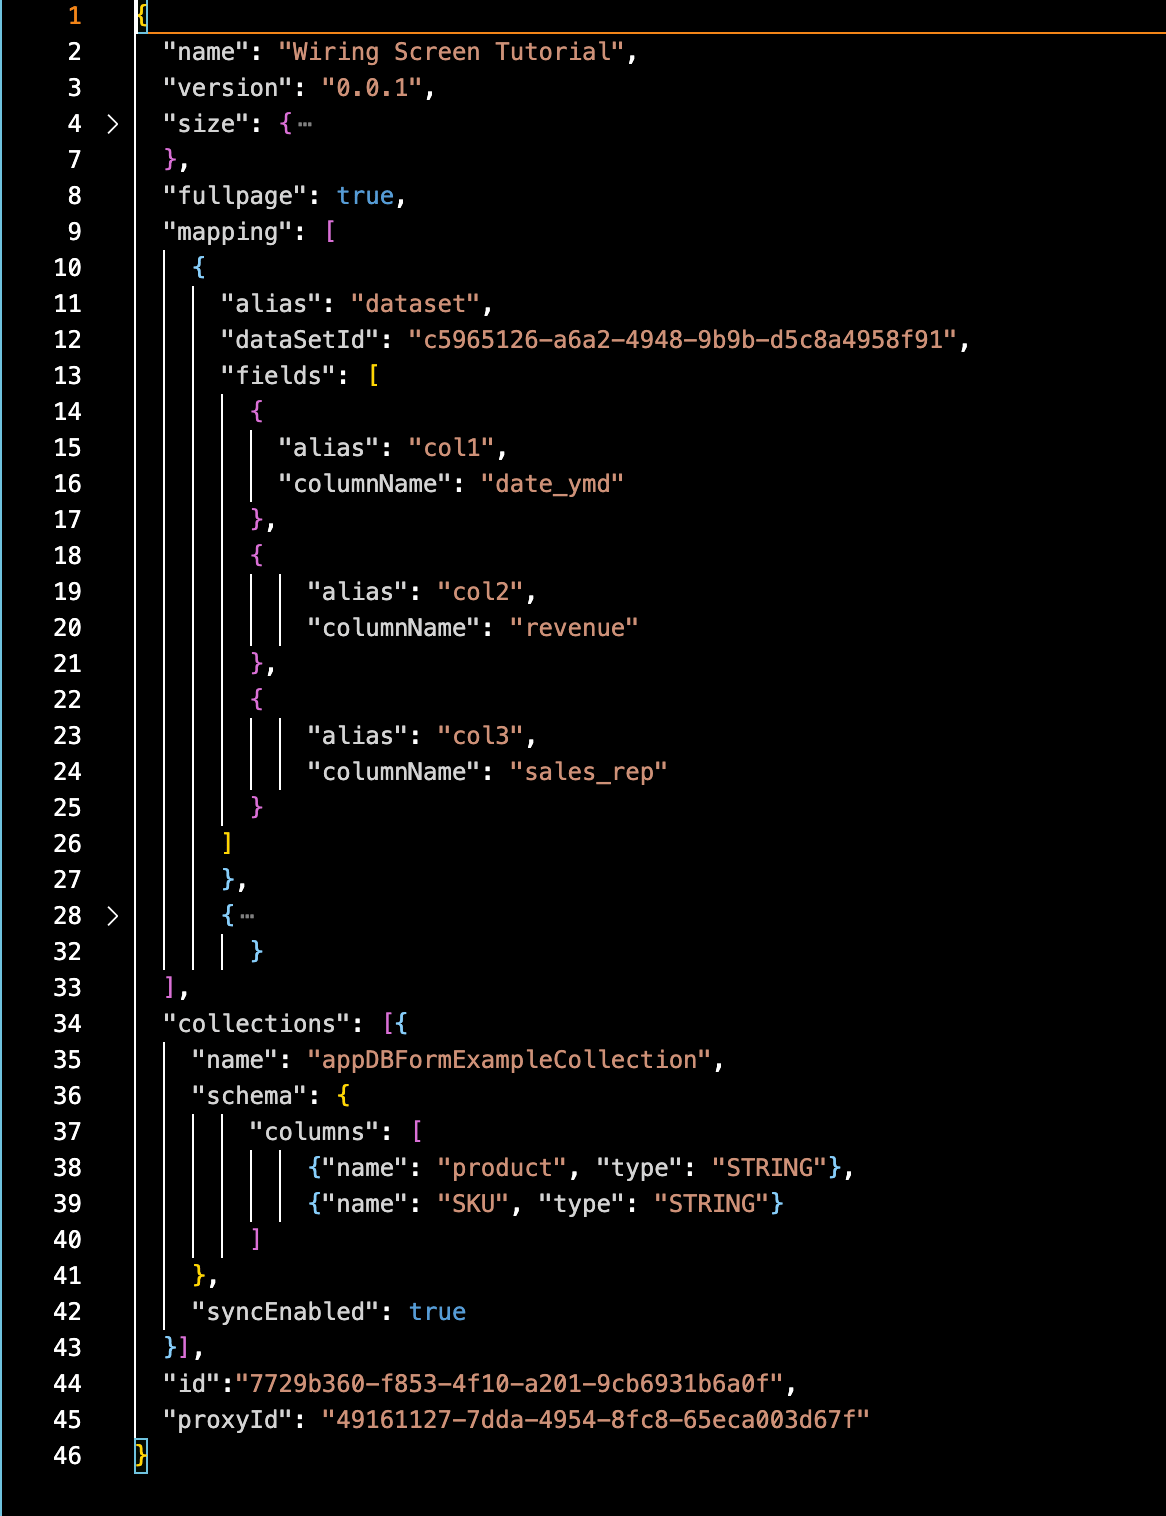
manifest.jsonfile declares the App’s name, version, properties, default Collections, and DataSet field mappings. The manifest must be placed in the base directory of the App and namedmanifest.json. - Mapping — The list of DataSet mappings the App uses. Each mapping defines an alias and the fields the App expects to find in the DataSet wired to that alias.
- Name — The name of the App as it appears in Domo.
- Version — The current version of your App.
- Wiring — The screen where you map your App to data in Domo.
Access the Wiring Screen
- Open the dashboard containing your App card.
-
On the App card, select Card options > Edit Card.
The App Wiring screen opens. The bottom half of the page displays the DataSets and Collections tabs — this is where you map the App to data in Domo based on the aliases and Collections declared in its
manifest.json.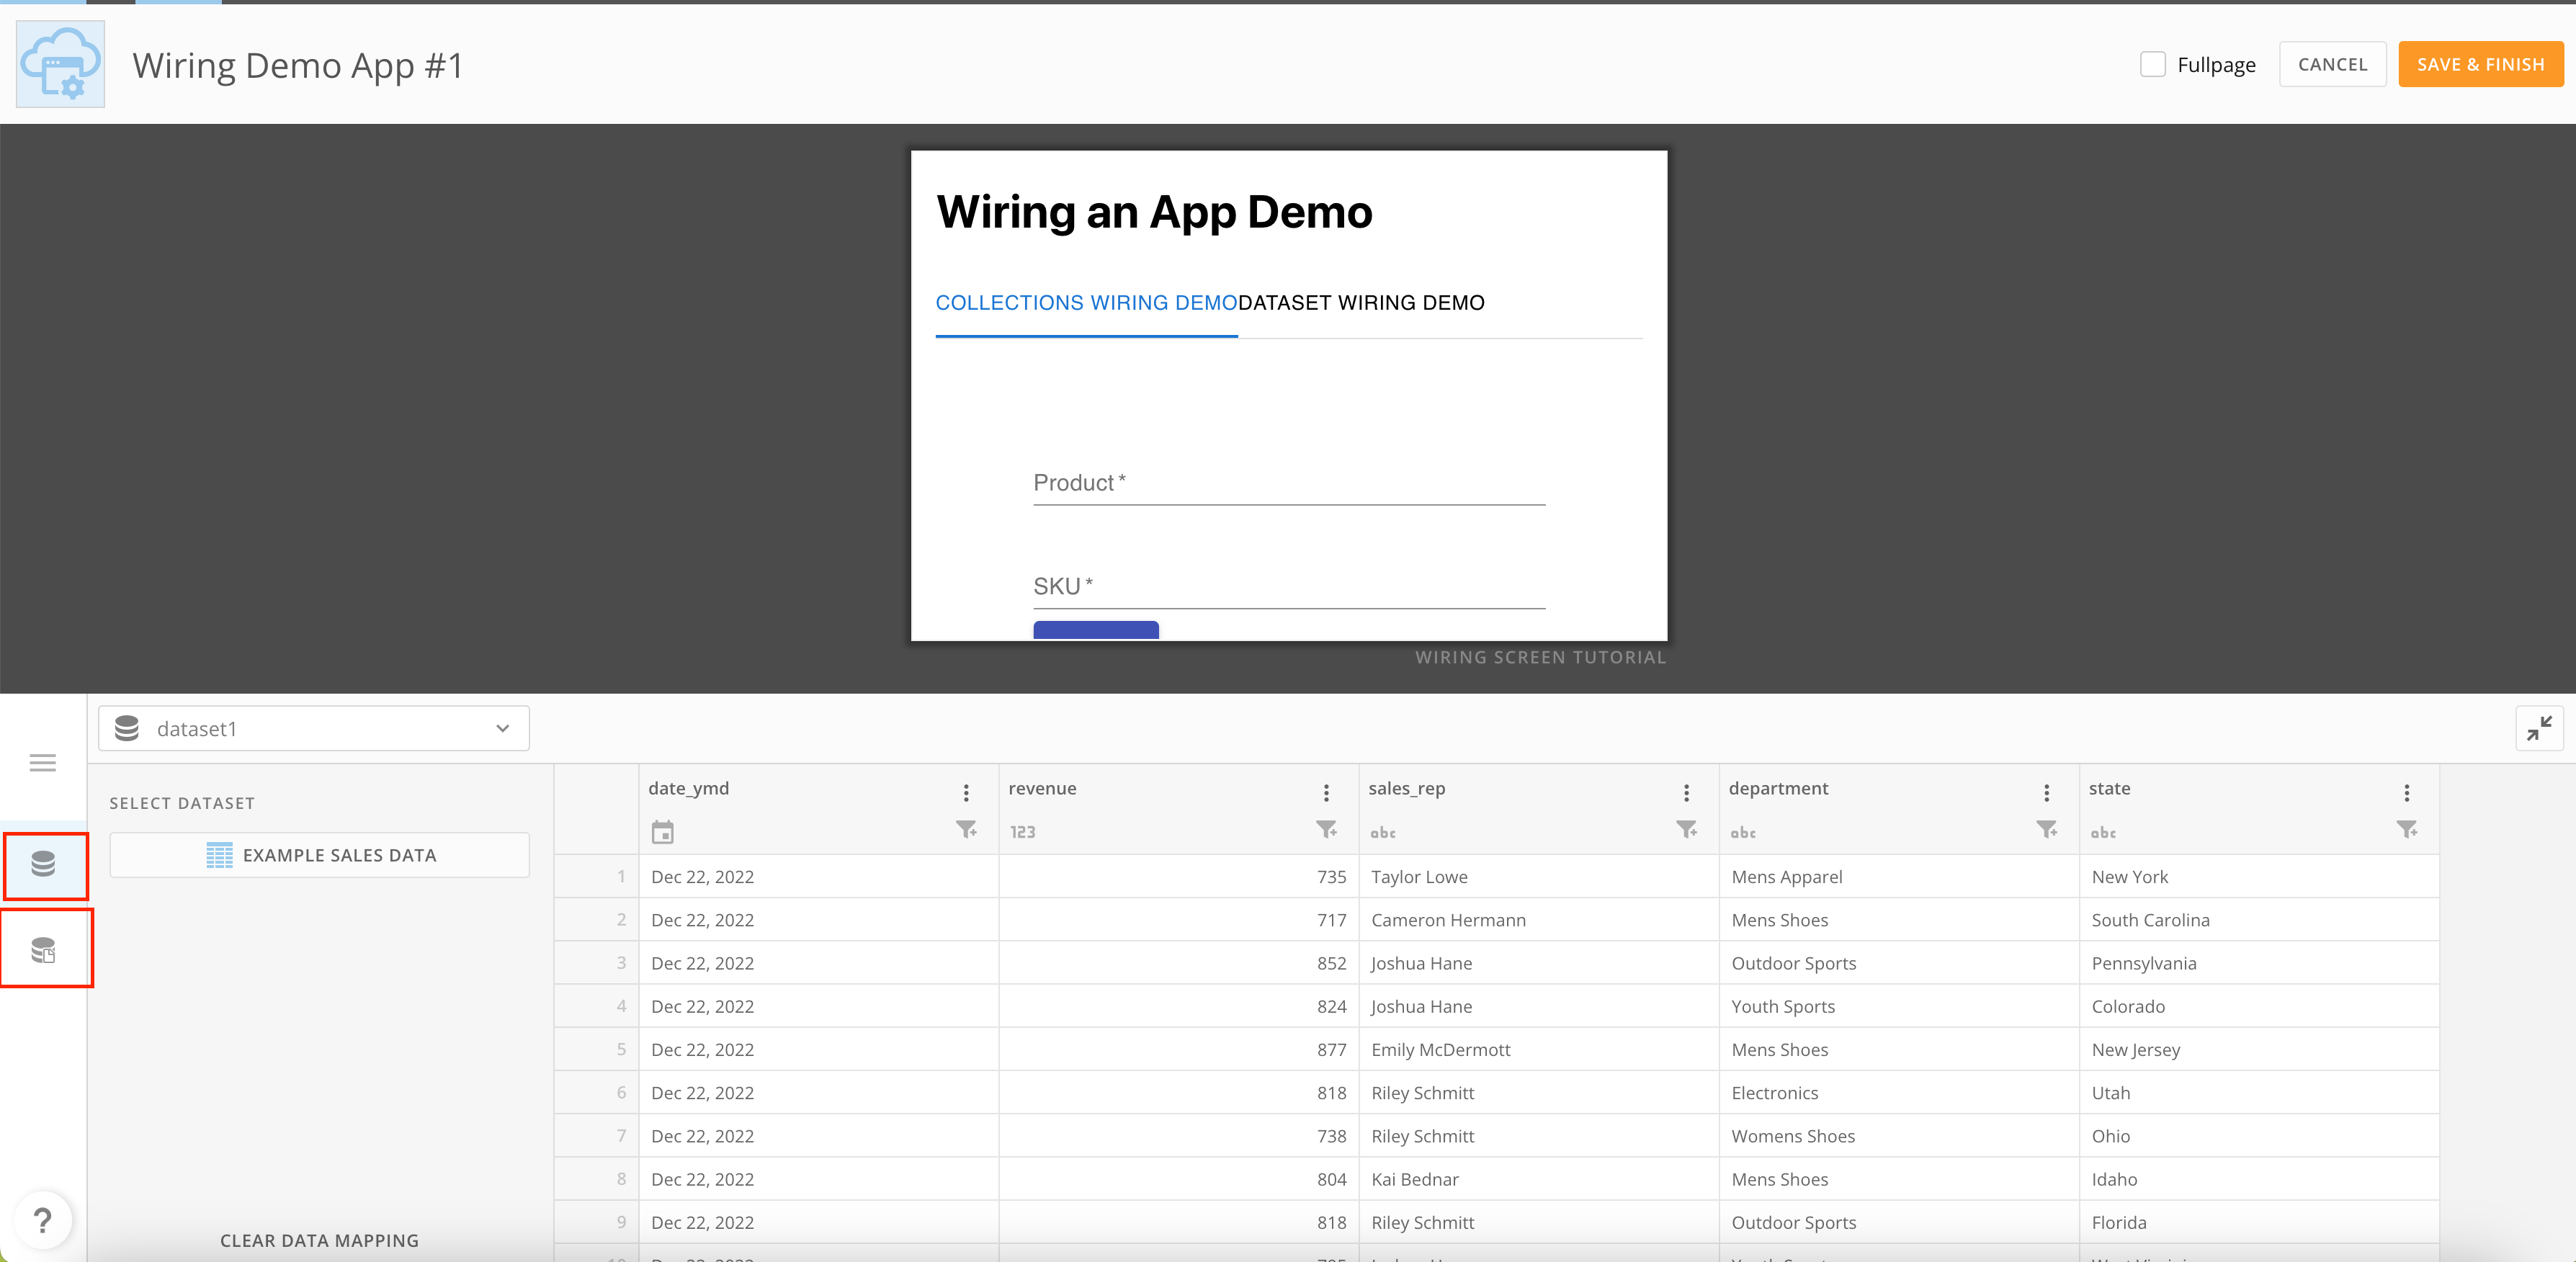
Wire a DataSet
The DataSet dropdown lists the aliases declared in the App’s manifest. For each alias, you select a DataSet in Domo and map the alias’s expected fields to columns on that DataSet.- On the Wiring screen, open the DataSets tab.
-
Select an alias from the dropdown.
The alias name comes from the
datasetsMappingentry in the App’smanifest.json. - Choose the Domo DataSet you want to wire to the alias.
-
For each field the App expects, select the matching column in the DataSet.
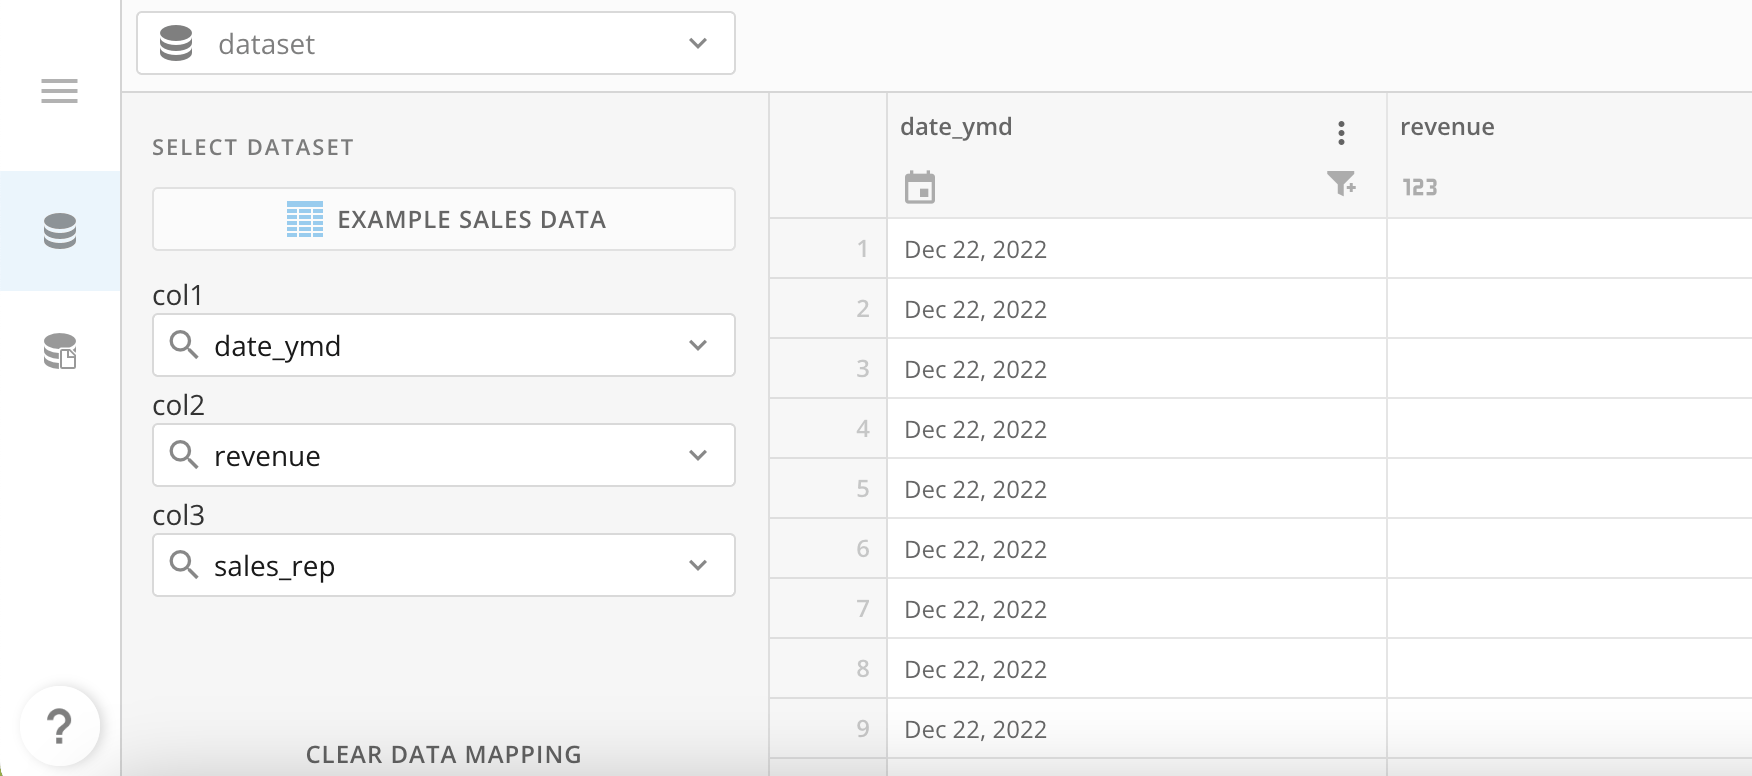
- Repeat for any additional aliases declared in the manifest.
Note: If you later update field mappings in the manifest, return to the Wiring screen and re-map the DataSet so the App continues to read the fields it expects.
Wire a Collection
In the Collections tab you can either create a new AppDB Collection for the App or wire it to a pre-existing Collection. In most cases, you’ll want to create a new Collection so the App has its own dedicated storage.- On the Wiring screen, open the Collections tab.
-
Use the toggle to choose between creating a new Collection and wiring to an existing one.
- To create a new Collection, leave the toggle on the new-Collection option. Domo provisions the Collection for the App when you save.
- To wire to an existing Collection, switch the toggle and select the Collection from the list.
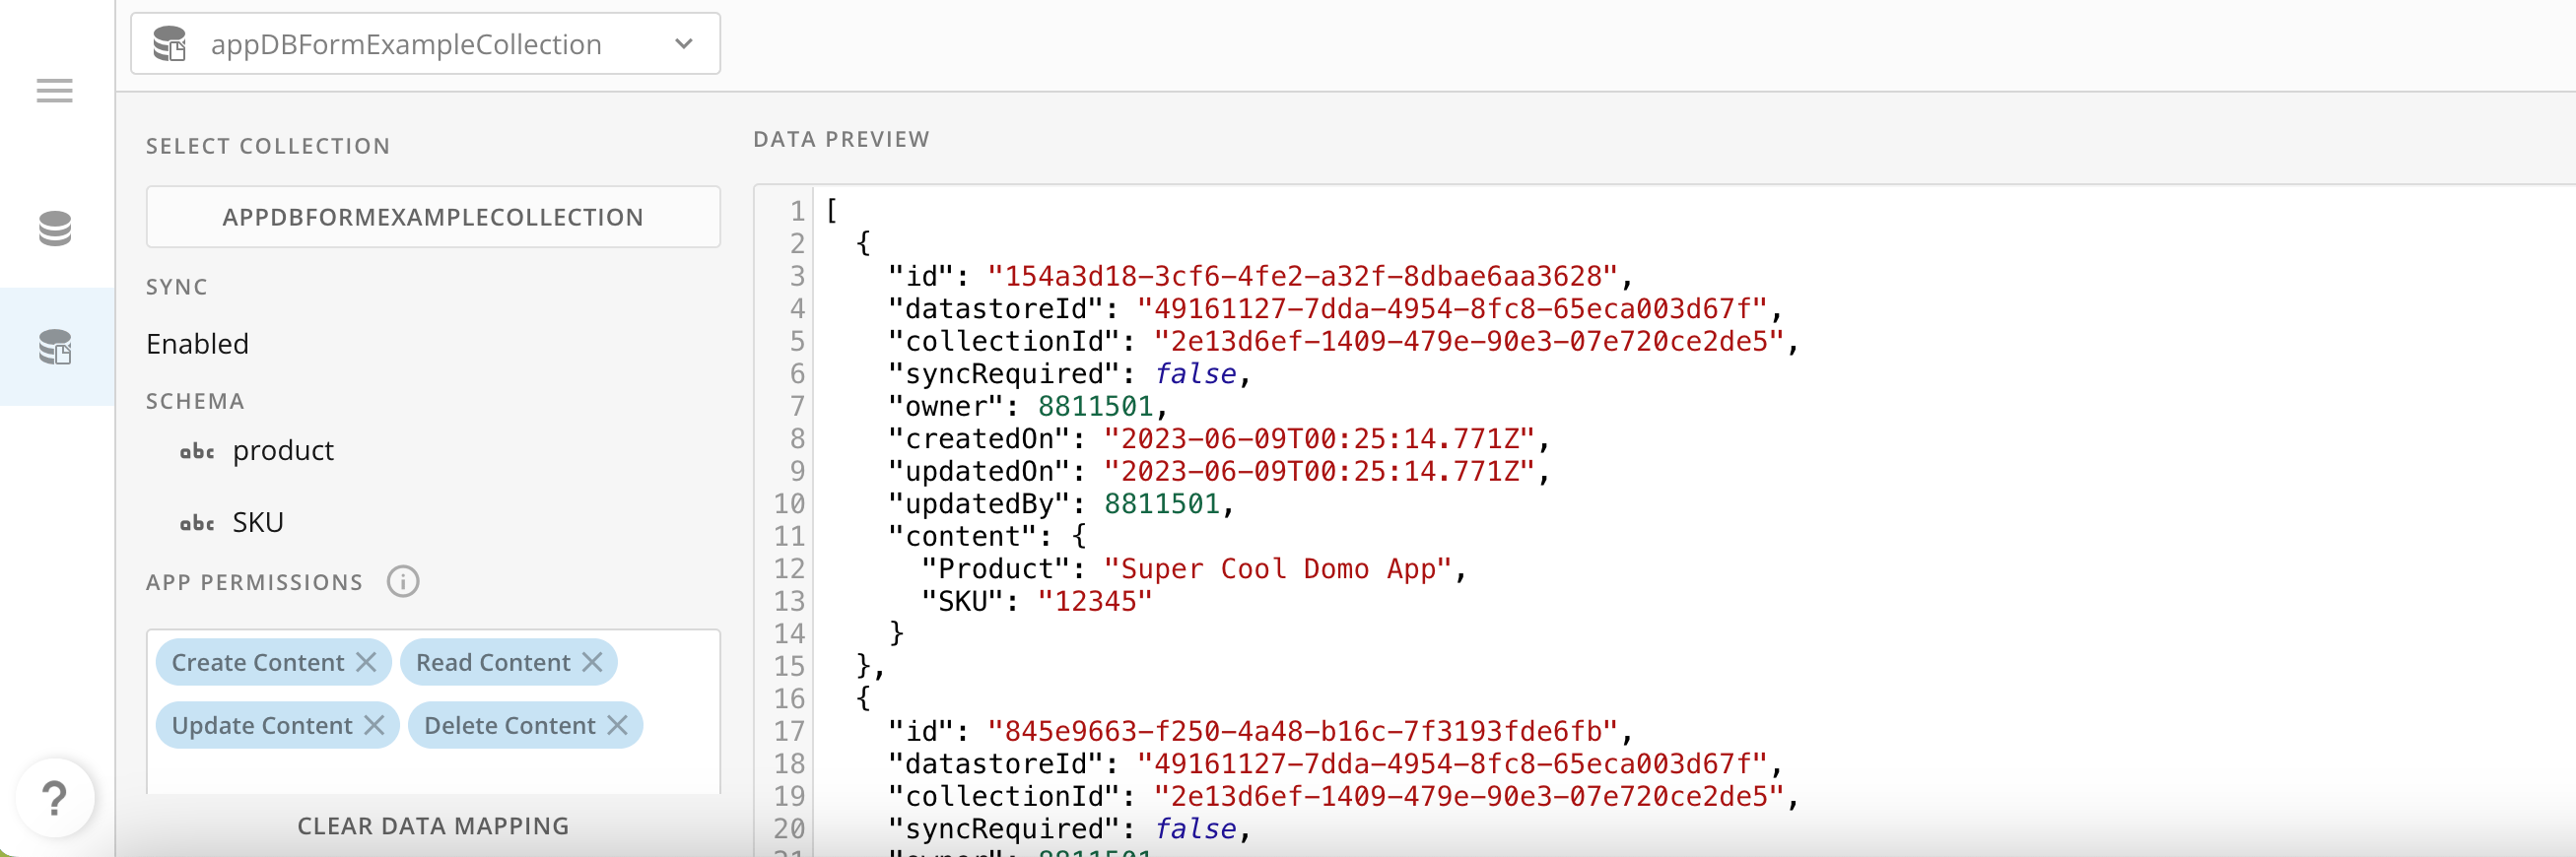
- Save the wiring.
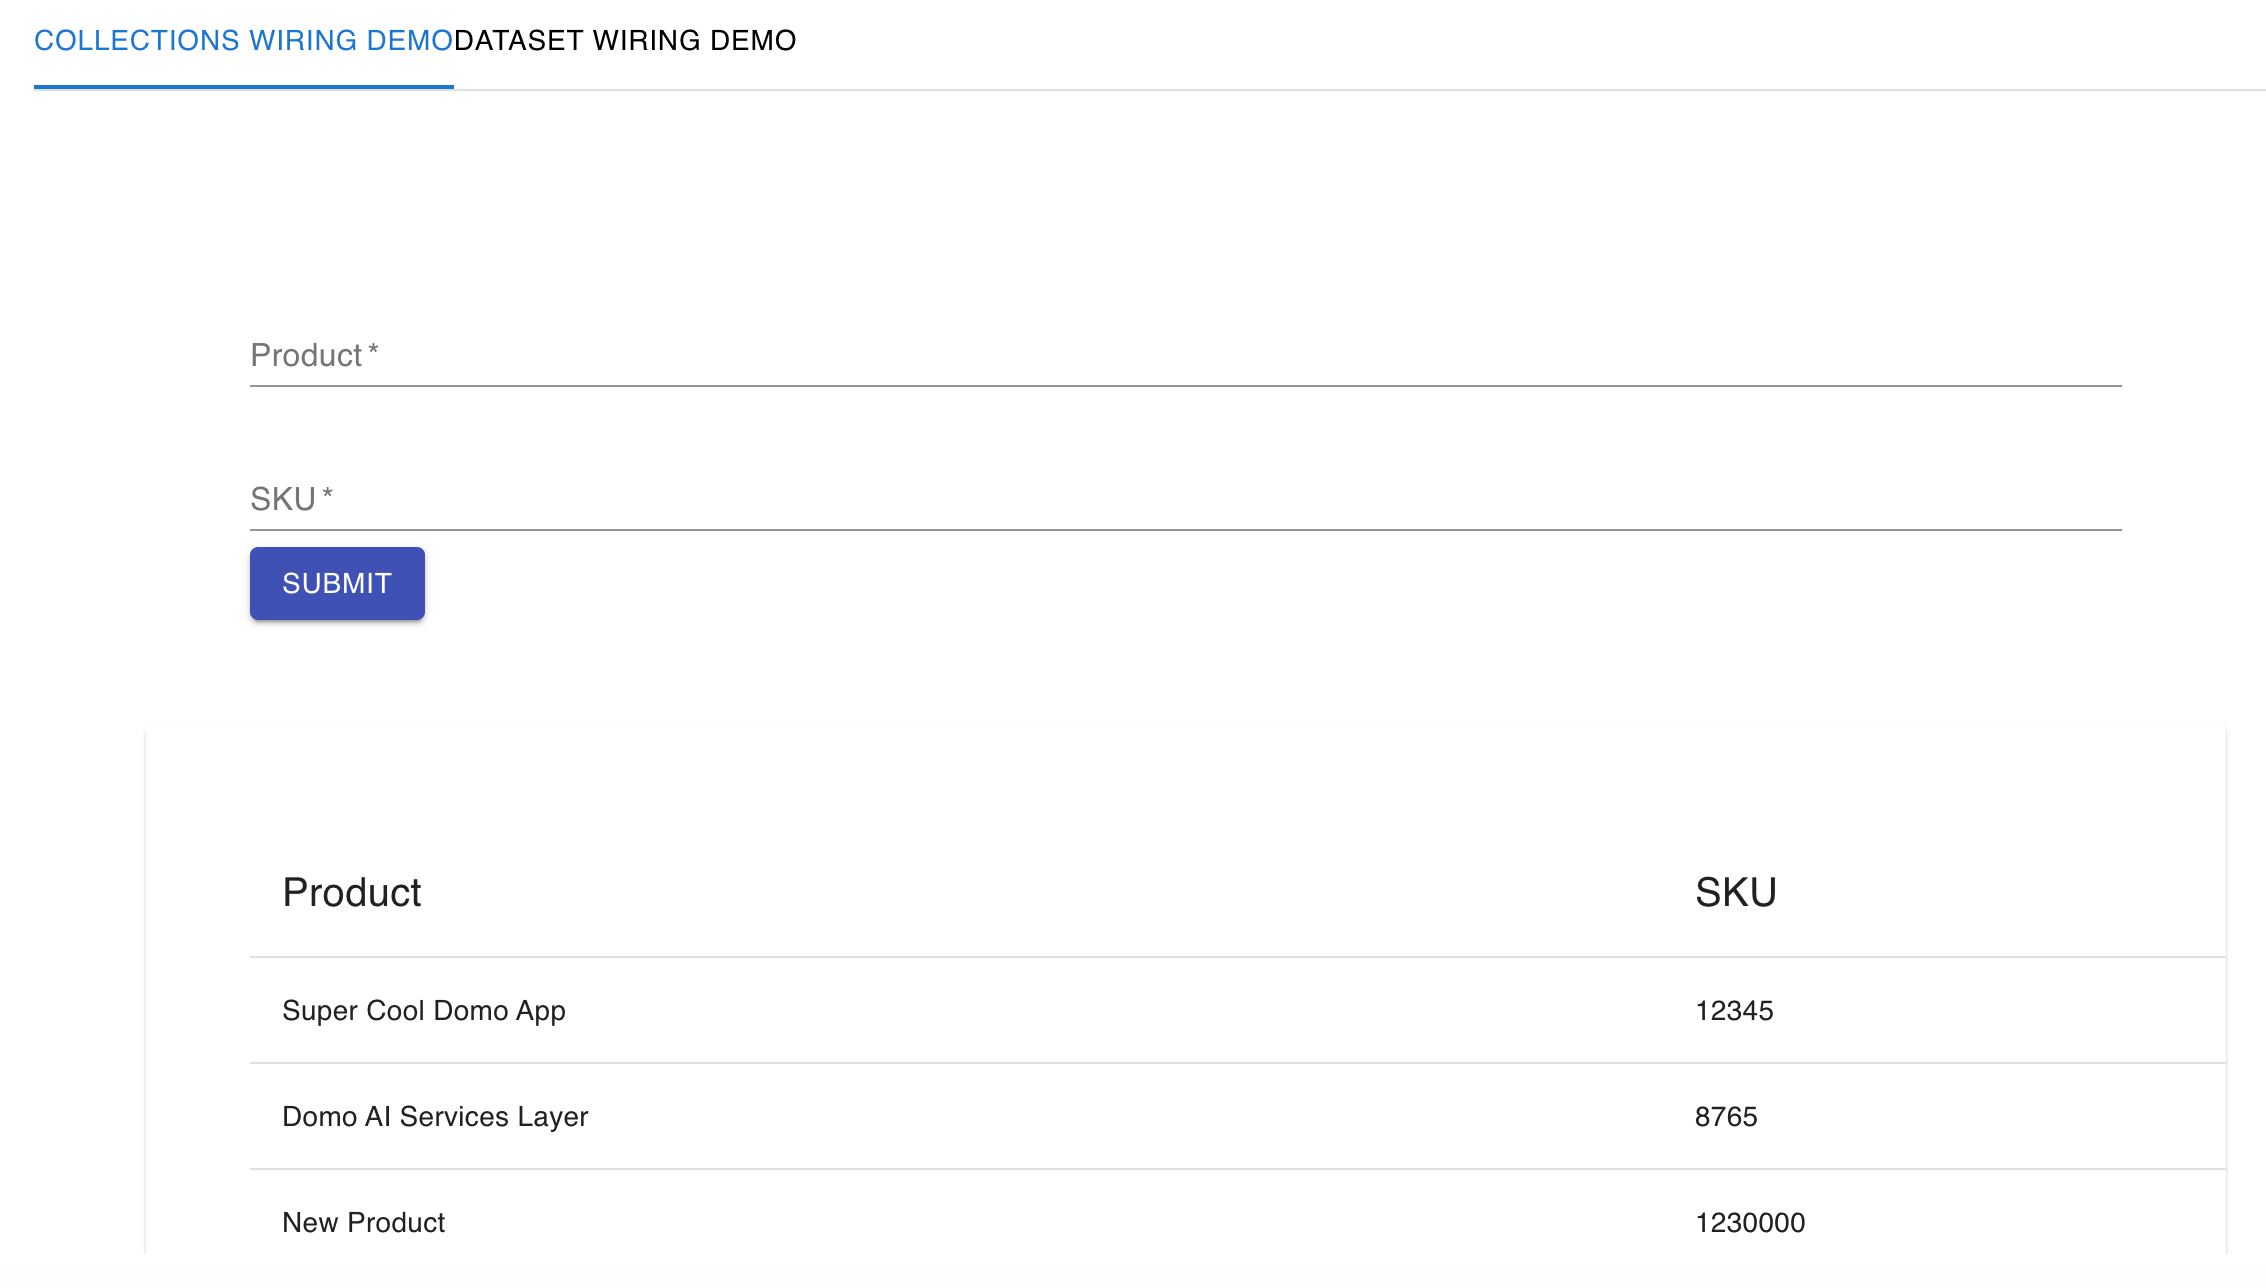
Use Wired Data in the App
After an App is wired, the DataSet and Collection serve different roles at runtime. A typical demo App illustrates the difference:-
The App displays the wired DataSet in a table tab. Because DataSets are static from the App’s perspective, this view reflects whatever the DataSet currently contains.
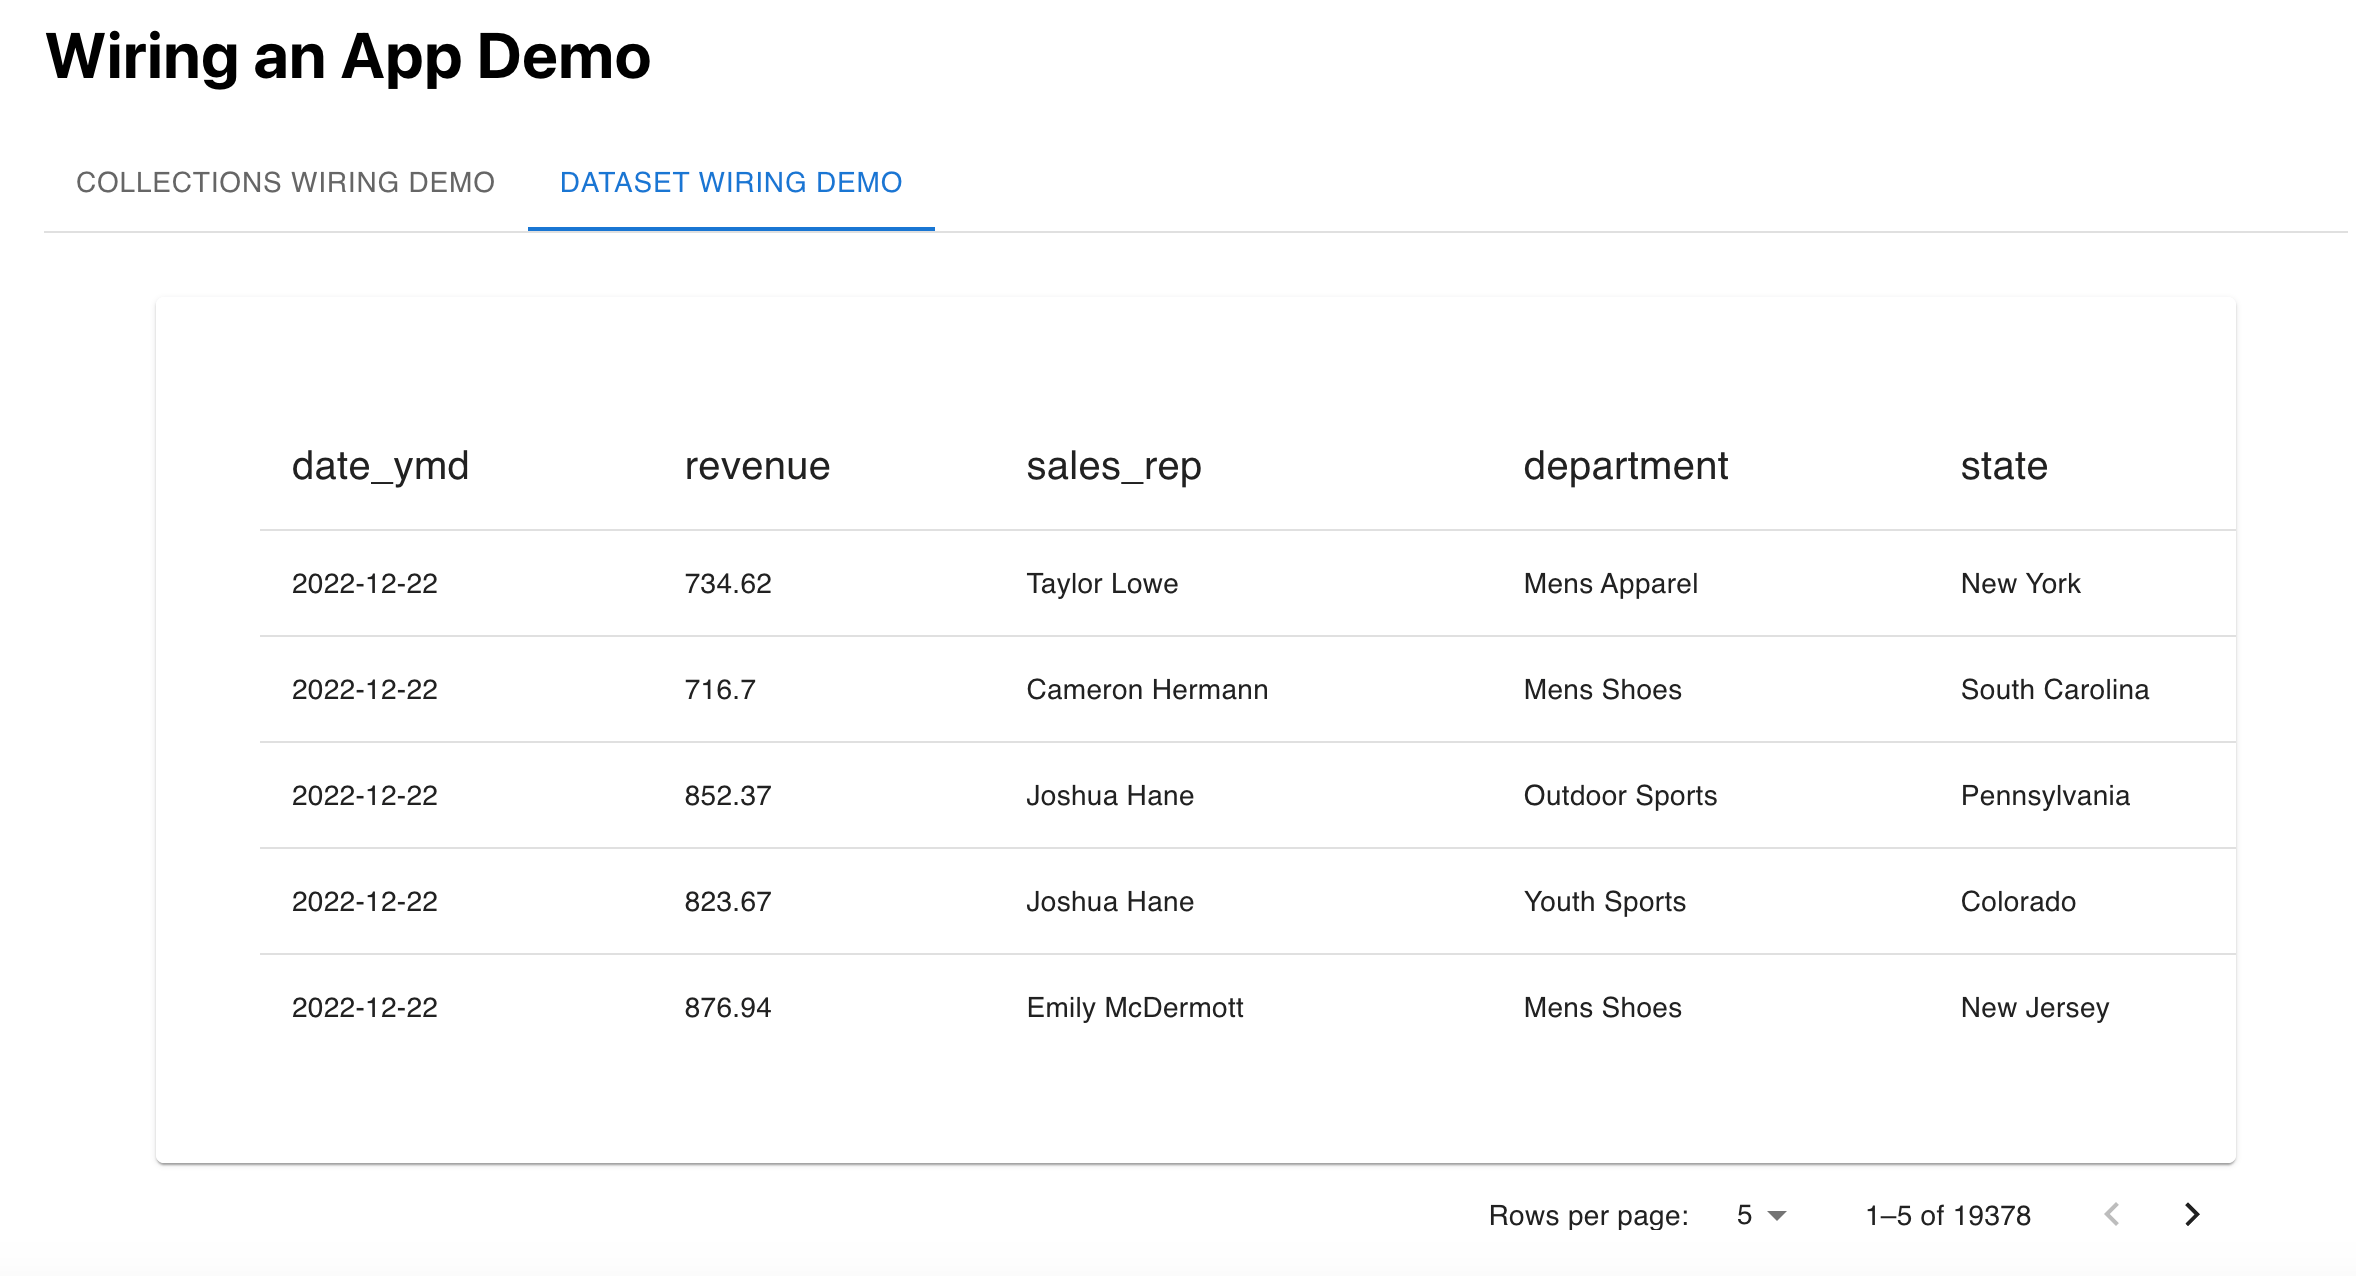
-
The App also exposes a small form with two fields, “product” and “SKU.” After you fill the fields and select Submit, the values are written to the wired Collection and immediately displayed below in a table that reads from the same Collection.
Configure Wiring in manifest.json
The App’smanifest.json file declares the data the App expects to be wired to. The Wiring screen surfaces these declarations as the aliases and Collections you map to actual DataSets and AppDB Collections in your Domo instance.
The properties most relevant to wiring are:
name— The name of the App as it appears in Domo.version— The current version of the App.collections— The default Collection or Collections the App expects. Each entry becomes a row in the Collections tab on the Wiring screen.datasetsMapping— The list of DataSet aliases the App expects, each with the fields the App reads. Each entry becomes an alias in the DataSet dropdown on the Wiring screen.
Note: If you change the field mapping for a DataSet in the manifest, you also need to update the App’s wiring so the DataSet you’re using exposes the columns the App now expects.
FAQ
What's the difference between a DataSet and a Collection in an App?
What's the difference between a DataSet and a Collection in an App?
A DataSet is static read-only data extracted into Domo from a data source. A Collection is an AppDB container the App can write to and read from at runtime. Use a DataSet for reference data the App displays and a Collection for data the App creates or updates.
Can I change which Collection an App is wired to after I publish it?
Can I change which Collection an App is wired to after I publish it?
Yes. Return to the Wiring screen for the App card and either create a new Collection or wire to a different pre-existing Collection. The pre-existing Collection must have Share with New App turned on.
Why doesn't my existing Collection appear in the Collections tab?
Why doesn't my existing Collection appear in the Collections tab?
The Collection most likely doesn’t have Share with New App turned on. Enable that option on the Collection, then return to the Wiring screen.
Can one App use multiple DataSets and Collections?
Can one App use multiple DataSets and Collections?
Yes. Declare each DataSet alias under
datasetsMapping and each Collection under collections in the App’s manifest.json. Every entry shows up as a separate slot on the Wiring screen.