
Intro


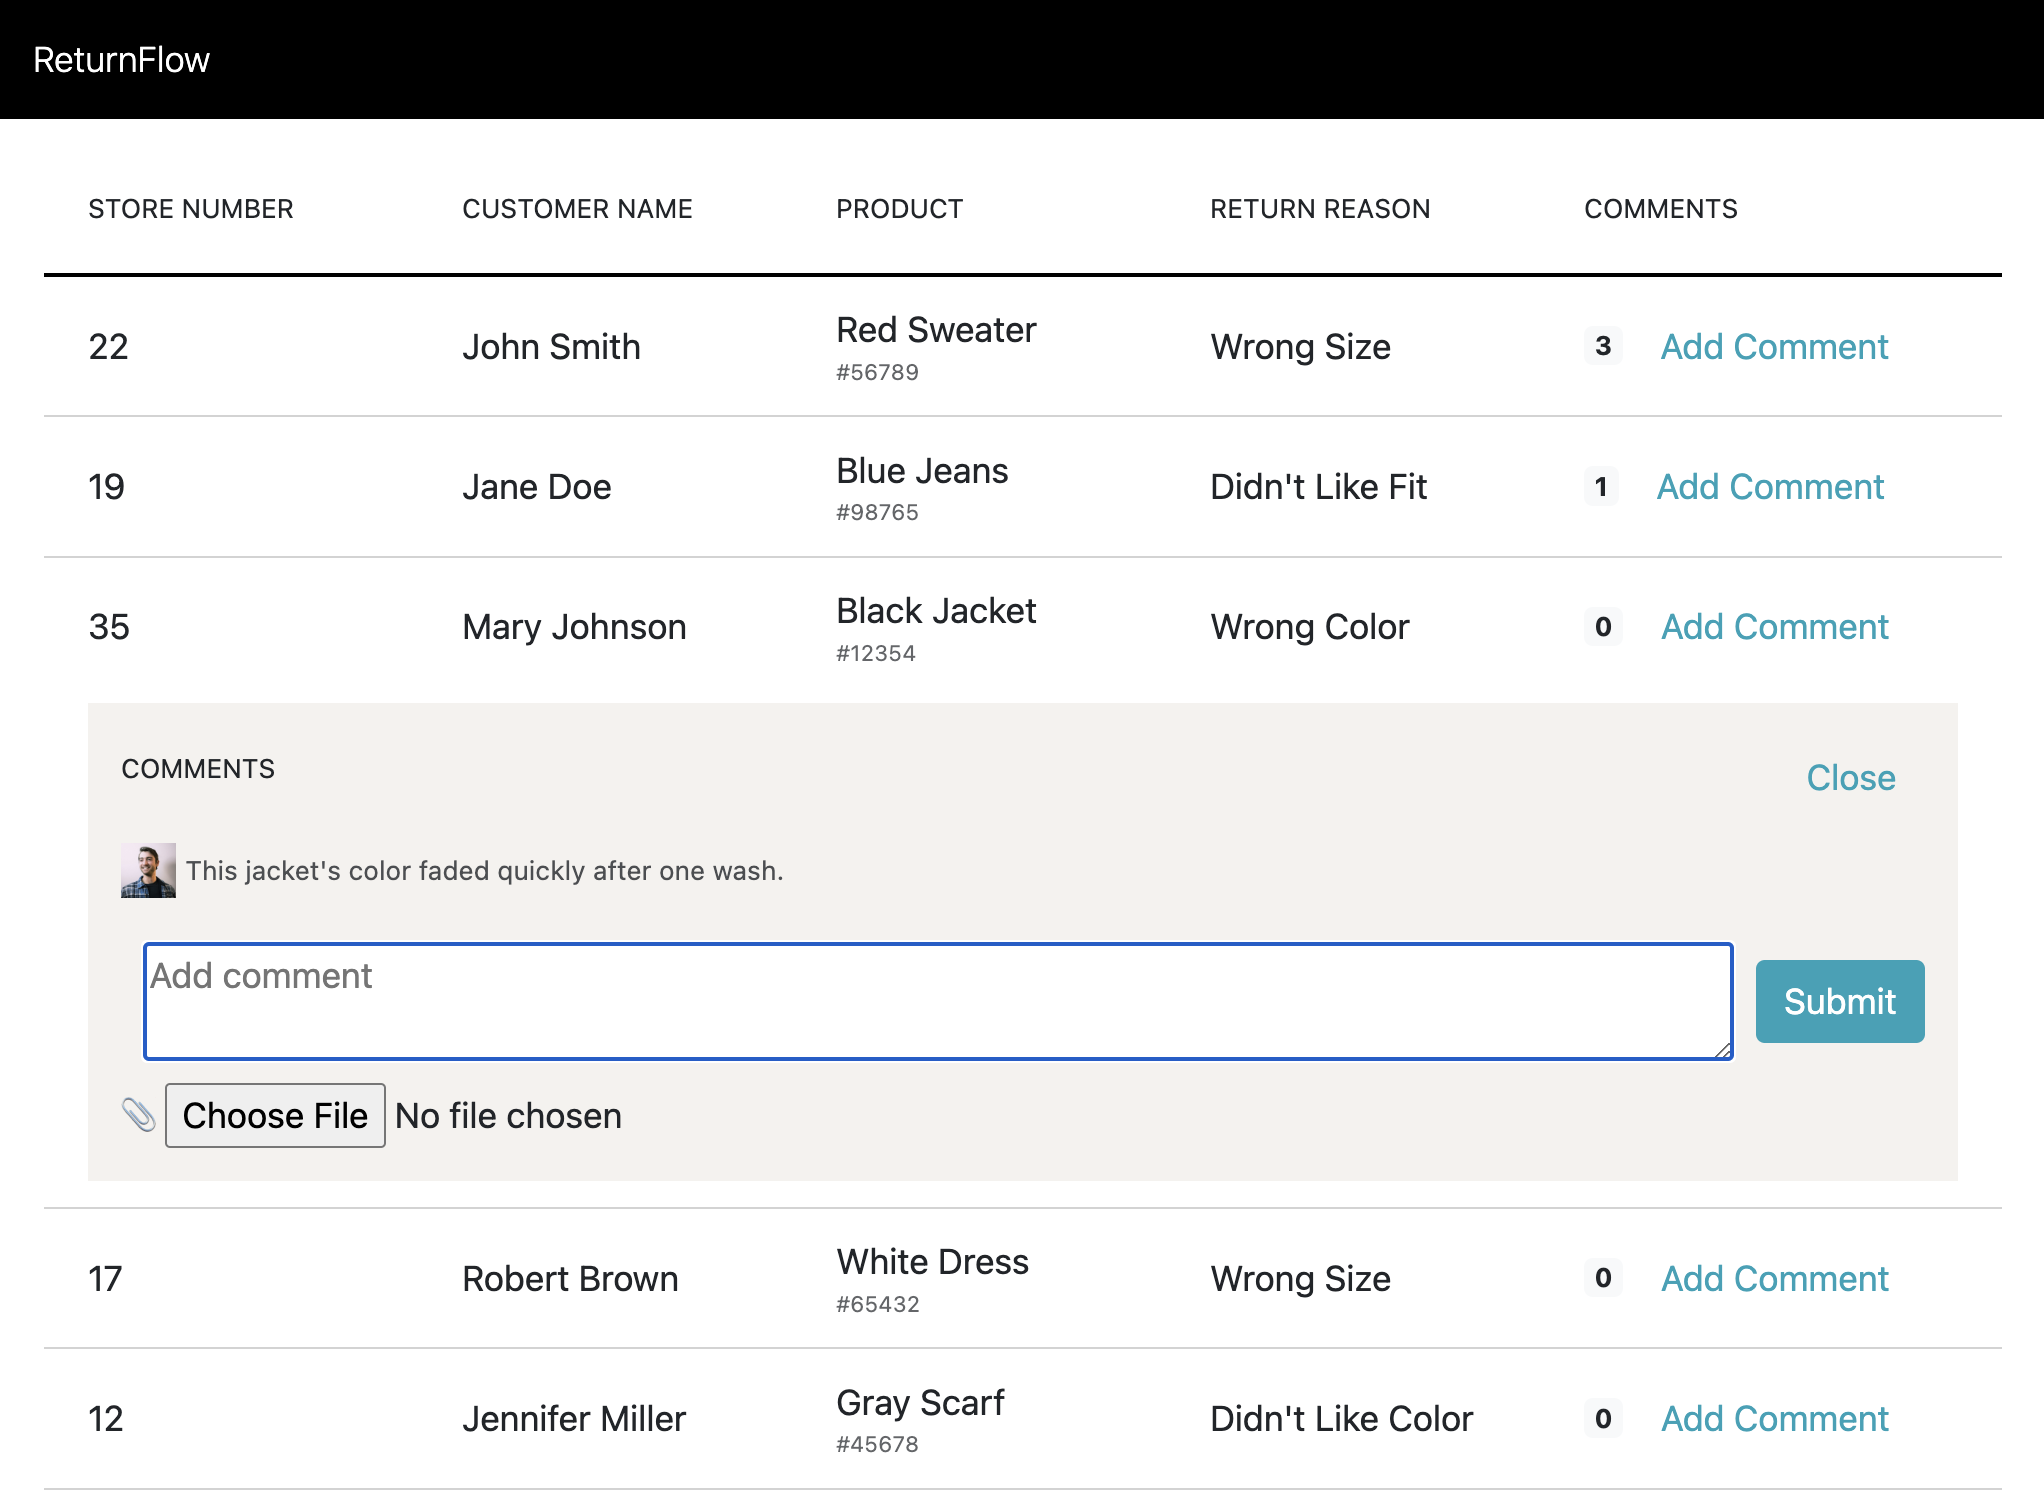
Being able to collect user feedback that provides additional color and context to tabular data can dramatically improve its value. In this tutorial, we’ll be building a “Return Flow” app, which allows retail associates to add comments to item-level returns data. You can check out complete code examples of the Return Flow app here. Screen Shot 2023-08-06 at 3.57.12 PM.png Before beginning make sure you’ve completed the QuickStart, which includes setup and installation and the prerequisites for building on the Domo App Platform.

Step 1: Get the Data


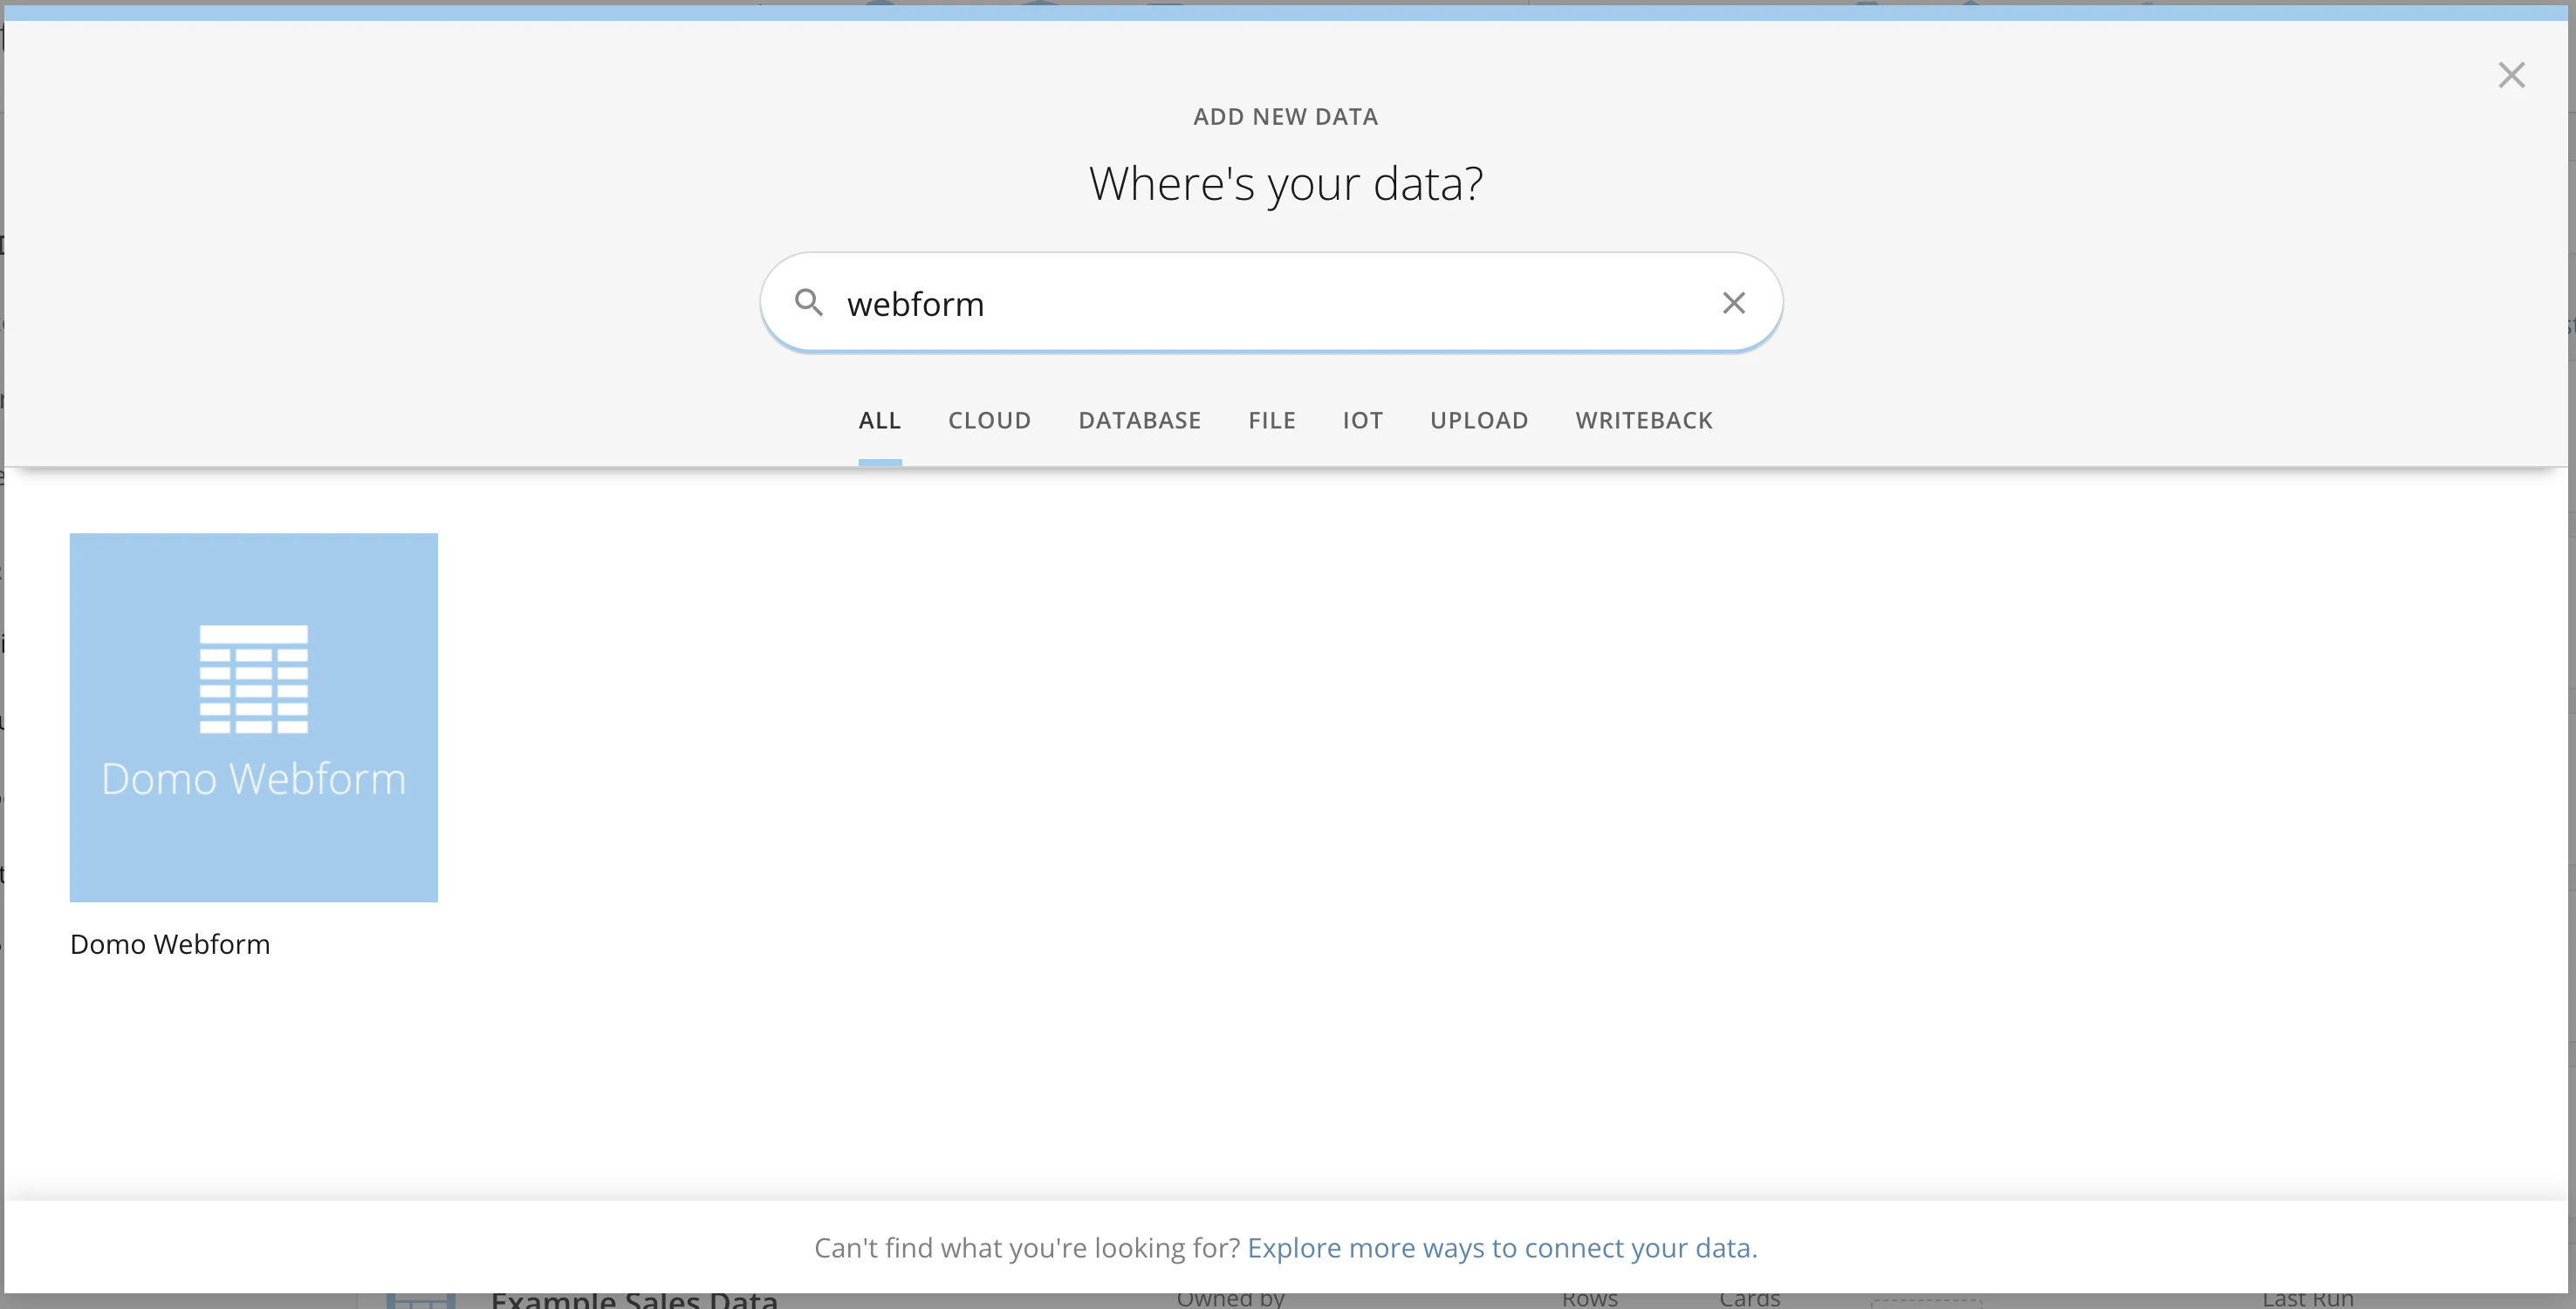
Before we can build an app that lets us add commentary to data, we need to upload our data to a Domo DataSet. In theory, this app could work with any DataSet, but for simplicity we’ll be using the following sample returns data.
Store NumberCustomer NameSKUItem ReturnedReason for Return
22John Smith56789Red SweaterWrong Size
19Jane Doe98765Blue JeansDidn’t Like Fit
35Mary Johnson12354Black JacketWrong Color
17Robert Brown65432White DressWrong Size
12Jennifer Miller45678Gray ScarfDidn’t Like Color
31Brian Williams23456Purple TopWrong Size
11Susan Davis89765Orange ShirtDidn’t Like Fit
25Thomas Moore34987Yellow ShirtWrong Color
26Amanda Taylor87654Green PantsDidn’t Like Fit
18William Thompson87456Brown SkirtWrong Size
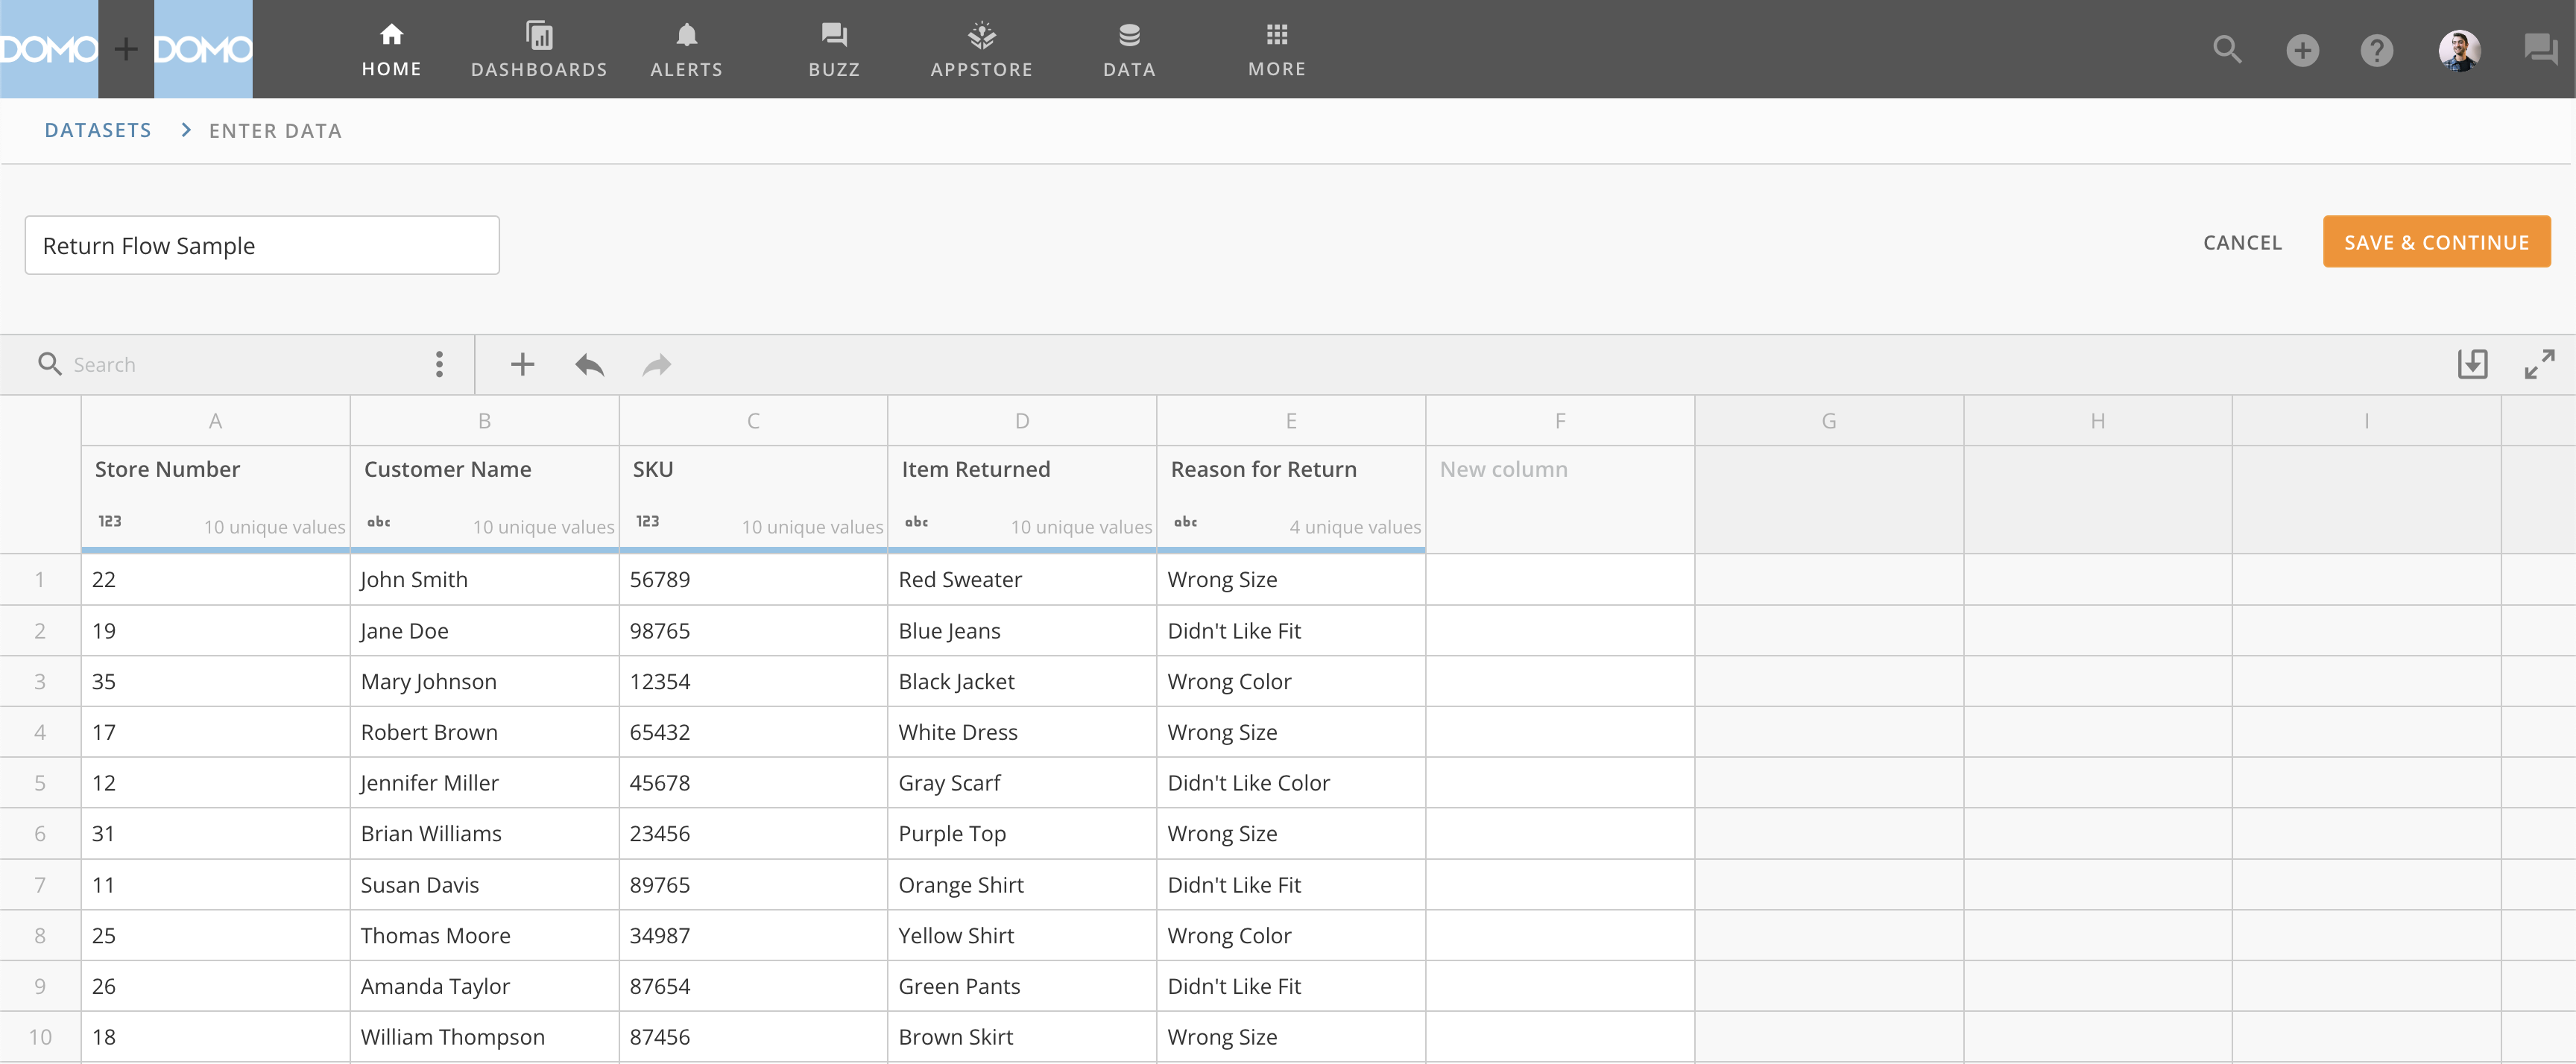
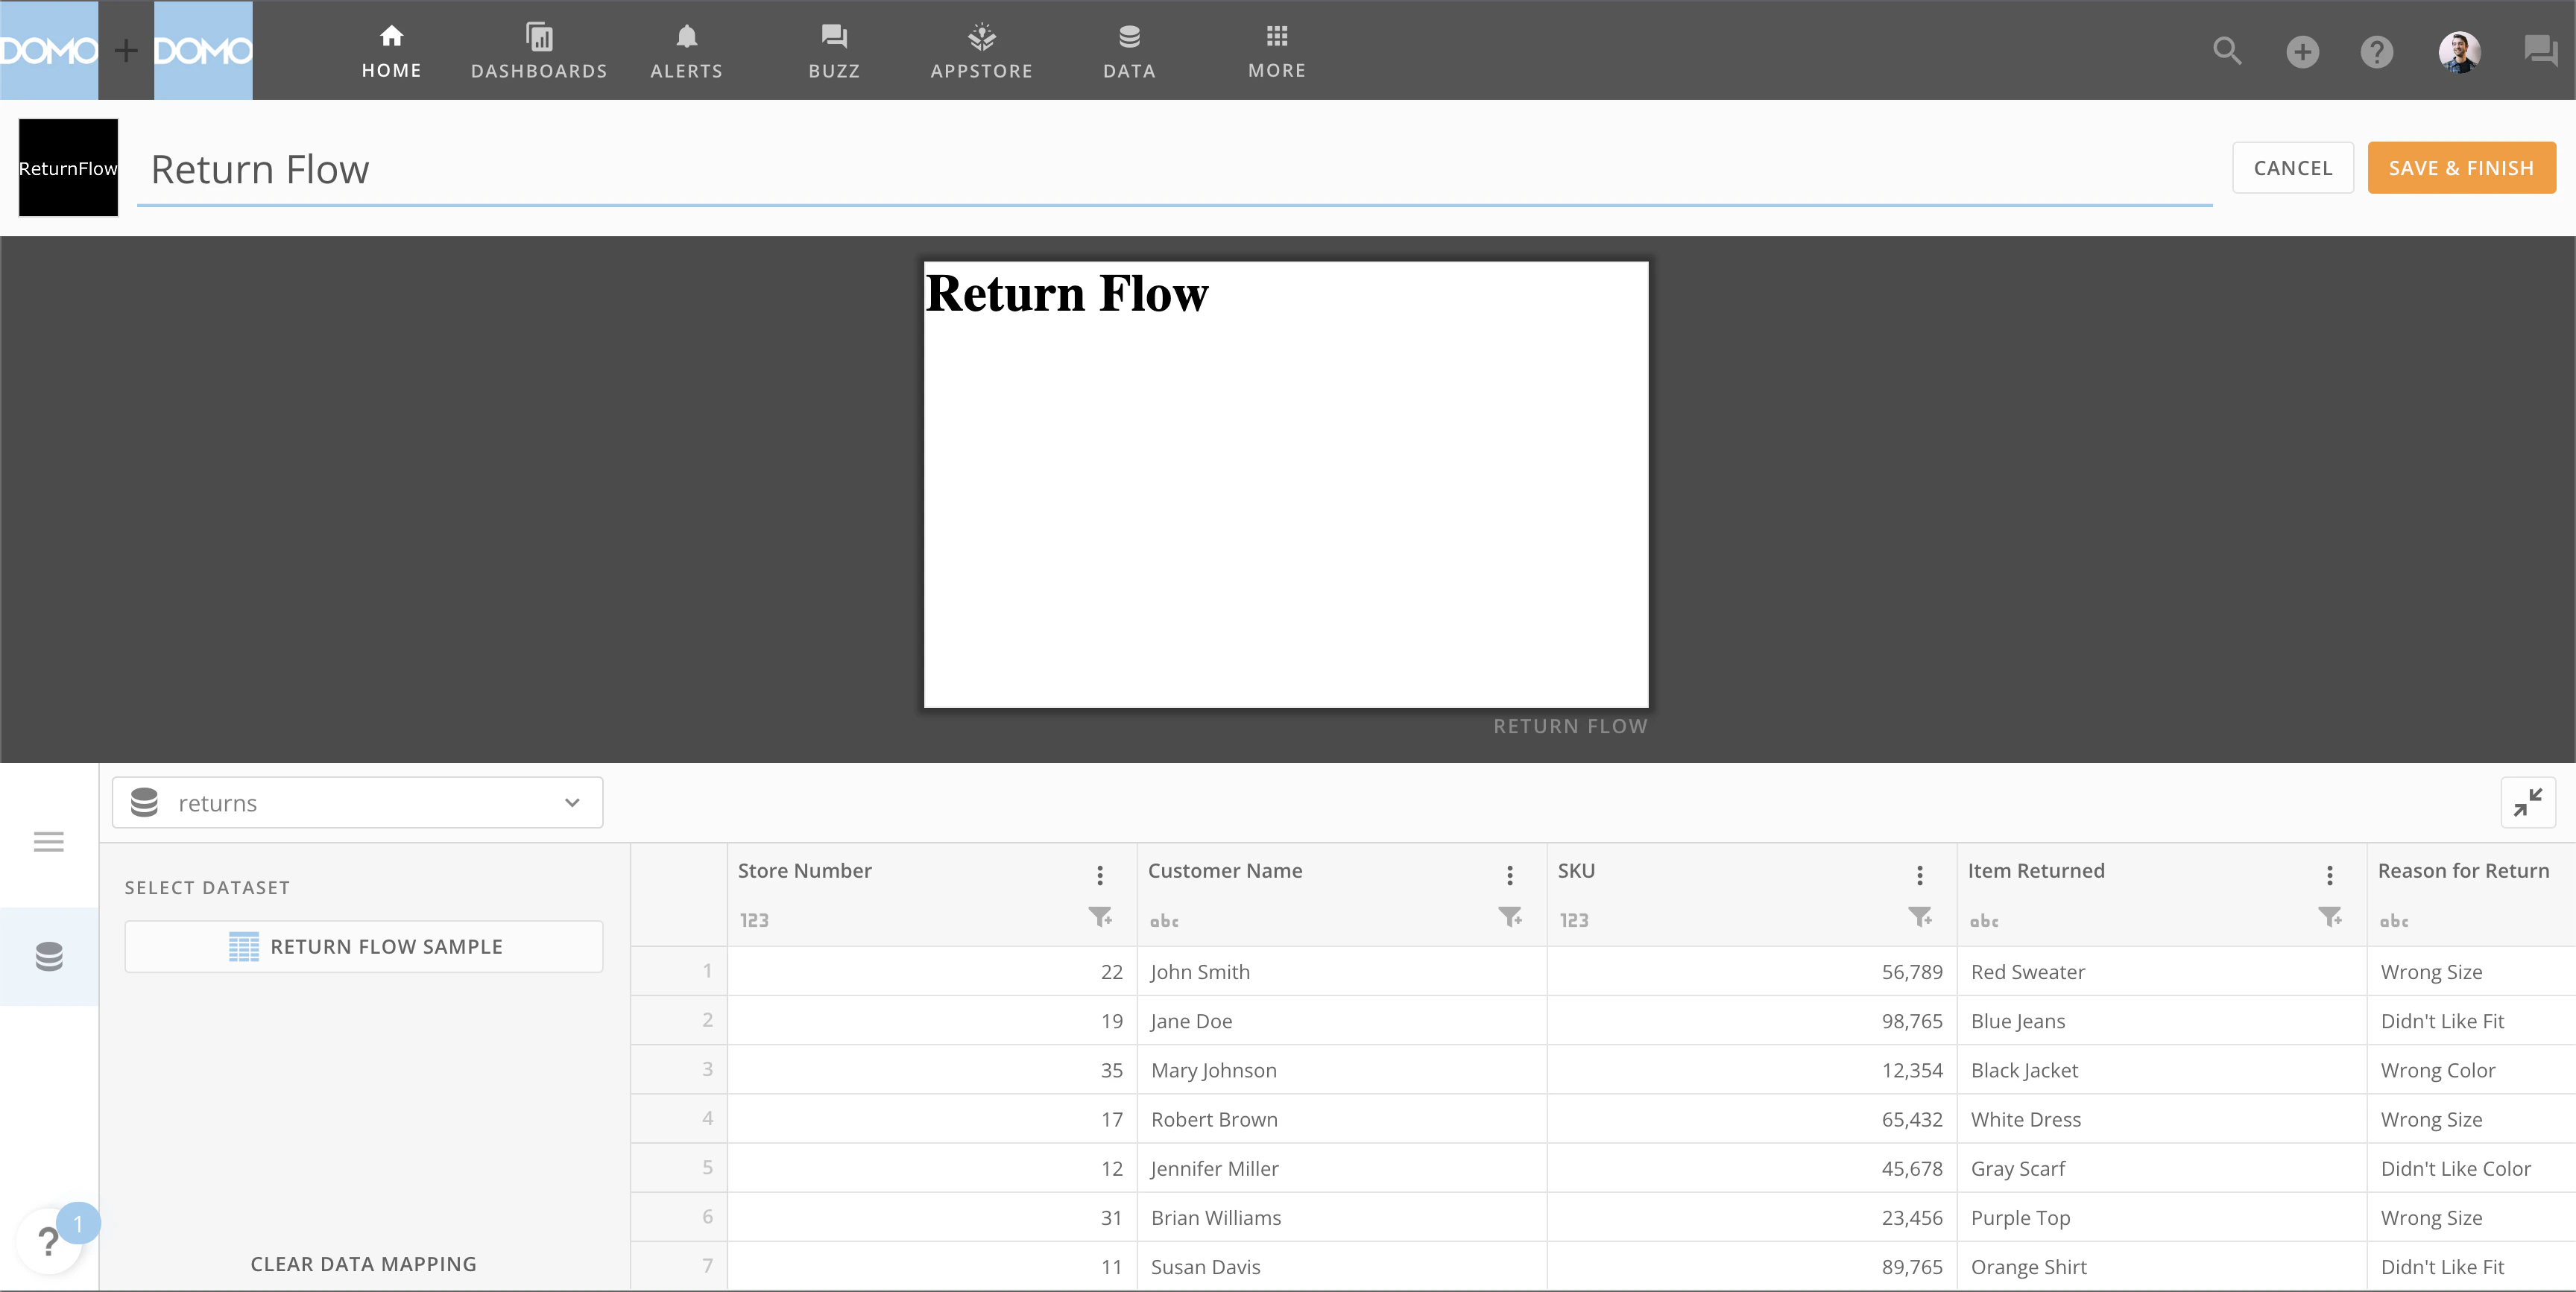
To get this data into Domo you can copy and paste the above directly into Domo using a webform. Screen Shot 2023-08-06 at 4.15.45 PM.png I’ve named my DataSet Return Flow Sample, but you can name yours whatever you’d like. Screen Shot 2023-08-06 at 4.25.52 PM.png Click ‘Save and Continue.‘

Step 2: Initialize Our App


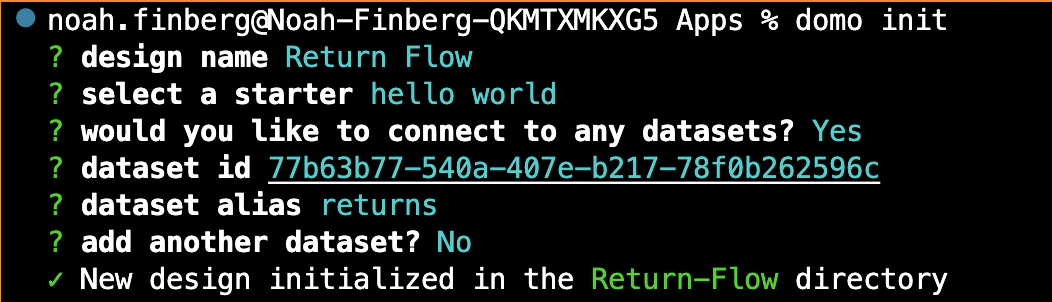
To generate an initial app template, use the domo init command from your command line in the directory where you want your app files to live. You’ll be prompted to:
  1. Give your app a name
  2. Select a starter template
  3. Connect a DataSet
Please use the same configuration as the image below, replacing the dataset id with the id of your DataSet. Screen Shot 2023-08-06 at 4.38.28 PM.png Once the files have been initialized in a new directory, you can navigate to that directory with the cd command and explore the basic file structure of your App. It should look like the following: Screen Shot 2023-08-06 at 4.42.44 PM.png If you open up the 
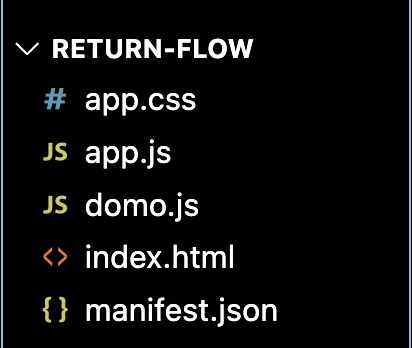
manifest.json file you can see that we have some default configuration set for our app.
{
  "name": "Return Flow",
  "version": "1.0.0",
  "size": {
    "width": 1,
    "height": 1
  },
  "mapping": [
    {
      "dataSetId": "77b63b77-540a-407e-b217-78f0b262596c",
      "alias": "returns",
      "fields": []
    }
  ]
}
In order to create an App Design in our Domo instance, the last thing we need is a thumbnail.png file to use for the App’s icon image in Domo. You can use the image found here. Once, you’ve added the thumbnail.png file, go ahead and run the domo publish command. This should automatically add the id of the App Design in Domo to your manifest.json file as well as a fileName property. Make sure your manifest.json file now looks something like this:
{
  "name": "Return Flow",
  "version": "1.0.0",
  "size": {
    "width": 1,
    "height": 1
  },
  "mapping": [
    {
      "dataSetId": "77b63b77-540a-407e-b217-78f0b262596c",
      "alias": "returns",
      "fields": []
    }
  ],
  "fileName": "manifest.json",
  "id": "26cc6762-76cf-47f5-8def-dd76d0a6966a"
}
You can find a link to your new App Design in the terminal output. Screen Shot 2023-08-06 at 4.56.16 PM.png Go ahead and click on that link and then create a new Card. Screen Shot 2023-08-06 at 4.58.27 PM.png When you create a new Card (also known as an “App Instance”), you should see the App Wiring Screen that looks like the below. Our app has a simple h1 element and is successfully wired up to a DataSet with the alias returns, which we’ve set by default to the Return Flow Sample DataSet we setup in Step 1. Screen Shot 2023-08-06 at 4.58.58 PM.png Click ‘Save and Finish’ and we’re ready to start writing the code to build our App.

Step 3: Explore Default Files


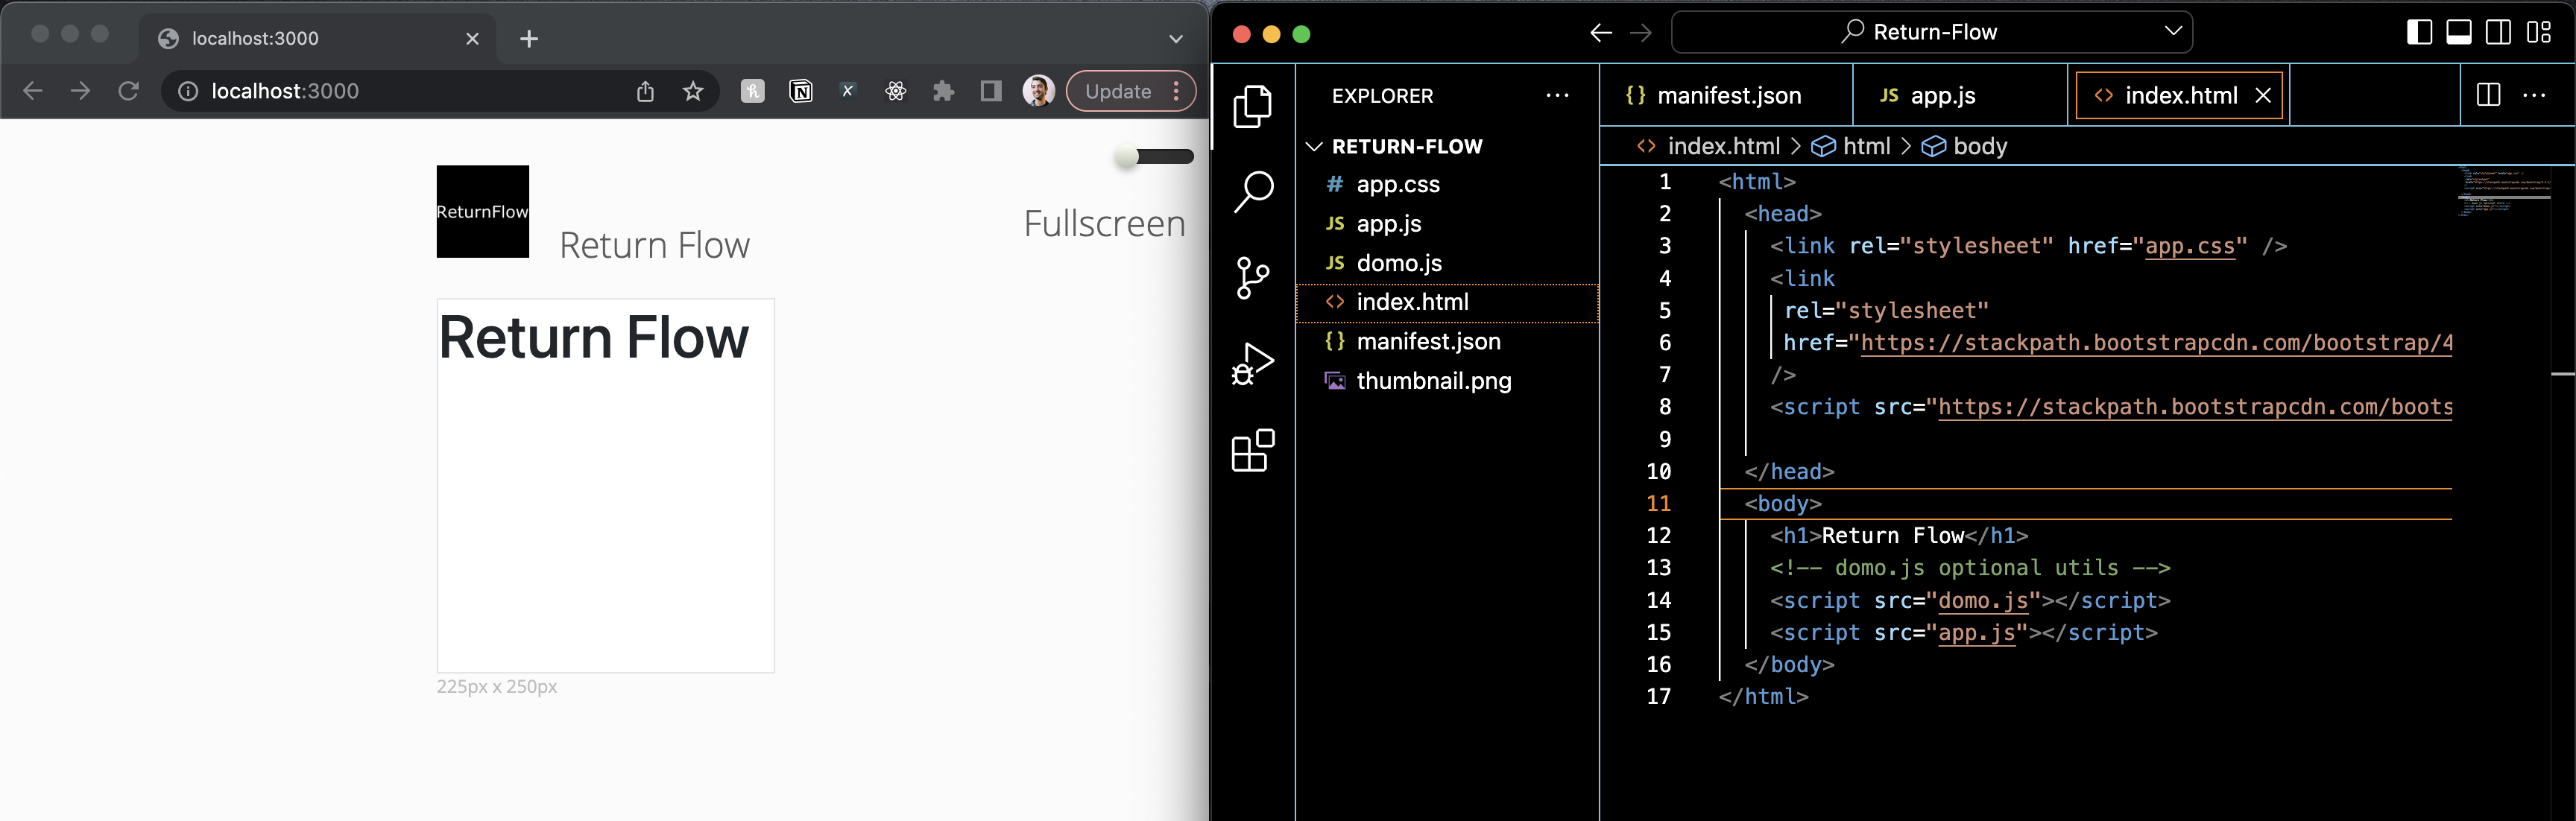
Let’s have a look at some of the default files generated by our starter template. The index.html file contains the basic structure of our page and loads our JavaScript and CSS assets.
<html>
  <head>
    <link rel="stylesheet" href="app.css" />
  </head>
  <body>
    <h1>Return Flow</h1>
    {/* domo.js optional utils */}
    <script src="domo.js"></script>
    <script src="app.js"></script>
  </body>
</html>
The domo.js library provides a number of useful functions for interfacing with Domo, including the domo.get call that is included in our app.js file by default.
domo.get('/data/v2/returns?limit=100').then(function (returns) {
  console.log('returns', returns);
});
This starter code uses Domo’s Data API to get the first 100 records from our DataSet with the alias returns. Let’s confirm that this is working by running the domo dev command to launch a hot-reloading local server. You should see a window open in your browser at localhost:3000. Screen Shot 2023-08-07 at 12.41.41 PM.png Next, right-click in your browser and click “Inspect”, the navigate to the console to see if the 
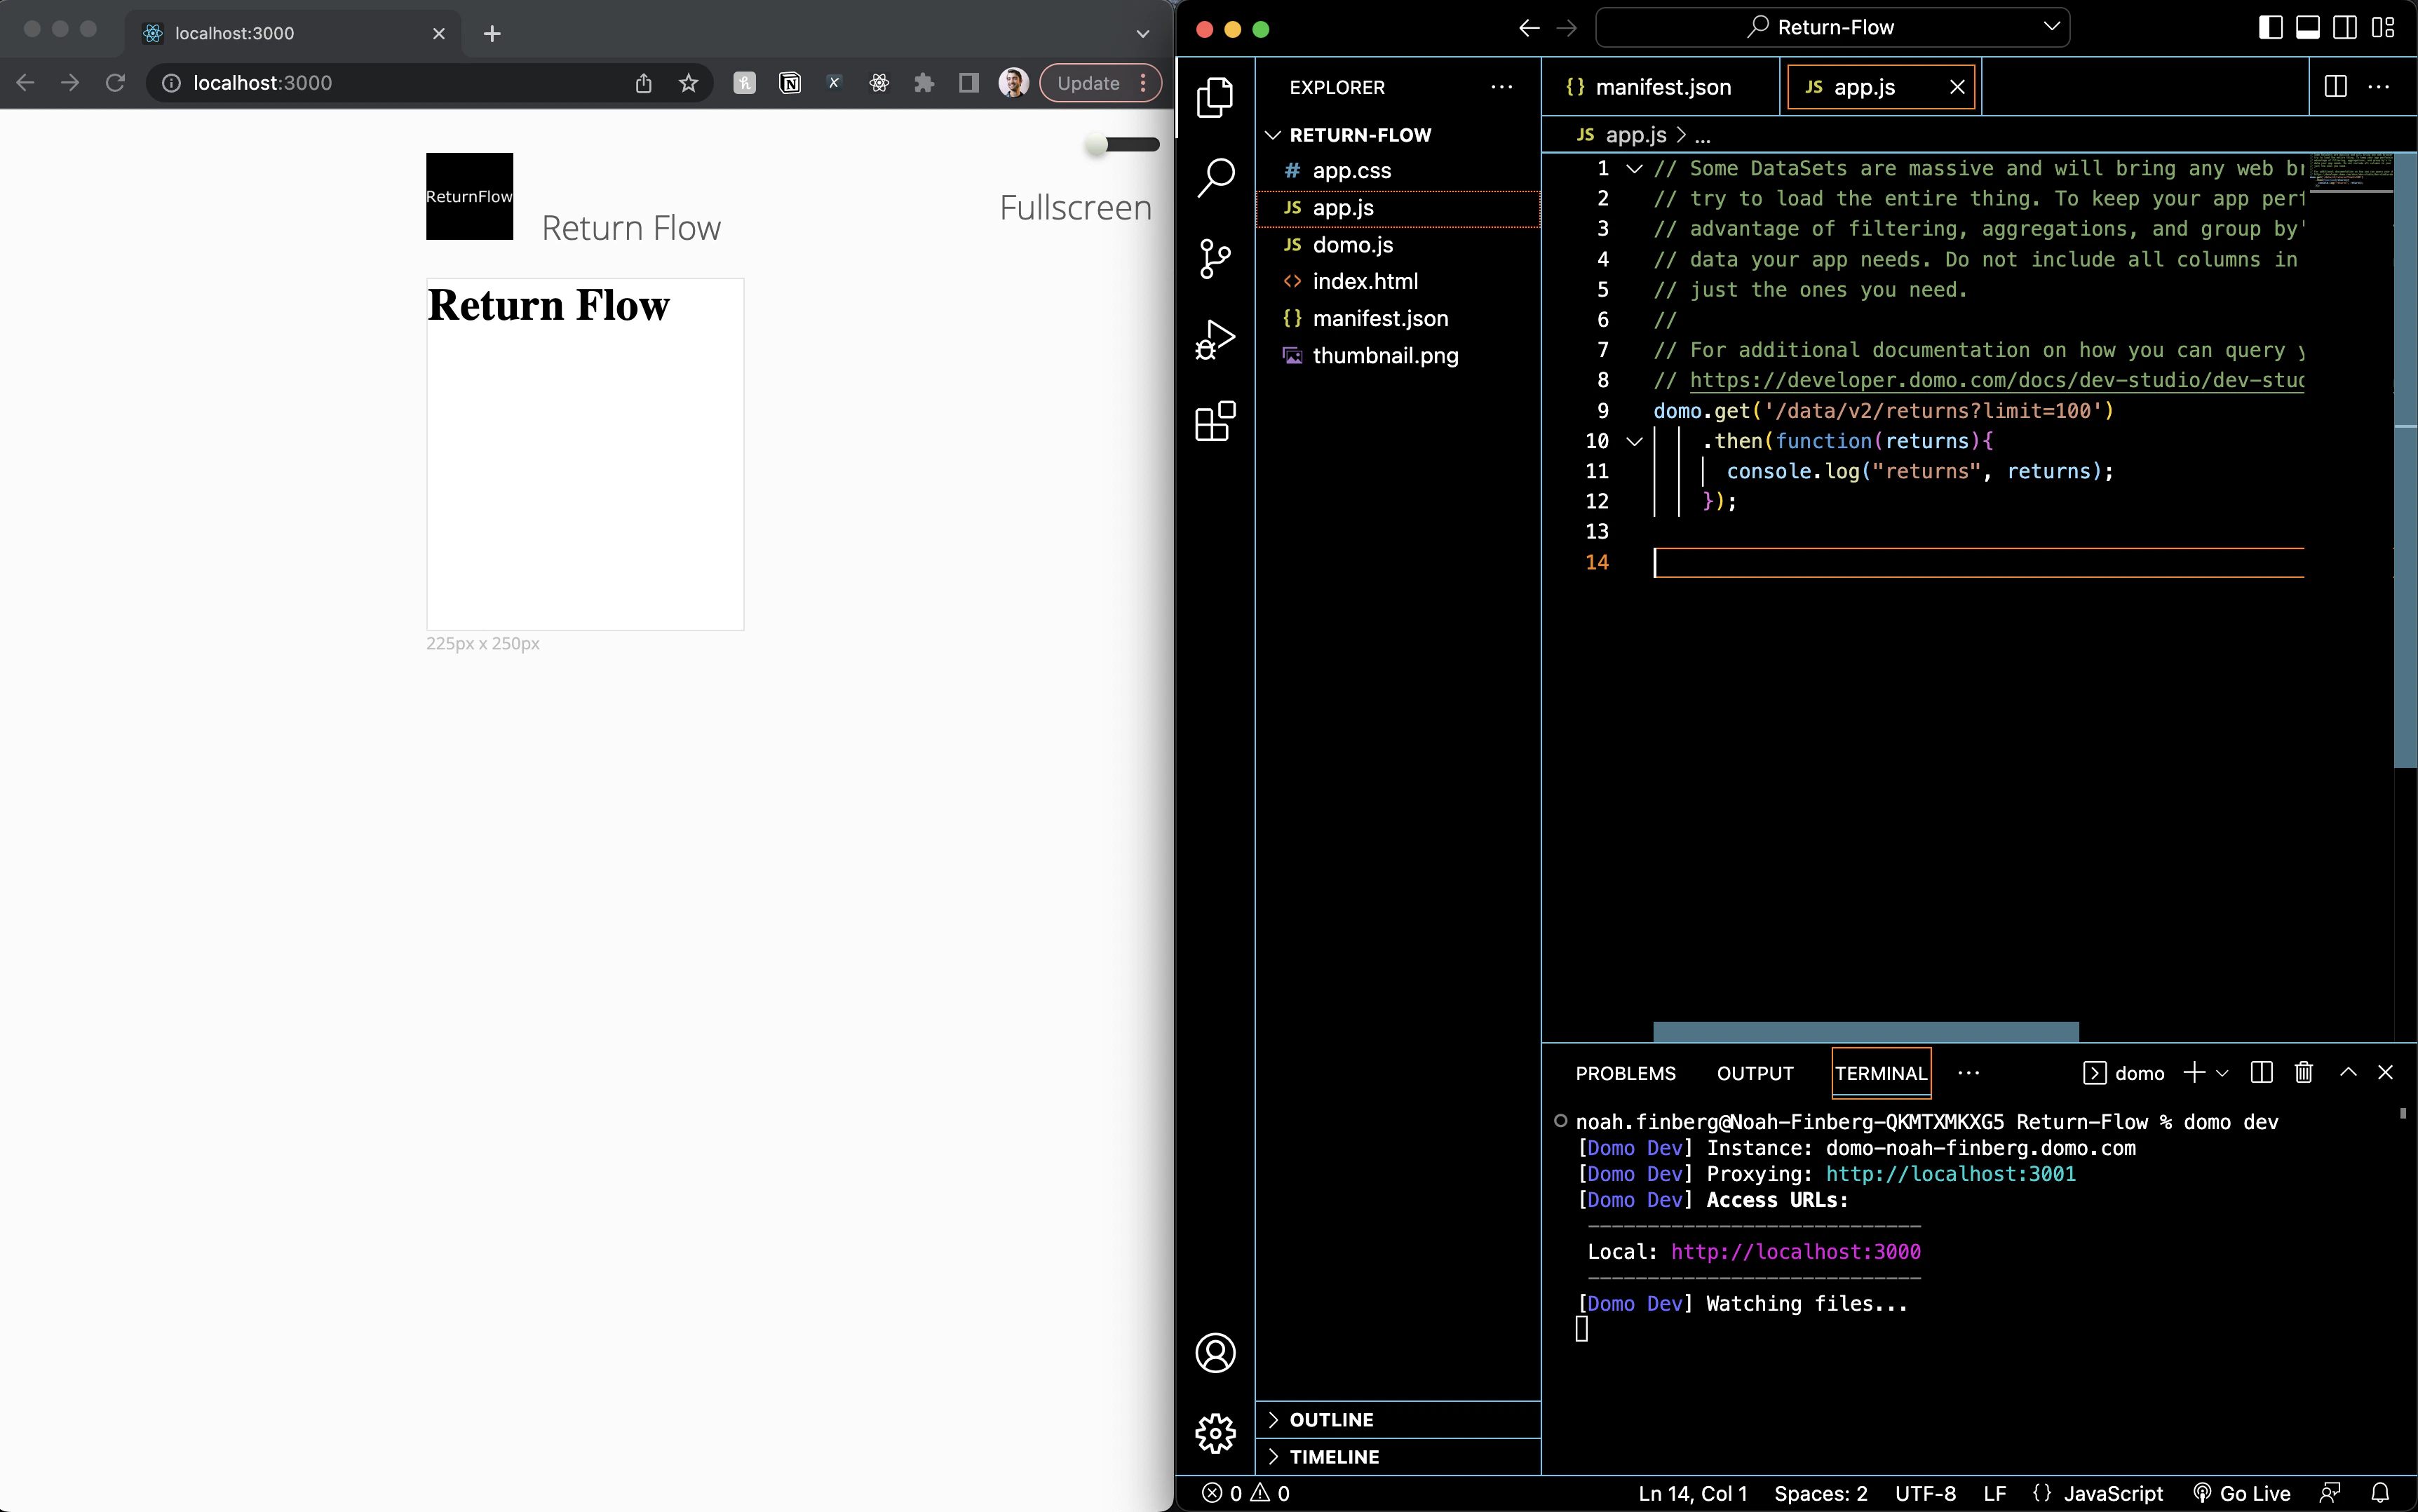
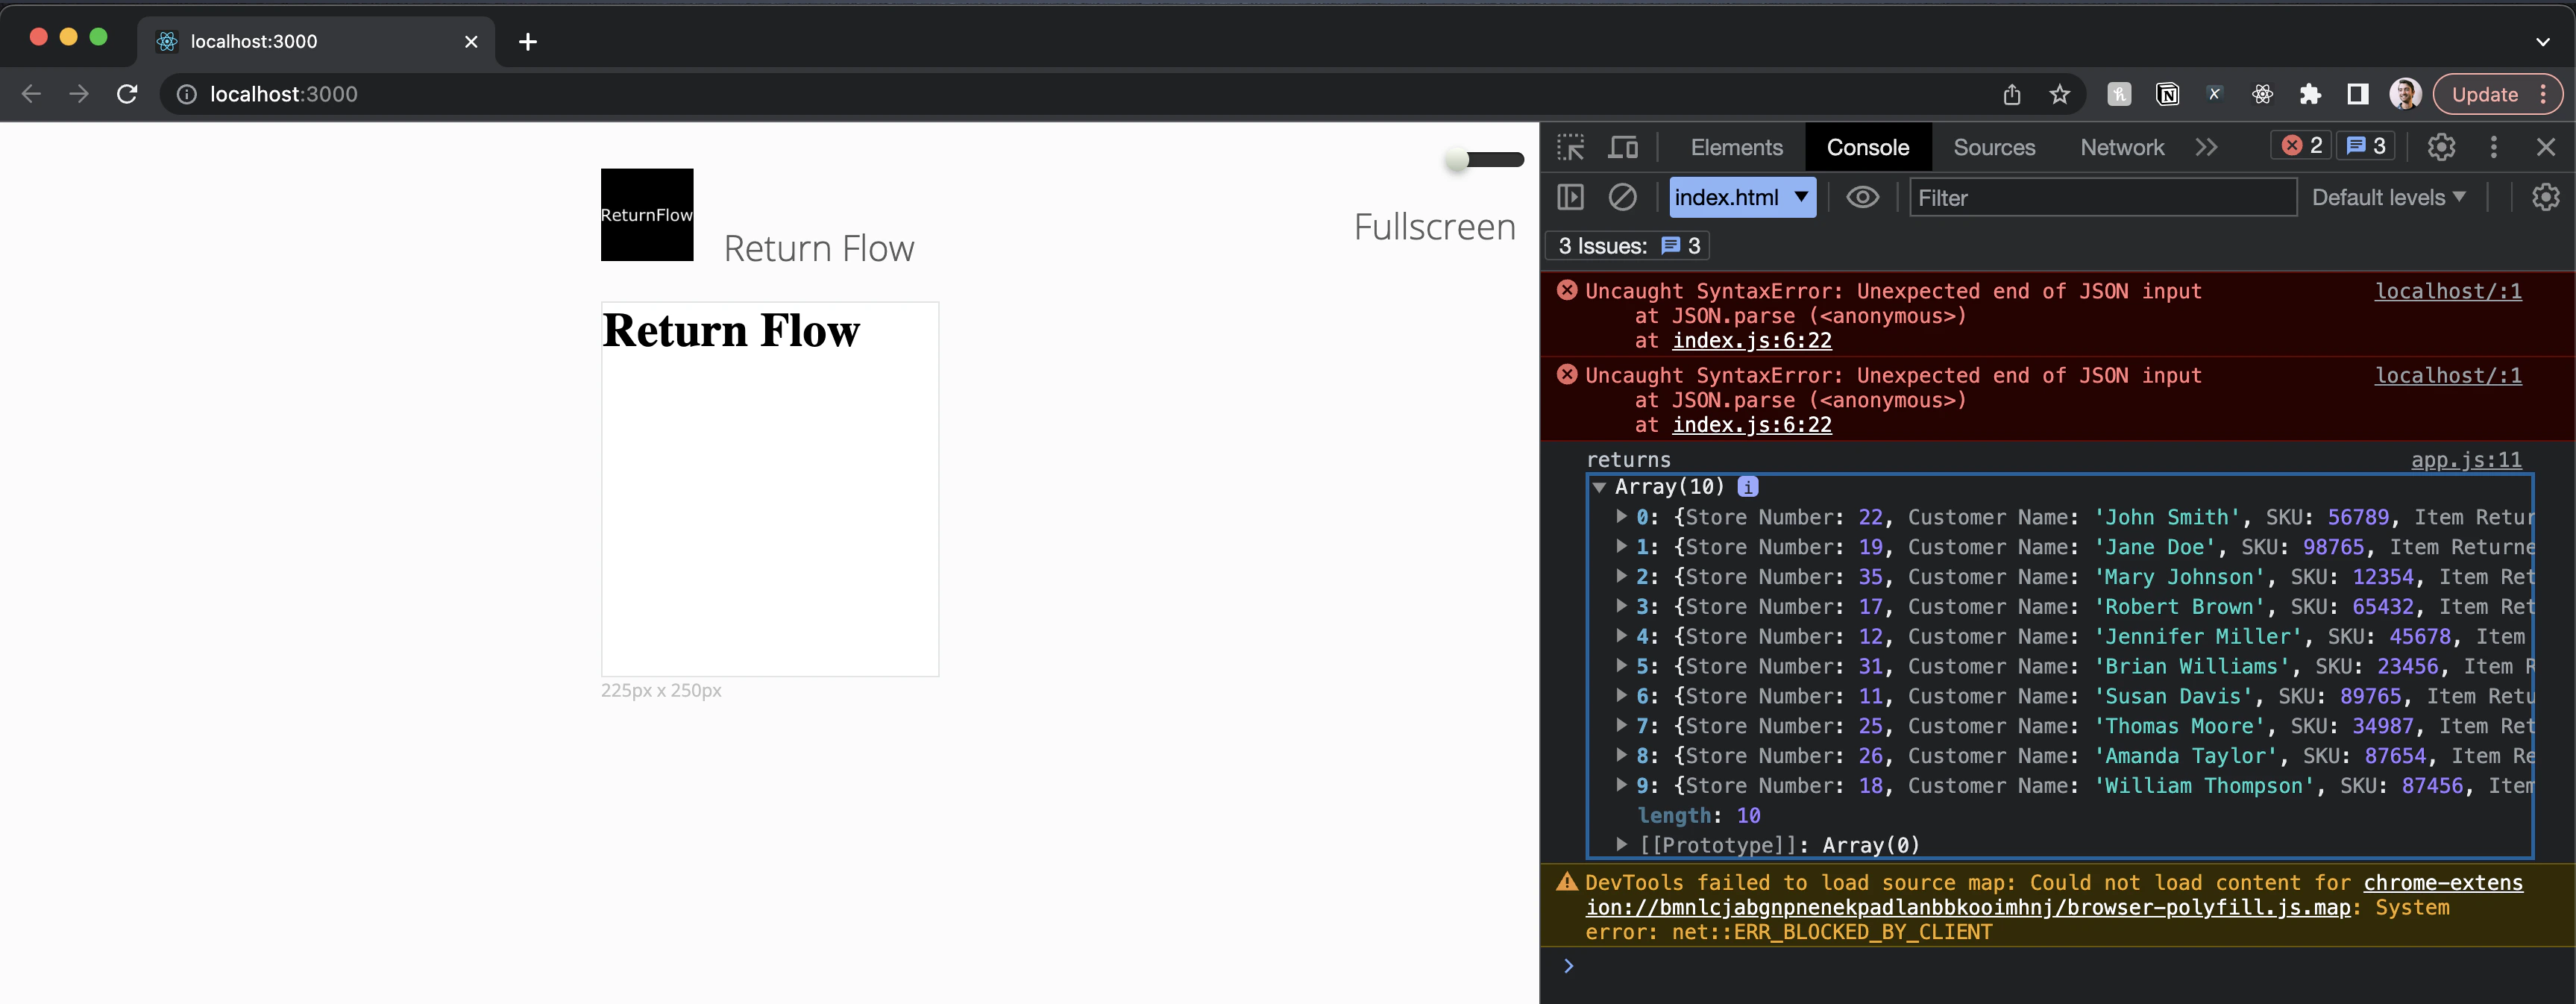
domo.get request is logging data from your DataSet. Screen Shot 2023-08-07 at 12.44.33 PM.png Great! We have a nice development environment ready to go and it’s connected directy to data in Domo.

Step 4: Add Item CSS


We’ll be using the Bootstrap CSS library to provide some styles that will make the grid data we eventually display look cleaner. The Bootstrap CDN can be found here: https://www.bootstrapcdn.com/ The Bootstrap component documentation here: https://getbootstrap.com/ To pull in the Bootstrap library via CDN, add the following code to the <head> tag in your index.html file.
<link
  rel="stylesheet"
  href="https://stackpath.bootstrapcdn.com/bootstrap/4.3.1/css/bootstrap.min.css"
/>
<script src="https://stackpath.bootstrapcdn.com/bootstrap/4.3.1/js/bootstrap.min.js"></script>
You should notice the font used in the App to change slightly. Screen Shot 2023-08-07 at 12.55.12 PM.png We can override the default Bootstrap styles with some custom CSS of our own. To do that, add the following to the app.css file.
.header {
  background-color: black;
  color: white;
  font-weight: 300;
  padding: 15px;
}

.bodyContainer {
  padding: 20px;
}

.itemContainer {
  display: grid;
  grid-template-columns: repeat(5, 20%);
  align-items: center;
}

label {
  font-weight: 400;
  font-size: 12px;
  text-transform: uppercase;
}

.sku {
  font-size: 10px;
  opacity: 0.7;
}

/** BOOTSTRAP OVERRIDES */

.list-group-item {
  border: none;
  border-bottom: 2px solid lightgray;
}

.list-group-item:last-child {
  border-radius: 0px;
  border: none;
}

.btn-link {
  color: #17a2b8;
}

a {
  color: #17a2b8;
  font-size: 12px;
}

Step 5: Update Manifest


Update the App Size

First, we can make our card bigger by editing the manifest.json file’s size property.
"size": {
  "width": 4,
  "height": 3
},

Update the DataSet Mapping

Next, the default information for the dataset mapping needs to be updated to include some additional information about the columns that we will be using in the app. Replace the fields array of the dataset in the mapping object:

"fields": [
  {
    "alias": "storeNumber",
    "columnName": "Store Number"
  },
  {
    "alias": "customerName",
    "columnName": "Customer Name"
  },
  {
    "alias": "SKU",
    "columnName": "SKU"
  },
  {
    "alias": "itemReturned",
    "columnName": "Item Returned"
  },
  {
    "alias": "reasonForReturn",
    "columnName": "Reason for Return"
  }
]

Configure an AppDB Collection

We also want to define an AppDB collection where we can store data from user input. Define that collection using the below code snippet that can be added after the mapping array:
"collections": [
  {
    "name": "comments",
    "schema": {
      "columns": [
        {
          "name": "id",
          "type": "STRING"
        },
        {
          "name": "user",
          "type": "STRING"
        },
        {
          "name": "postBody",
          "type": "STRING"
        }
      ]
    },
    "syncEnabled": true
  }
],

This code will define a new collection named comments with three properties: id, user, and postBody. With the syncEnabled property set to true, this will also automatically sync our AppDB collection to a DataSet in Domo. For more on AppDB see the AppDB API Reference. There’s just one more update we need to make to the manifest.json file to ensure we can develop locally against our new AppDB collection: adding a proxyId. You can find the proxyId of your App Instance in the Cards tab of the App Design. Go ahead and copy that id and add it to your manifest.json file. ReturnFlow ProxyID.gif Your final manifest.json file should now look something like this:
{
  "name": "Return Flow",
  "version": "1.0.0",
  "size": {
    "width": 4,
    "height": 3
  },
  "mapping": [
    {
      "dataSetId": "77b63b77-540a-407e-b217-78f0b262596c",
      "alias": "returns",
      "fields": [
        {
          "alias": "storeNumber",
          "columnName": "Store Number"
        },
        {
          "alias": "customerName",
          "columnName": "Customer Name"
        },
        {
          "alias": "SKU",
          "columnName": "SKU"
        },
        {
          "alias": "itemReturned",
          "columnName": "Item Returned"
        },
        {
          "alias": "reasonForReturn",
          "columnName": "Reason for Return"
        }
      ]
    }
  ],
  "collections": [
    {
      "name": "comments",
      "schema": {
        "columns": [
          {
            "name": "id",
            "type": "STRING"
          },
          {
            "name": "user",
            "type": "STRING"
          },
          {
            "name": "postBody",
            "type": "STRING"
          }
        ]
      },
      "syncEnabled": true
    }
  ],
  "fileName": "manifest.json",
  "id": "26cc6762-76cf-47f5-8def-dd76d0a6966a",
  "proxyId": "b863c990-1ff9-4f63-a25c-07bb9003871b"
}

Publish the App

Let’s publish our changes to our App Design in Domo so we can see the new Data Mapping and AppDB Collection reflected there. Stop the local server with Command-C (Mac) or Control-C (Windows). Then run domo publish. If you look at your App Design, go to the Card where you App Instance lives, and then click “Edit Card” you can see that the Mapping on the Wiring Screen has changed. You can now select which columns in your connected DataSet map to which column aliases. You should also see a new AppDB collection called comments, which has and empty array of data to start []. ReturnFlow Card Mapping.gif

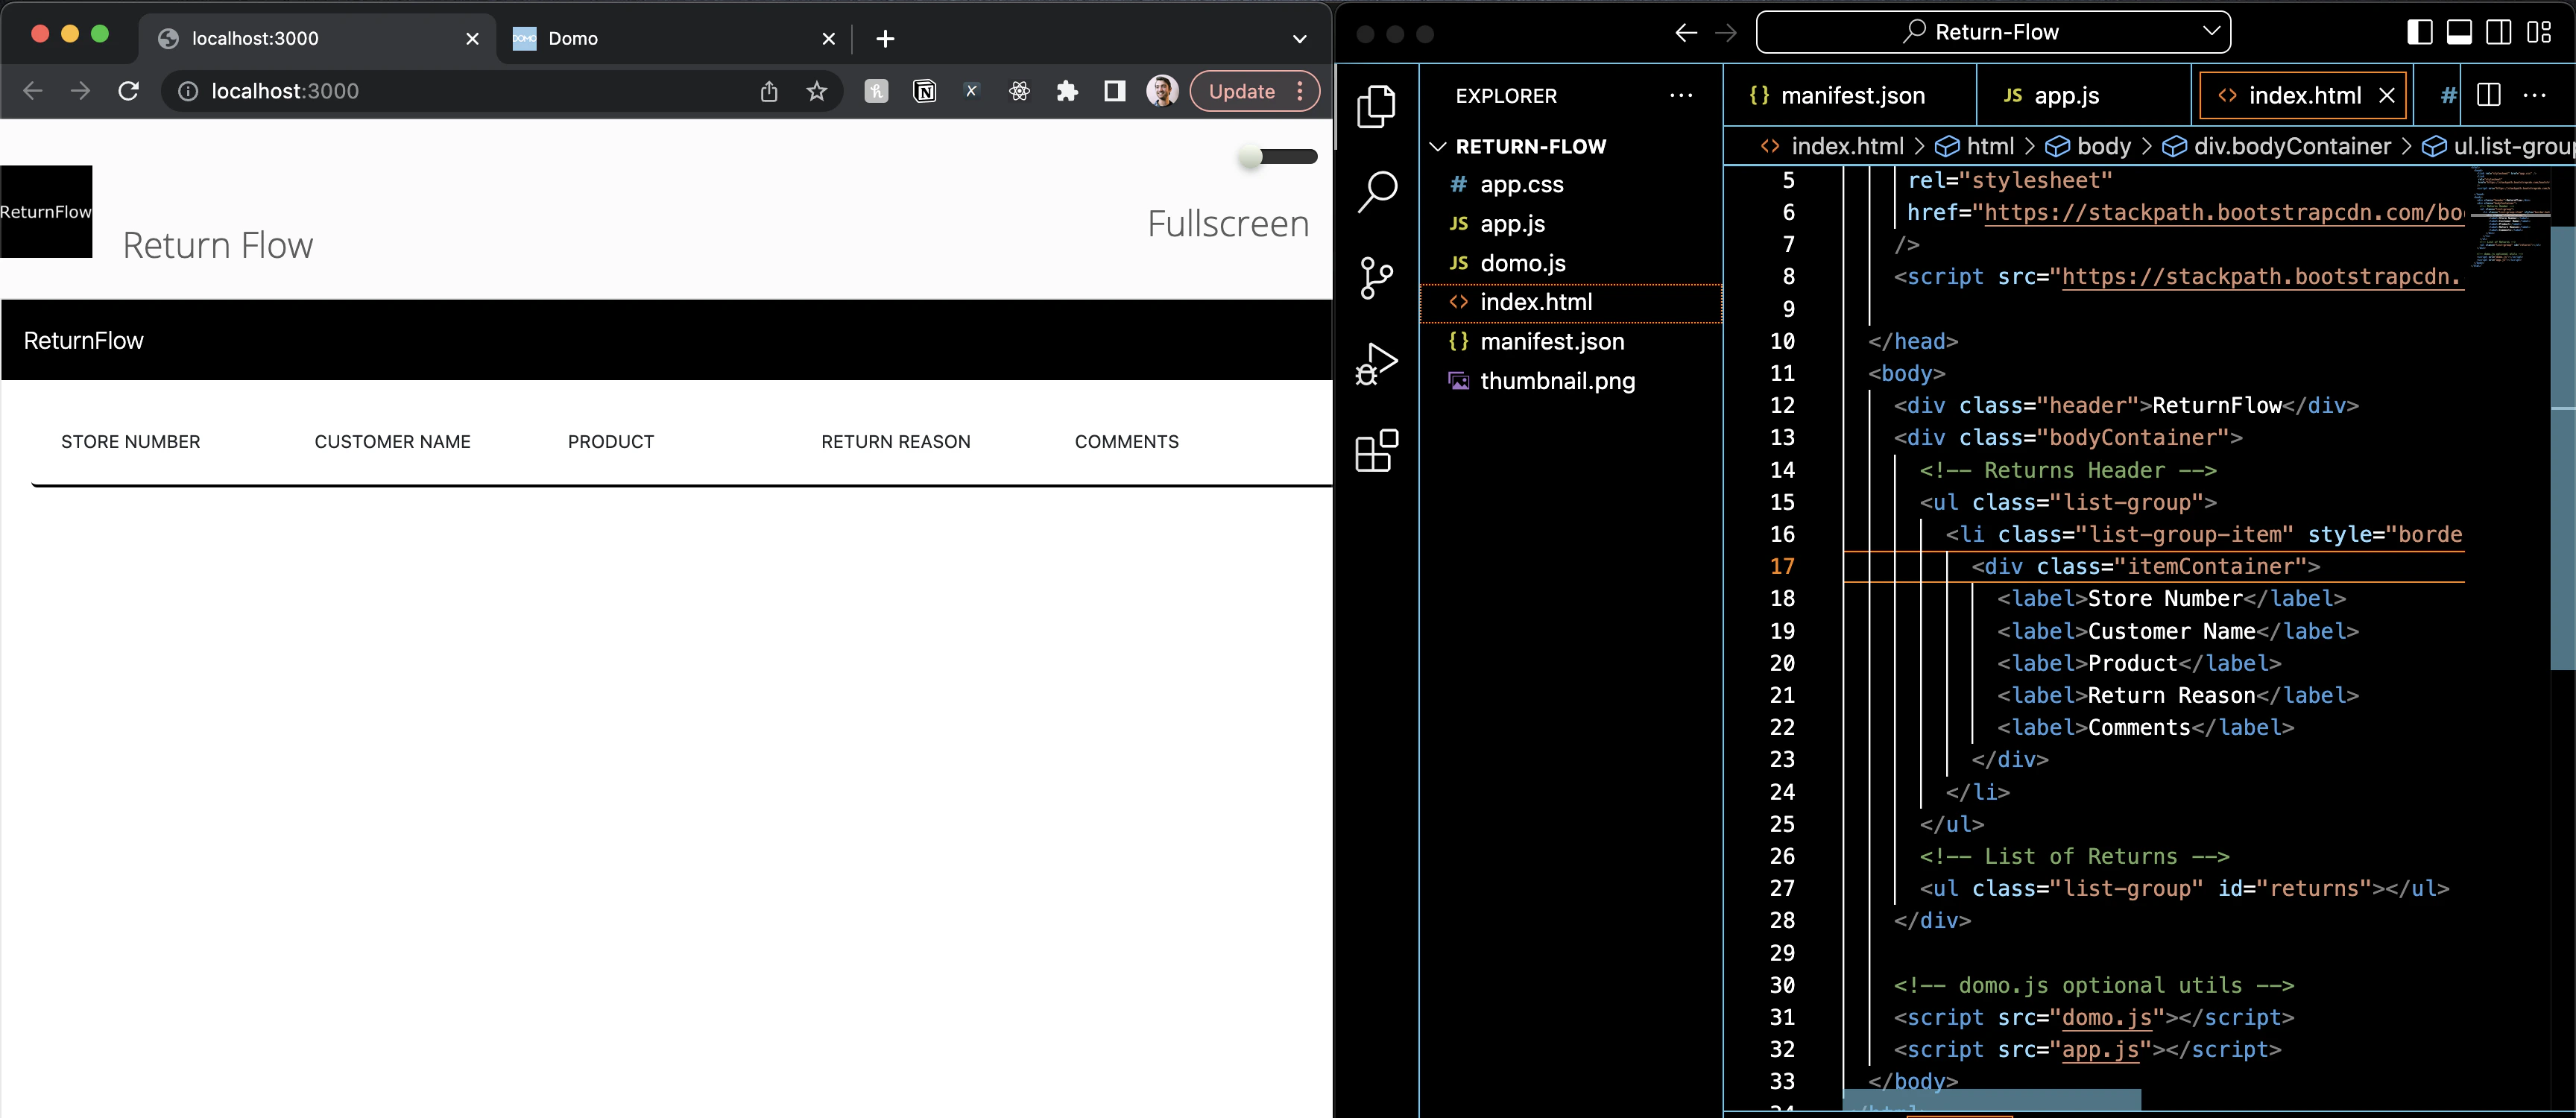
Step 6: Add some boilerplate HTML structure


Start your development server again using the domo dev command. Then, replace the <h1> tag in the index.html file with the following code:
<div class="header">ReturnFlow</div>
<div class="bodyContainer">
  {/* Returns Header */}
  <ul class="list-group">
    <li class="list-group-item" style="border-bottom: 2px solid black">
      <div class="itemContainer">
        <label>Store Number</label>
        <label>Customer Name</label>
        <label>Product</label>
        <label>Return Reason</label>
        <label>Comments</label>
      </div>
    </li>
  </ul>
  {/* List of Returns */}
  <ul class="list-group" id="returns"></ul>
</div>
This will setup the structure of our grid table that will display the data that we will be fetching from the sample returns dataset. Screen Shot 2023-08-07 at 1.37.50 PM.png

Step 7: Fetch Returns Data


Replace the existing domo.get() call with the following defined async function in the app.js file:
async function loadData() {
  const returns = await domo.get('/data/v1/returns?limit=100');

  const returnsElement = document.querySelector('#returns');
  returns.forEach((item, index) => {
    const row = document.createElement('li');
    row.setAttribute('class', 'list-group-item'); // bootstrap class name
    row.innerHTML = generateRow(item, index);
    returnsElement.appendChild(row);
  });
}
The above code references a function called generateRow() which has not yet been defined. Define it below the loadData() function to give your app a way to generate html structure for each row of data returned from the dataset:
function generateRow(item, index) {
  return `
      {/* Row of Return Data */}
      <div class="itemContainer">
          <div>${item.storeNumber}</div>
          <div>${item.customerName}</div>
          <div>${item.itemReturned}<div class="sku">#${item.SKU}</div></div>
          <div>${item.reasonForReturn}</div>
          <div>
            <span class="badge badge-light">0</span>
            <button class="btn btn-link">Add Comment</button>
          </div>
      </div>   
     `;
}
To see these functions being called by your app, you will need to add the loadData() function call to the body onload event in your app.html file like so:
<body onload="loadData()"></body>
Your App should now look like this: Screen Shot 2023-08-07 at 1.53.44 PM.png However, the “Add Comments” link doesn’t do anything yet. Let’s work on that next.

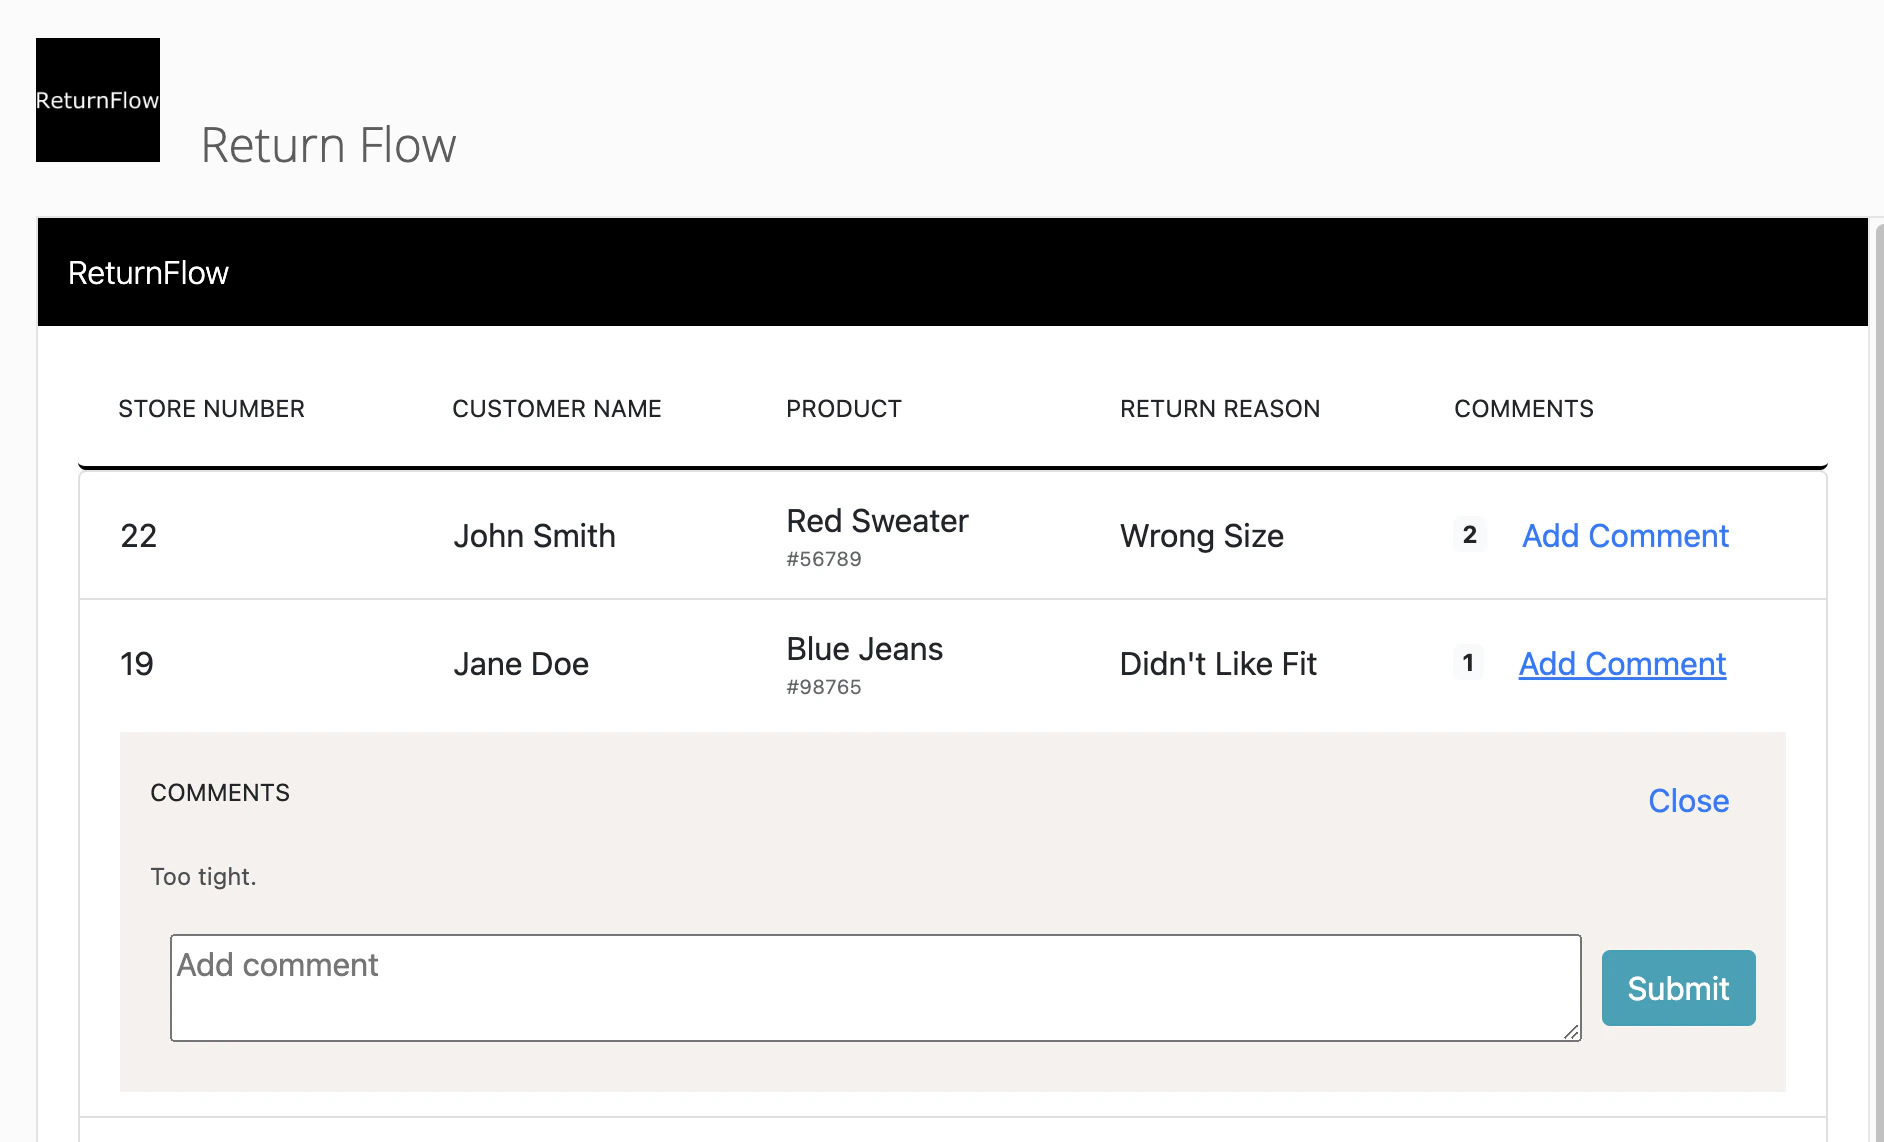
Step 8 Show Comment Section


In the app.js file add an onClick handler to the button HTML in the generateRow() function as follows.
<button
  class="btn btn-link"
  onClick="modifyCommentsContainer(${index}, 'commentsContainer')"
>
  Add Comment
</button>
Notice that it is calling a function called modifyCommentsContainer() that will set a comment container’s visibility property to true. We need to define that function at the bottom of the app.js file using the below code.
function modifyCommentsContainer(index, className) {
  const commentContainer = document.querySelector(
    `#commentsContainer-${index}`,
  );
  commentContainer.setAttribute('class', className);
}
This code references an html element called commentsContainer that should be created for each row in our dataset. We need to ensure that this container is defined when generating each row of data. To do this, update the generateRow() function to look like this:
function generateRow(item, index) {
  return `
      {/* Row of Return Data */}
      <div class="itemContainer">
          <div>${item.storeNumber}</div>
          <div>${item.customerName}</div>
          <div>${item.itemReturned}<div class="sku">#${item.SKU}</div></div>
          <div>${item.reasonForReturn}</div>
          <div>
            <span class="badge badge-light">0</span>
            <button class="btn btn-link" onClick="modifyCommentsContainer(${index}, 'commentsContainer')">Add Comment</button>
          </div>
      </div>  
      
      {/* Comments for each return */}
      <div class="commentsContainer hidden" id="commentsContainer-${index}">
        <div class="commentHeader">
          <label>Comments</label>
          <button class="btn btn-link" onClick="modifyCommentsContainer(${index}, 'commentsContainer hidden')">Close</button>
        </div>
        <div class="addCommentContainer">
          <textarea id="comment-${index}" placeholder="Add comment"></textarea>
          <button class="btn btn-info">Submit</button>
        </div>
      </div>

     `;
}
To give our comments container a nicer look, add the following CSS to the app.css file.
.header {
  background-color: black;
  color: white;
  font-weight: 300;
  padding: 15px;
}

.bodyContainer {
  padding: 20px;
}

.itemContainer {
  display: grid;
  grid-template-columns: repeat(5, 20%);
  align-items: center;
}

label {
  font-weight: 400;
  font-size: 12px;
  text-transform: uppercase;
}

.sku {
  font-size: 10px;
  opacity: 0.7;
}

/** BOOTSTRAP OVERRIDES */

.list-group-item {
  border: none;
  border-bottom: 2px solid lightgray;
}

.list-group-item:last-child {
  border-radius: 0px;
  border: none;
}

.btn-link {
  color: #17a2b8;
}

a {
  color: #17a2b8;
  font-size: 12px;
}

/** COMMENT STYLES */

.commentsContainer {
  background-color: #f5f2ef;
  padding: 15px;
  margin-top: 15px;
}

.hidden {
  display: none;
}

.commentHeader {
  display: flex;
  justify-content: space-between;
  align-items: center;
}

.addCommentContainer {
  display: flex;
  align-items: center;
  justify-content: center;
}

.addCommentContainer > textarea {
  margin: 10px;
  width: 100%;
}

.commentDocument {
  padding: 10px 0px;
}

.commentDocument > text {
  opacity: 0.8;
  font-size: 12px;
}

.commentDocument > img {
  height: 25px;
}
You should now be able to show and hide the comments section for each row. Screen Shot 2023-08-07 at 3.28.38 PM.png

Step 9: Create Comment Data


Modify the onClick handler for the submit button inside the generateRow() function in app.js as follows:
<div class="addCommentContainer">
  <textarea id="comment-${index}" placeholder="Add comment"></textarea>
  <button class="btn btn-info" onClick="submitComment(${index})">Submit</button>
</div>
Notice that this calls a submitComment function that we need to define. Add a new function at the bottom of the app.js file. For simplicity, we will use the return’s index in the array as its unique identifier, but in general its best practice to use a unique identifier based on your data.
async function submitComment(index) {
  const postBody = document.querySelector(`#comment-${index}`);
  let commentDocument = {
    content: {
      id: index,
      user: domo.env.userId,
      postBody: postBody.value,
    },
  };

  await domo.post(
    '/domo/datastores/v1/collections/comments/documents/',
    commentDocument,
  );

  const comments = document.querySelector(`#comments-${index}`);
  const commentElement = document.createElement('div');
  commentElement.innerHTML = generateCommentElement(commentDocument);
  comments.appendChild(commentElement);
  postBody.value = '';
}
This function references a generateCommentElement() function that will need to be defined as well:
function generateCommentElement(commentDocument) {
  return `
      <div class="commentDocument">
        <text>${commentDocument.content.postBody}</text>
      </div>
  `;
}
We also need to create a section for the comments to be added to in our larger comments container. Update the generateRow() function to the following:
function generateRow(item, index) {
  return `
      {/* Row of Return Data */}
      <div class="itemContainer">
          <div>${item.storeNumber}</div>
          <div>${item.customerName}</div>
          <div>${item.itemReturned}<div class="sku">#${item.SKU}</div></div>
          <div>${item.reasonForReturn}</div>
          <div>
            <span class="badge badge-light">0</span>
            <button class="btn btn-link" onClick="modifyCommentsContainer(${index}, 'commentsContainer')">Add Comment</button>
          </div>
      </div>   

      {/* Comments for each return */}
      <div class="commentsContainer hidden" id="commentsContainer-${index}">
        <div class="commentHeader">
          <label>Comments</label>
          <button class="btn btn-link" onClick="modifyCommentsContainer(${index}, 'commentsContainer hidden')">Close</button>
        </div>
        <div id="comments-${index}">
          
        </div>
        <div class="addCommentContainer">
          <textarea id="comment-${index}" placeholder="Add comment"></textarea>
          <button class="btn btn-info" onClick="submitComment(${index})">Submit</button>
        </div>
      </div> 
     `;
}
You should now be able to type some text into the comment box and hit Submit and see the comment appear in the comments section for that row. However, this text will not appear if you refresh the app. We need to fetch that data from the server on load. We’ll do that next. ReturnFlow Add Comment.gif

Step 10: Fetch comment data


To fetch our comment data, we’ll make a get request to our AppDB collection like this:
const commentDocuments = await domo.get(
  '/domo/datastores/v1/collections/comments/documents',
);
We’ll add this code to the loadData() function and pass our commentDocuments to our generateRow() function:
async function loadData() {
  const returns = await domo.get('/data/v1/returns?limit=100');

  const commentDocuments = await domo.get(
    '/domo/datastores/v1/collections/comments/documents',
  );

  const returnsElement = document.querySelector('#returns');
  returns.forEach((item, index) => {
    const row = document.createElement('li');
    row.setAttribute('class', 'list-group-item'); // bootstrap class name
    row.innerHTML = generateRow(item, index, commentDocuments);
    returnsElement.appendChild(row);
  });
}
Now that the generateRow() function has access to the commentDocuments that were passed in, it will need to filter those documents down to just the documents that apply to that row. Add the following filter expression at the top of the generateRow() function:
function generateRow(item, index, commentDocuments) {
  const filteredComments = commentDocuments.filter(
    (commentDocument) => commentDocument.content.id == index,
  );
  return `
      {/* Row of Return Data */}
      <div class="itemContainer">
          <div>${item.storeNumber}</div>
          <div>${item.customerName}</div>
          <div>${item.itemReturned}<div class="sku">#${item.SKU}</div></div>
          <div>${item.reasonForReturn}</div>
          <div>
            <span class="badge badge-light">0</span>
            <button class="btn btn-link" onClick="modifyCommentsContainer(${index}, 'commentsContainer')">Add Comment</button>
          </div>
      </div>   

      {/* Comments for each return */}
      <div class="commentsContainer hidden" id="commentsContainer-${index}">
        <div class="commentHeader">
          <label>Comments</label>
          <button class="btn btn-link" onClick="modifyCommentsContainer(${index}, 'commentsContainer hidden')">Close</button>
        </div>
        <div id="comments-${index}">
          
        </div>
        <div class="addCommentContainer">
          <textarea id="comment-${index}" placeholder="Add comment"></textarea>
          <button class="btn btn-info" onClick="submitComment(${index})">Submit</button>
        </div>
      </div> 
     `;
}
Now you can add a reference to the length of this filteredComments variable in the badge that shows how many comments that row contains (which up until now has been hard coded to 0):
<span class="badge badge-light">${filteredComments.length}</span>
Now, for all comments that were loaded at load time (as opposed to being added at run time) you will need to create a comment entry in the comments-${index} div:
<div id="comments-${index}">
  ${filteredComments.map((commentDocument) =>
  `${generateCommentElement(commentDocument)} `).join("") }
</div>
Your entire generateRow() function should now look like this:
function generateRow(item, index, commentDocuments) {
  const filteredComments = commentDocuments.filter(
    (commentDocument) => commentDocument.content.id == index,
  );

  return `
      {/* Row of Return Data */}
      <div class="itemContainer">
          <div>${item.storeNumber}</div>
          <div>${item.customerName}</div>
          <div>${item.itemReturned}<div class="sku">#${item.SKU}</div></div>
          <div>${item.reasonForReturn}</div>
          <div>
            <span class="badge badge-light">${filteredComments.length}</span>
            <button class="btn btn-link" onClick="modifyCommentsContainer(${index}, 'commentsContainer')">Add Comment</button>
          </div>
      </div>   

      {/* Comments for each return */}
      <div class="commentsContainer hidden" id="commentsContainer-${index}">
        <div class="commentHeader">
          <label>Comments</label>
          <button class="btn btn-link" onClick="modifyCommentsContainer(${index}, 'commentsContainer hidden')">Close</button>
        </div>
        <div id="comments-${index}">
          ${filteredComments
            .map((commentDocument) => {
              return `
                    ${generateCommentElement(commentDocument)}
                  `;
            })
            .join('')}
        </div>
        <div class="addCommentContainer">
          <textarea id="comment-${index}" placeholder="Add comment"></textarea>
          <button class="btn btn-info" onClick="submitComment(${index})">Submit</button>
        </div>
      </div> 
     `;
}
Screen Shot 2023-08-07 at 4.00.25 PM.png

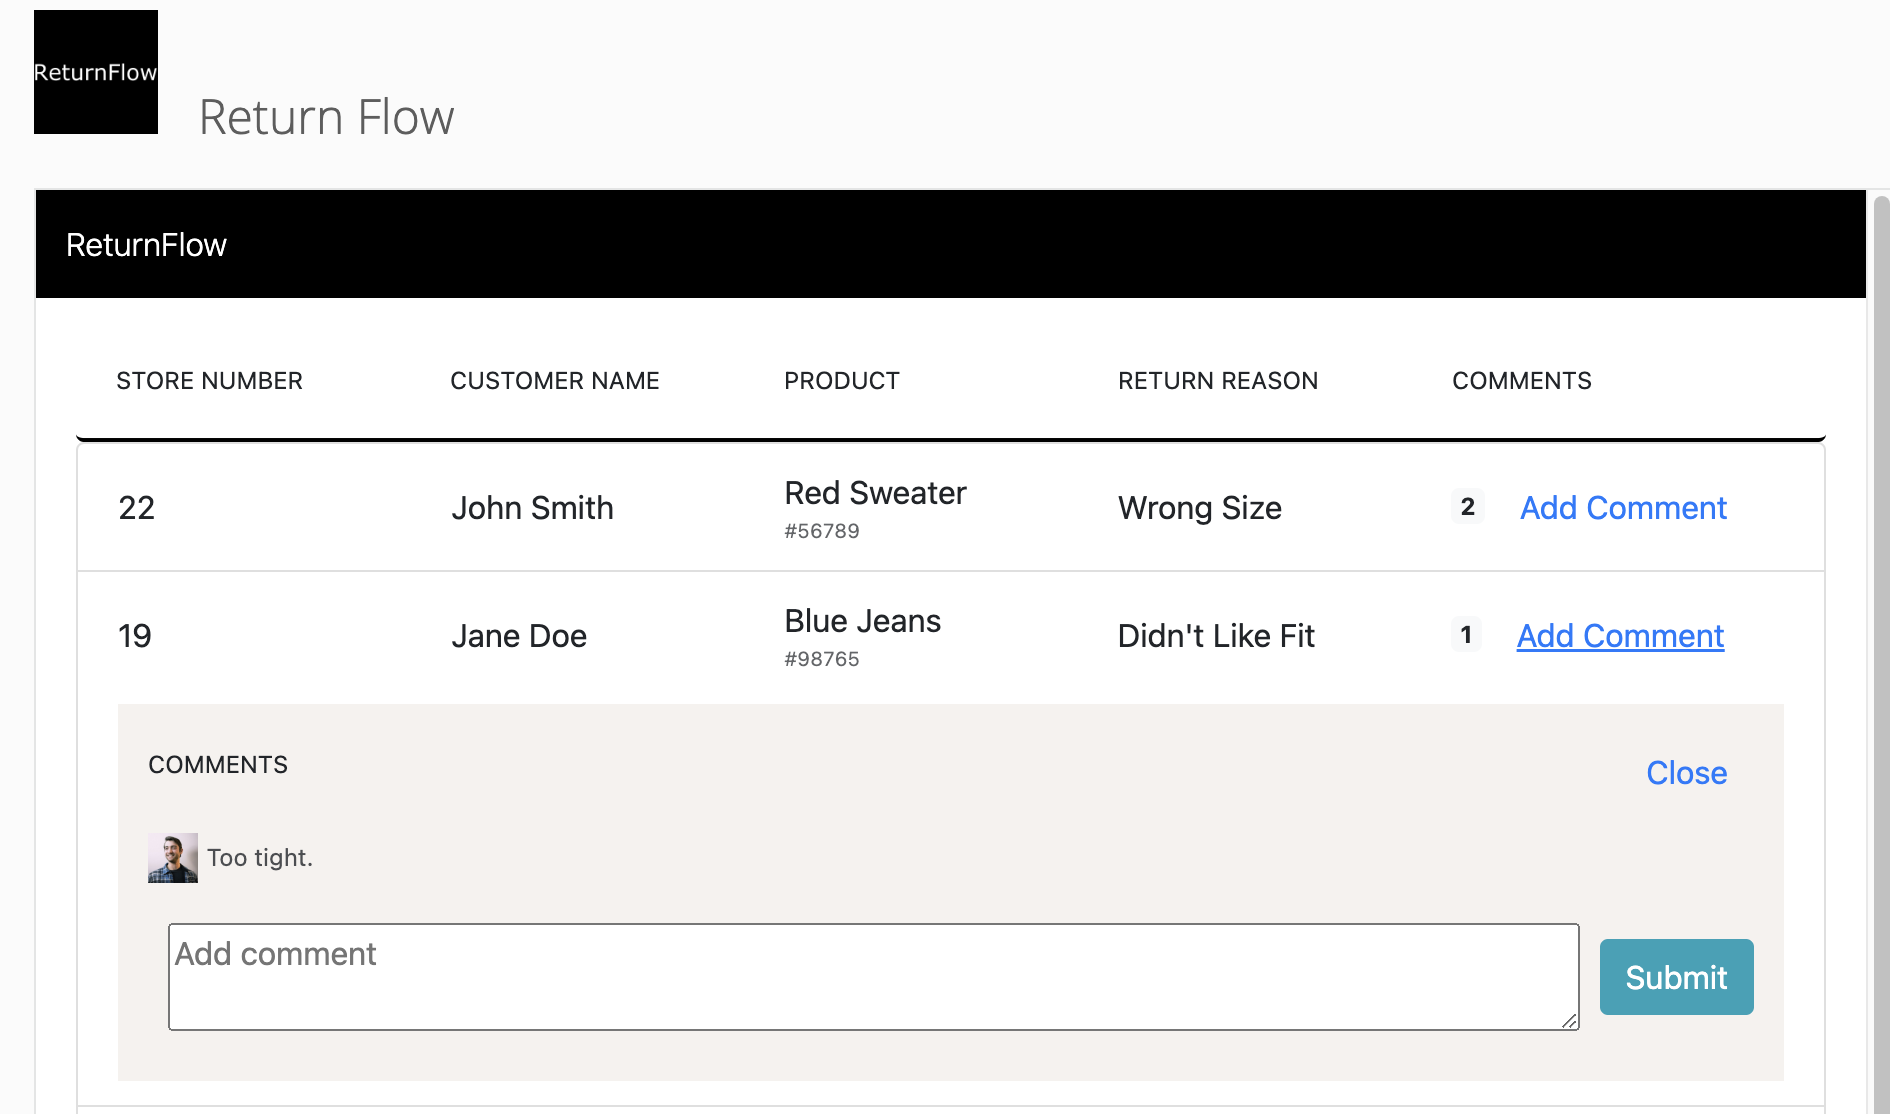
Step 11 - Add Avatars


Next we can add avatars to each comment by using the Users API so that we know who made each comment. Update the generateComment() function as follows.
function generateCommentElement(commentDocument) {
  return `
      <div class="commentDocument">
        <img src="/domo/avatars/v2/USER/${commentDocument.content.user}?size=50&defaultForeground=fff&defaultBackground=000&defaultText=D" alt="User Avatar" />
        <text>${commentDocument.content.postBody}</text>
      </div>
  `;
}
Screen Shot 2023-08-07 at 4.03.03 PM.png

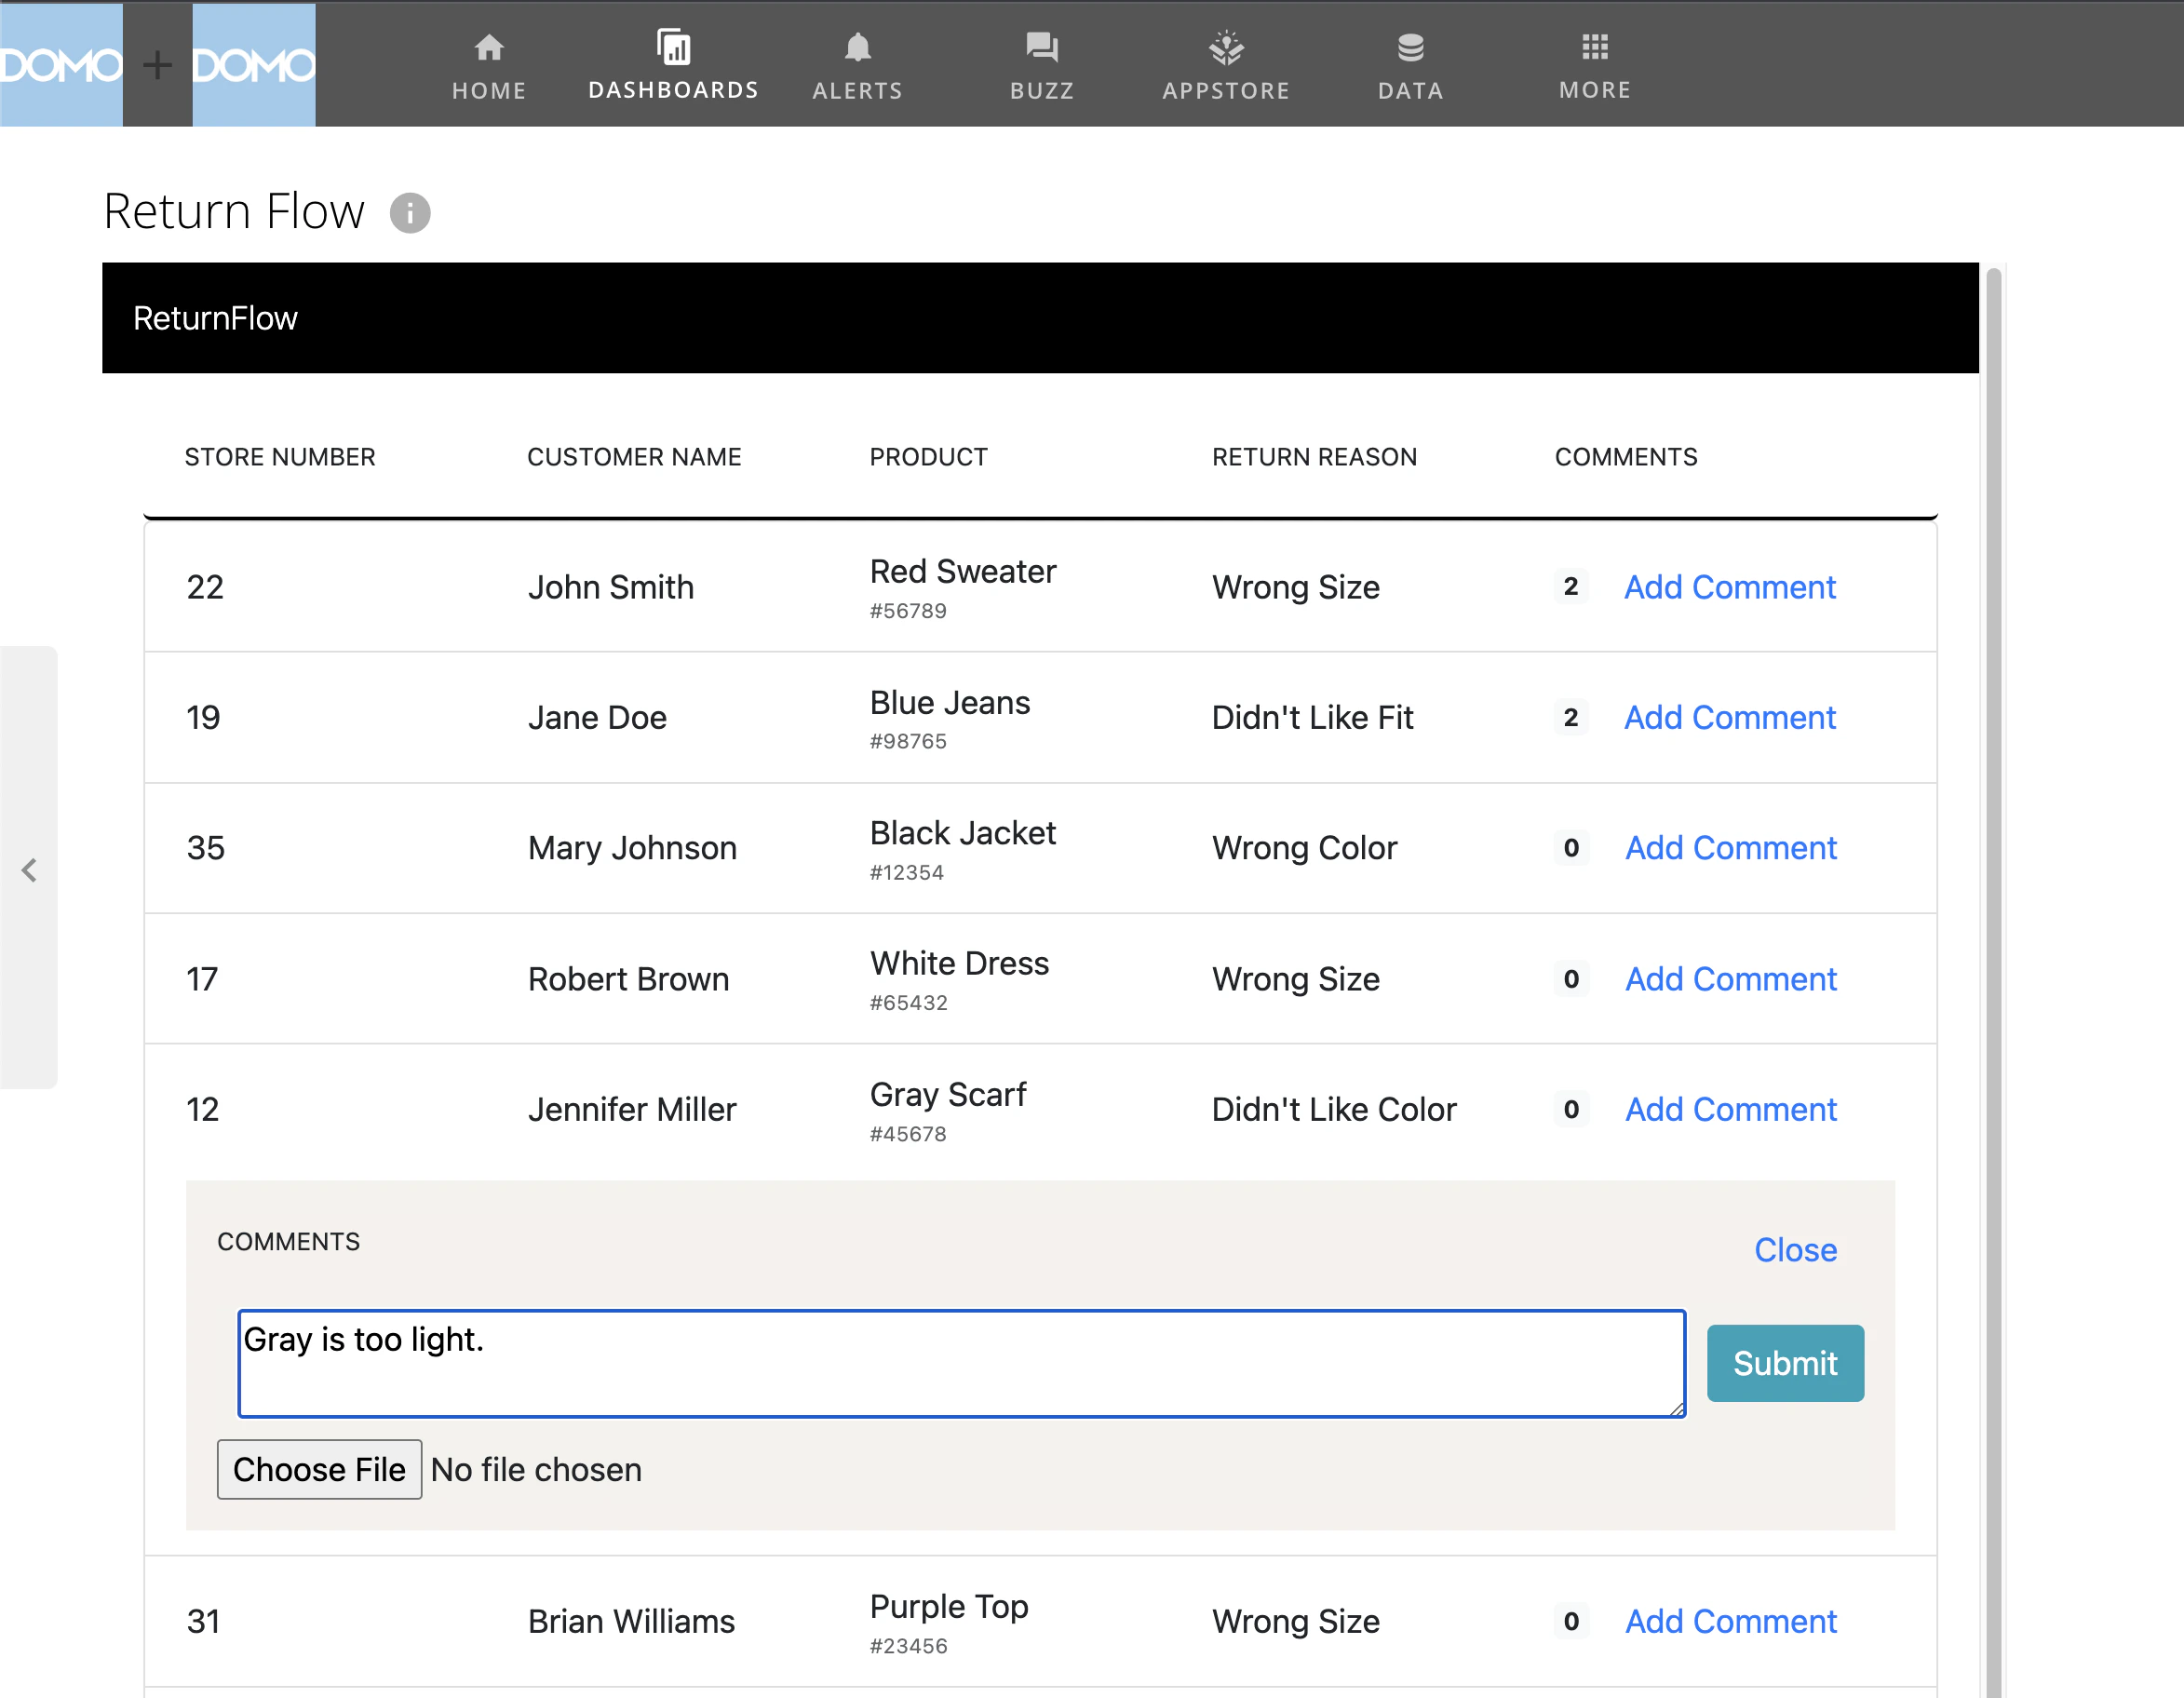
Step 12: Add Attachments


You can add attachments to your comments using the Files API. Add the following code to the bottom of the generateRow() function right below the commentsContainer div to give the user the option to add an attachment with their comment.
<div>
  <input type="file" id="attachment-${index}" class="attachment" />
</div>
Next, we’ll want to reference the file selected by the user when submitting the comment. Add the following code to the top of the submitComment() function.
const attachment = document.querySelector(`#attachment-${index}`);
const file = attachment.files[0];
const fileName = attachment.value.replace(/^.*\\/, '');
Now, if a user has selected a file, we will want to upload it and add a reference to the uploaded file in our comment document. Add the following if condition to the submitComment() function.
if (file !== undefined) {
  var formData = new FormData();
  formData.append('file', file);
  var postOptions = { contentType: 'multipart' };
  const fileResponse = await domo.post(
    `domo/data-files/v1?name=${fileName}`,
    formData,
    postOptions,
  );

  commentDocument = {
    content: {
      ...commentDocument.content,
      attachmentName: fileName,
      attachmentURL: `domo/data-files/v1/${fileResponse.dataFileId}`,
    },
  };
}
Finally, add the following line of code to the bottom of the submitComment() function to clear out the attachment once the user submits.
attachment.value = '';
Your completed submitComment() function should now look like this:
async function submitComment(index) {
  const attachment = document.querySelector(`#attachment-${index}`);
  const file = attachment.files[0];
  const fileName = attachment.value.replace(/^.*\\/, '');
  const postBody = document.querySelector(`#comment-${index}`);
  let commentDocument = {
    content: {
      id: index,
      user: domo.env.userId,
      postBody: postBody.value,
    },
  };
  if (file !== undefined) {
    var formData = new FormData();
    formData.append('file', file);
    var postOptions = { contentType: 'multipart' };
    const fileResponse = await domo.post(
      `domo/data-files/v1?name=${fileName}`,
      formData,
      postOptions,
    );

    commentDocument = {
      content: {
        ...commentDocument.content,
        attachmentName: fileName,
        attachmentURL: `domo/data-files/v1/${fileResponse.dataFileId}`,
      },
    };
  }

  await domo.post(
    '/domo/datastores/v1/collections/comments/documents/',
    commentDocument,
  );

  const comments = document.querySelector(`#comments-${index}`);
  const commentElement = document.createElement('div');
  commentElement.innerHTML = generateCommentElement(commentDocument);
  comments.appendChild(commentElement);
  postBody.value = '';
  attachment.value = '';
}
Finally, we’ll need to render the attachments in the UI using the generateCommentElement() function. Update that function so it looks like this:
function generateCommentElement(commentDocument) {
  return `
      <div class="commentDocument">
        <img src="/domo/avatars/v2/USER/${
          commentDocument.content.user
        }?size=50&defaultForeground=fff&defaultBackground=000&defaultText=D" alt="User Avatar" />
        <text>${commentDocument.content.postBody}</text>
      </div>
      <div>
        ${
          commentDocument.content.attachmentName !== undefined
            ? `📎 <a href="${commentDocument.content.attachmentURL}" download>${commentDocument.content.attachmentName}</a>`
            : ''
        }
      </div>
  `;
}
You should now be able to submit a comment with an attachment, see that attachment on the comment, and download the attachment. Finally, let’s domo publish one more time to update the App in our Domo instance.
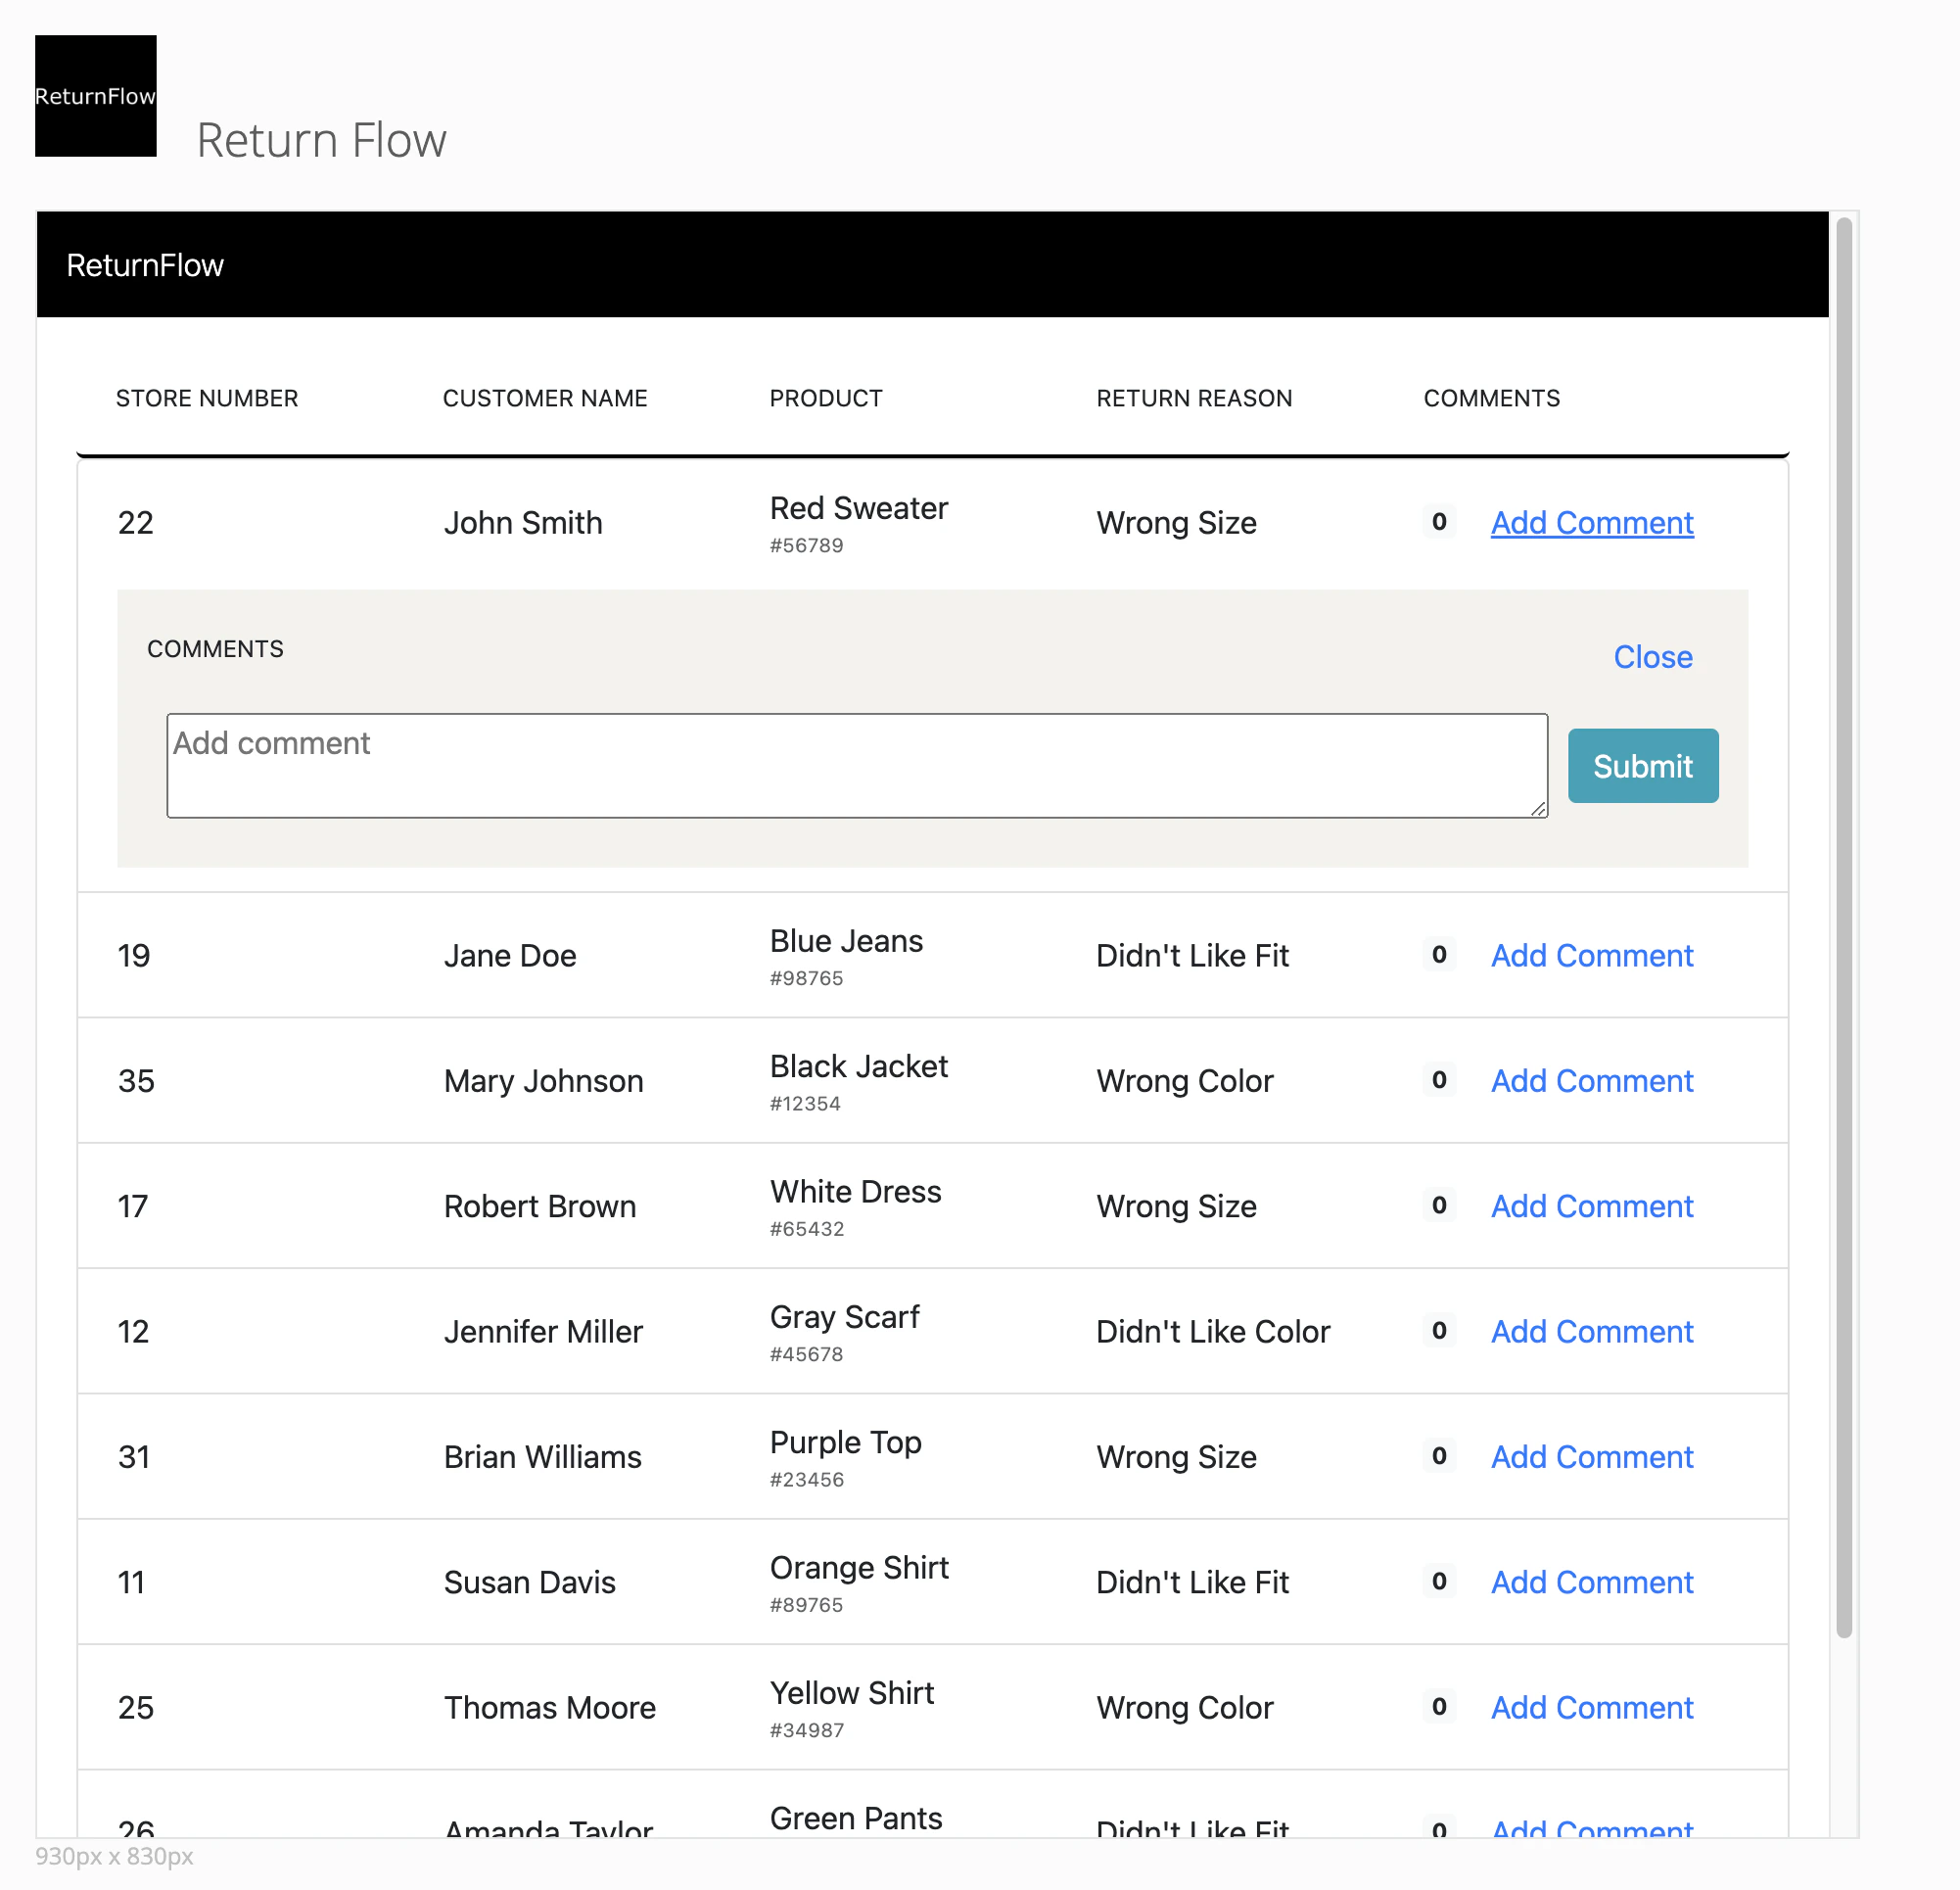
 Screen Shot 2023-08-07 at 4.28.14 PM.png

Next Steps


Congrats! You’ve successfully built an App on Domo to be able to add comments to data in a table. You’ve leveraged many of the App Framework APIs (Data API, AppDB API, Users API, and Files API) and should be in good shape to extend the functionality of this App. A few potential improvements you might try to make as a challenge:
  1. Add loading states
  2. Create a search bar that filters the list of returns
  3. Add branding and logos
  4. Add ability to edit and delete comments
  5. Dynamically update the comment count after a comment has been submitted