> ## Documentation Index
> Fetch the complete documentation index at: https://www.domo.com/docs/llms.txt
> Use this file to discover all available pages before exploring further.
# Connect Amazon Quick Suite to Domo MCP
export const BetaNote = ({generic = false}) =>
Note:{" "}
{generic ? "" : "This feature is in beta. "}
Beta Program participants can enable features{" "}
here. To join the
Beta Program, fill out{" "}
this form. For beta
questions or feedback, email{" "}
beta.admin@domo.com.
;
This article explains how to connect Amazon Quick Suite to Domo's MCP Server using OAuth (recommended) or a Client ID/Secret, and how to set up the connector for the Amazon Quick desktop app.
After you're connected, Amazon Quick can use the **Domo Basic MCP** toolkit to read from Domo DataSets and Document Collections.
***
## Required Grants
To use the AI Library feature, the following grants must be enabled for your role:
* **Use AI Services —** Access to features and Apps built using the AI Services Layer.
* **Use AI Chat —** Access to the Domo AI Assistant.
* **Use MCP —** Access to connect external AI tools to Domo's MCP Server.
Learn more about [grants](/docs/s/article/360043438973).
## Prerequisites
* Access to the Amazon Quick web console with permission to create connectors for your team.
* The **Domo Basic MCP** server endpoint from the AI Library:
```
https://.domo.com/api/ai/v1/assistant/mcp/toolkits/domo_basic_mcp
```
**Tip:** For background on connecting external tools to Amazon Quick agents, see the AWS blog post [Integrate external tools with Amazon Quick agents using Model Context Protocol (MCP) ](https://aws.amazon.com/blogs/machine-learning/integrate-external-tools-with-amazon-quick-agents-using-model-context-protocol-mcp/), which also includes a guide for setting up Dynamic Client Registration (DCR).
## Connect Amazon Quick Suite (Web) Using OAuth
This is the recommended way to connect Amazon Quick Suite to Domo. Use the [Client ID/Secret setup](#connect-with-a-client-id-and-secret-fallback) only if your Amazon Quick environment doesn't offer a default OAuth app.
1. Log in to the Amazon Quick web console.
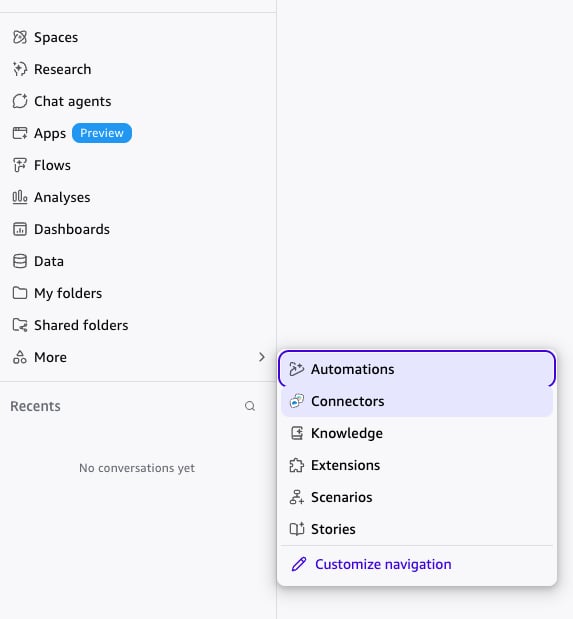
2. In the left navigation, select **More**, then select **Connectors**.
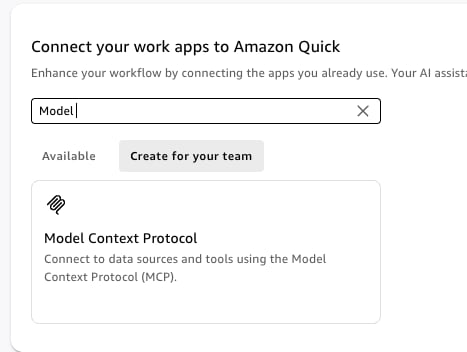
 3. Select **Create for your team**.
4. Search for **Model Context Protocol** and select it from the results.
3. Select **Create for your team**.
4. Search for **Model Context Protocol** and select it from the results.
 5. Give the MCP server a **Name**, **Description**, and **MCP server endpoint**:
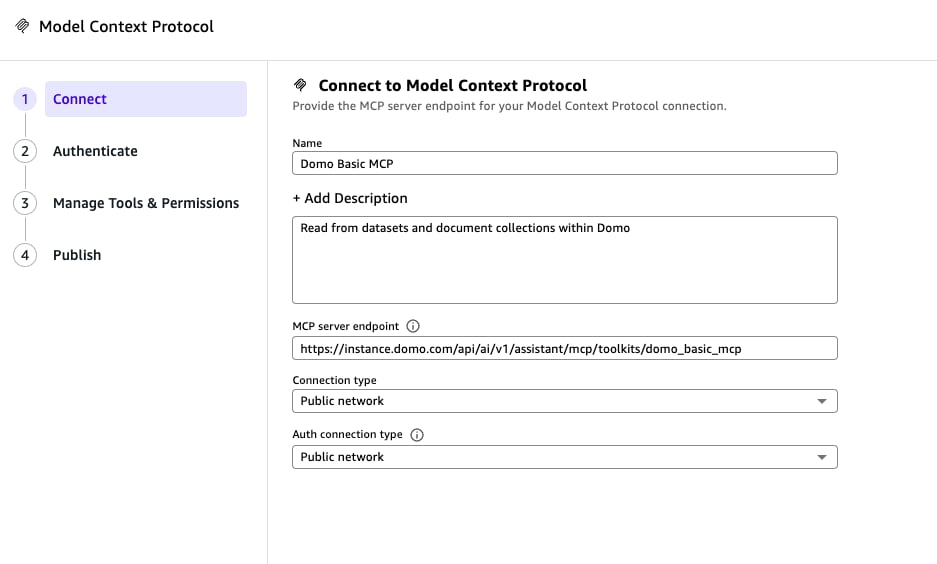 * **Name —** A name for the connector, such as `Domo Basic MCP`.
* **Description —** An optional description, such as `Read from datasets and document collections within Domo`.
* **MCP server endpoint —** `https://.domo.com/api/ai/v1/assistant/mcp/toolkits/domo_basic_mcp`
* **Connection type —** Public network
* **Auth connection type —** Public network
6. Select **Next**.
7. On the **Authenticate** step, leave **Auth configuration** set to **Default OAuth app**. No changes are needed.
* **Name —** A name for the connector, such as `Domo Basic MCP`.
* **Description —** An optional description, such as `Read from datasets and document collections within Domo`.
* **MCP server endpoint —** `https://.domo.com/api/ai/v1/assistant/mcp/toolkits/domo_basic_mcp`
* **Connection type —** Public network
* **Auth connection type —** Public network
6. Select **Next**.
7. On the **Authenticate** step, leave **Auth configuration** set to **Default OAuth app**. No changes are needed.
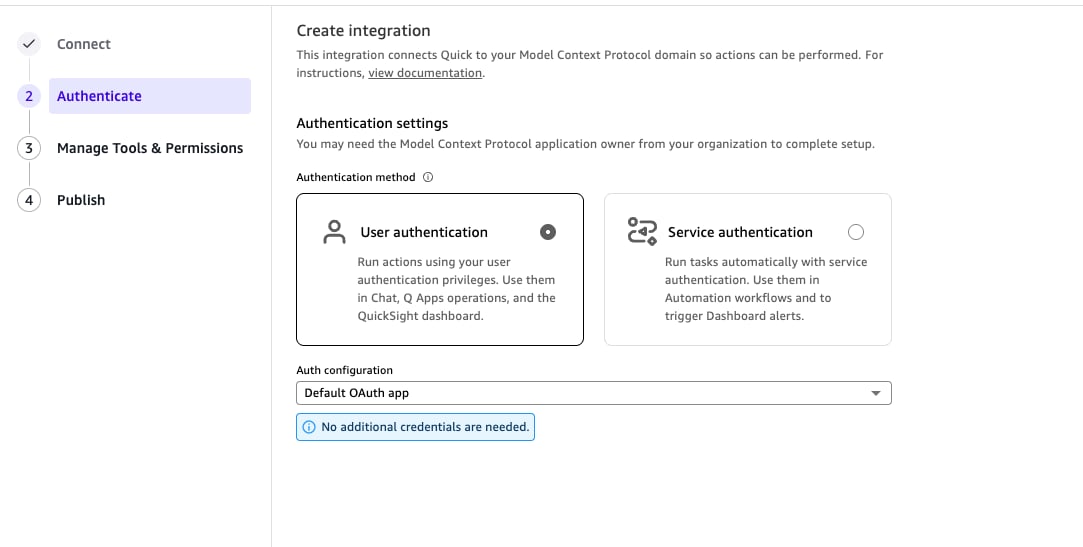 8. Select **Create and continue**.
9. A pop-up displays asking you to allow Amazon Quick Suite MCP Client access to Domo. Select **Allow**.
8. Select **Create and continue**.
9. A pop-up displays asking you to allow Amazon Quick Suite MCP Client access to Domo. Select **Allow**.
 **Note:** If you don't get a pop-up, make sure your browser isn't blocking pop-ups for the Amazon Quick domain.
10. Select **Next** and continue through the remaining steps.
**Note:** On the **Manage Tools & Permissions** step, the `domo_basic_mcp` server doesn't currently expose any write tools, so this step may not populate. This can change in the future.
11. Select **Publish & test**.
## Connect with a Client ID and Secret (Fallback)
**Important:** Use the [OAuth setup](#connect-amazon-quick-suite-web-using-oauth) above instead of this method whenever possible.
Use this method only if **Default OAuth app** isn't available as an **Auth configuration** option.
1. Follow steps 1 through 6 of the [OAuth setup](#connect-amazon-quick-suite-web-using-oauth) to create the connector and reach the **Authenticate** step.
2. Select the **Auth configuration** dropdown and change it to **Custom user based OAuth**.
3. At the bottom of the screen, note the **Redirect URL**. You need this for the next steps, which are performed outside of Amazon Quick.
4. In Domo, generate an access token. See [Self-Serve Access Token Creation (Beta)](/docs/s/article/360042934494#self-serve-access-token-creation-beta) for instructions, then copy and save the token.
5. Open a terminal and run the following curl command, replacing `` with your Domo domain and `` with the access token you generated:
```bash theme={"dark"}
curl -i -X POST \
"https://.domo.com/oauth2/admin/clients" \
-H "X-DOMO-Developer-Token: " \
-H "Content-Type: application/json" \
-d '{
"client_name": "Amazon Quick MCP",
"redirect_uris": ["https://us-east-1.quicksight.aws.amazon.com/sn/oauthcallback"],
"grant_types": ["refresh_token", "authorization_code"],
"token_endpoint_auth_method": "client_secret_post",
"scope": "ai:read ai:execute"
}'
```
**Note:** Update the `redirect_uris` value to the Redirect URL from Amazon Quick if it differs from the example above.
6. The response includes a `client_id` and `client_secret`. Copy both values.
```json theme={"dark"}
{"client_id":"","client_name":"Amazon Quick MCP","client_secret":"","redirect_uris":["https://us-east-1.quicksight.aws.amazon.com/sn/oauthcallback"],"grant_types":["refresh_token","authorization_code"],"token_endpoint_auth_method":"client_secret_post","scope":"ai:execute ai:read","created_at":1786548125.374035183}
```
7. Return to Amazon Quick and complete the **Custom user based OAuth** fields:
**Note:** If you don't get a pop-up, make sure your browser isn't blocking pop-ups for the Amazon Quick domain.
10. Select **Next** and continue through the remaining steps.
**Note:** On the **Manage Tools & Permissions** step, the `domo_basic_mcp` server doesn't currently expose any write tools, so this step may not populate. This can change in the future.
11. Select **Publish & test**.
## Connect with a Client ID and Secret (Fallback)
**Important:** Use the [OAuth setup](#connect-amazon-quick-suite-web-using-oauth) above instead of this method whenever possible.
Use this method only if **Default OAuth app** isn't available as an **Auth configuration** option.
1. Follow steps 1 through 6 of the [OAuth setup](#connect-amazon-quick-suite-web-using-oauth) to create the connector and reach the **Authenticate** step.
2. Select the **Auth configuration** dropdown and change it to **Custom user based OAuth**.
3. At the bottom of the screen, note the **Redirect URL**. You need this for the next steps, which are performed outside of Amazon Quick.
4. In Domo, generate an access token. See [Self-Serve Access Token Creation (Beta)](/docs/s/article/360042934494#self-serve-access-token-creation-beta) for instructions, then copy and save the token.
5. Open a terminal and run the following curl command, replacing `` with your Domo domain and `` with the access token you generated:
```bash theme={"dark"}
curl -i -X POST \
"https://.domo.com/oauth2/admin/clients" \
-H "X-DOMO-Developer-Token: " \
-H "Content-Type: application/json" \
-d '{
"client_name": "Amazon Quick MCP",
"redirect_uris": ["https://us-east-1.quicksight.aws.amazon.com/sn/oauthcallback"],
"grant_types": ["refresh_token", "authorization_code"],
"token_endpoint_auth_method": "client_secret_post",
"scope": "ai:read ai:execute"
}'
```
**Note:** Update the `redirect_uris` value to the Redirect URL from Amazon Quick if it differs from the example above.
6. The response includes a `client_id` and `client_secret`. Copy both values.
```json theme={"dark"}
{"client_id":"","client_name":"Amazon Quick MCP","client_secret":"","redirect_uris":["https://us-east-1.quicksight.aws.amazon.com/sn/oauthcallback"],"grant_types":["refresh_token","authorization_code"],"token_endpoint_auth_method":"client_secret_post","scope":"ai:execute ai:read","created_at":1786548125.374035183}
```
7. Return to Amazon Quick and complete the **Custom user based OAuth** fields:
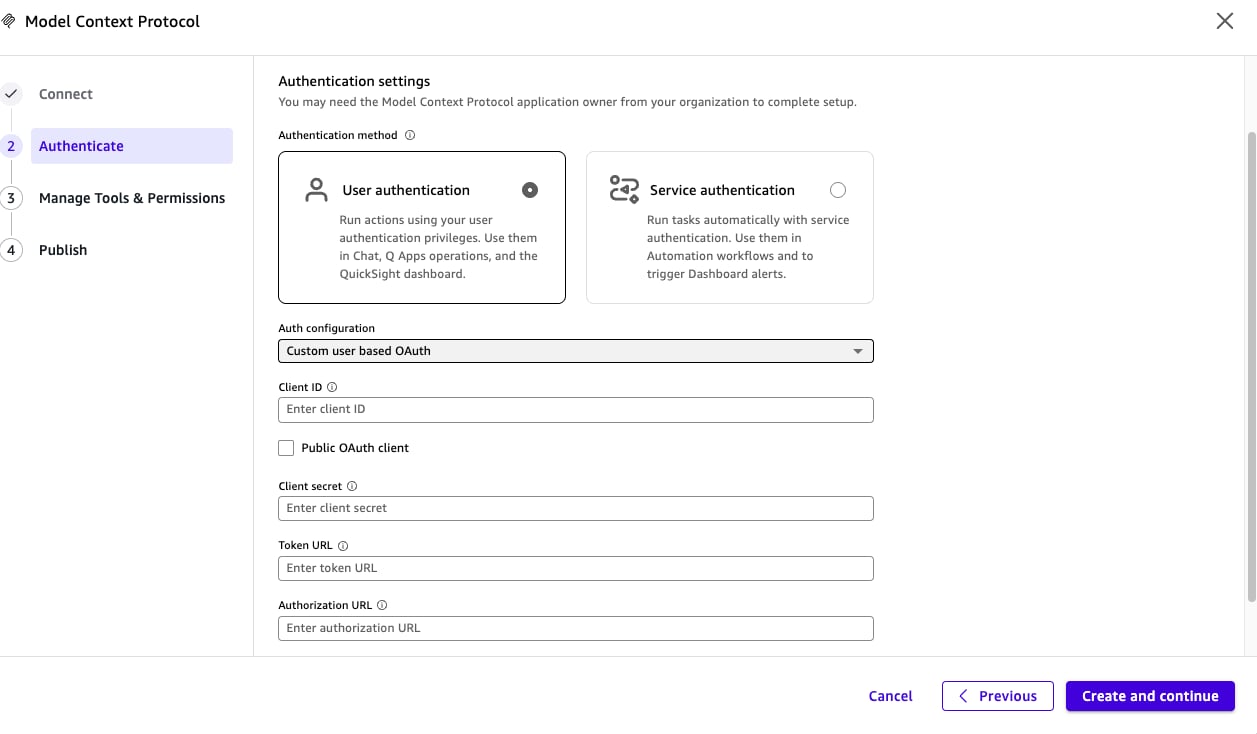 * **Client ID —** From the curl response.
* **Public OAuth client —** Leave unchecked.
* **Client secret —** From the curl response.
* **Token URL —** `https://.domo.com/oauth2/token`
* **Authorization URL —** `https://.domo.com/oauth2/authorize`
8. Select **Create and continue** and continue through the remaining screens.
## Set Up the Desktop App
* Set up the connector in the Amazon Quick web console first. See [Connect Amazon Quick Suite (Web) Using OAuth](#connect-amazon-quick-suite-web-using-oauth).
* Make sure the connector setup in the Amazon Quick web console and the desktop app use the same AWS region.
## Troubleshoot
If **Auth configuration** only offers **Custom user based OAuth** and not **Default OAuth app**:
* Double-check that the MCP server endpoint is correct.
* Double-check that you aren't blocking requests from Amazon Quick to Domo. Amazon Quick has domain and IP exclusion/inclusion settings that can block these requests.
## Related Articles
* [Connect AI Tools to Domo Using MCP](/docs/s/article/Connect-AI-Tools-to-Domo-Using-MCP)
* [Manage Access Tokens](/docs/s/article/360042934494)
* **Client ID —** From the curl response.
* **Public OAuth client —** Leave unchecked.
* **Client secret —** From the curl response.
* **Token URL —** `https://.domo.com/oauth2/token`
* **Authorization URL —** `https://.domo.com/oauth2/authorize`
8. Select **Create and continue** and continue through the remaining screens.
## Set Up the Desktop App
* Set up the connector in the Amazon Quick web console first. See [Connect Amazon Quick Suite (Web) Using OAuth](#connect-amazon-quick-suite-web-using-oauth).
* Make sure the connector setup in the Amazon Quick web console and the desktop app use the same AWS region.
## Troubleshoot
If **Auth configuration** only offers **Custom user based OAuth** and not **Default OAuth app**:
* Double-check that the MCP server endpoint is correct.
* Double-check that you aren't blocking requests from Amazon Quick to Domo. Amazon Quick has domain and IP exclusion/inclusion settings that can block these requests.
## Related Articles
* [Connect AI Tools to Domo Using MCP](/docs/s/article/Connect-AI-Tools-to-Domo-Using-MCP)
* [Manage Access Tokens](/docs/s/article/360042934494)