> ## Documentation Index
> Fetch the complete documentation index at: https://www.domo.com/docs/llms.txt
> Use this file to discover all available pages before exploring further.
# Domo on Snowflake
## Intro
Cloud Integrations let you connect Domo directly to your Snowflake data—without moving it. Your data stays governed and secure in Snowflake, while Domo gives you powerful tools to explore, transform, and visualize it. Use this guide to set up the integration, including read/write access and OAuth configuration.
**Note:** Magic ETL uses the Snowflake Cloud Integration, allowing you to transform your data directly in Snowflake. Learn about [Magic ETL on Snowflake](/docs/s/article/000005455).
***
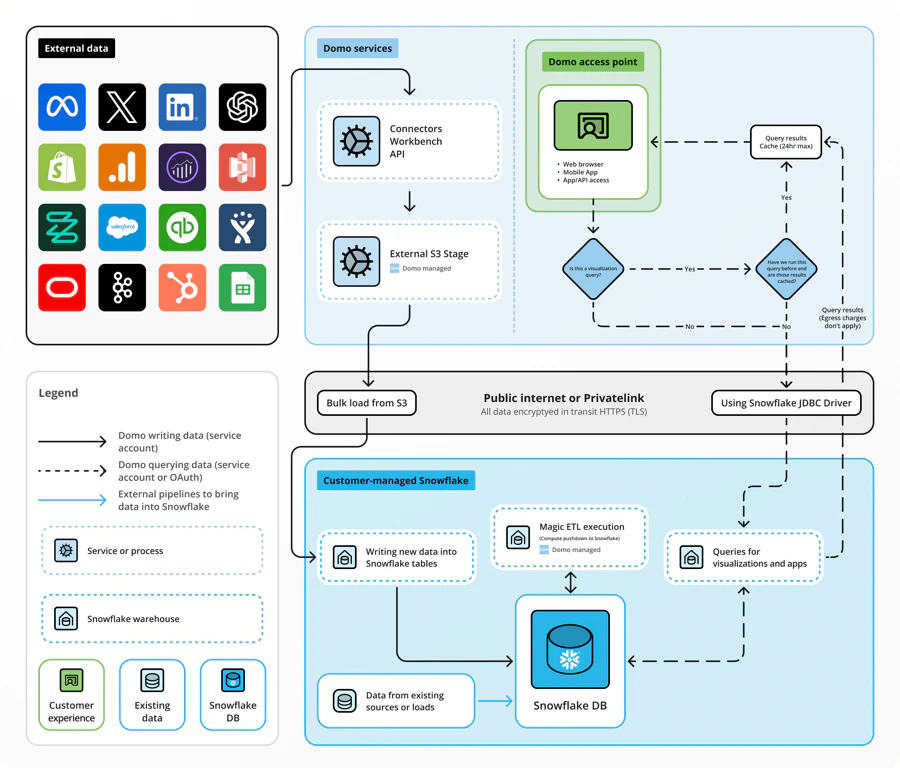
## Architectural Overview
 ## Prerequisites
A Snowflake Cloud Integration setup consists of two parts: read-only or read/write.
After the read-only setup is complete, you may begin using virtual tables that read from Snowflake to create cards, set up Alerts, or serve as inputs in Magic ETL flows. You can set up read-only and return later to set up the write portion.
Before setting up the Snowflake connection, complete the following:
1. **Create a Snowflake service account —** Create a new Snowflake account specifically for this integration. This account must have read access to your default Snowflake environment in order to create virtual Snowflake tables in Domo. For the required permissions, see [Snowflake Minimum Permissions for Domo](/docs/s/article/Snowflake-Minimum-Permissions-for-Domo).
2. (Optional) **Create a Domo service account —** Create a new Domo account specifically for this integration. The account role must have the **Manage Cloud Accounts** and **Manage DataSet** grants enabled.
For more information about roles and grants, see [Managing Custom Roles](/docs/s/article/360043438973).
### Account Creation—Write
Before registering a Snowflake Cloud Integration for the write portion of the setup, you must complete the following:
1. **Create a default Snowflake database —** You need a Snowflake database that is exclusively for Domo to write Domo-managed tables. During setup, this database is the default.
**Note:** Any tables not managed by Domo in this database are not seen by the Snowflake Cloud Integration.
2. (Conditional) **Place IP Addresses on an allowlist —** If your Snowflake environment restricts access based on IP address, place Domo IPs on an allowlist.
For more information, see [Allow Domo IP Addresses for Network Connections](/docs/s/article/360043630093).
**Important:** During the write setup process, Domo provides SQL statements to create the integration. These statements must be executed against your Snowflake environment by a Snowflake administrator with the `ACCOUNTADMIN` role.
This is a Snowflake requirement that removes the need to store your Snowflake administrator credentials in Domo, which is especially important in larger organizations where your Snowflake administrator may not have Domo access. After the integration is established, you no longer need a Snowflake administrator account.
## Create or Manage Your Snowflake Integrations
To access the integration management interface:
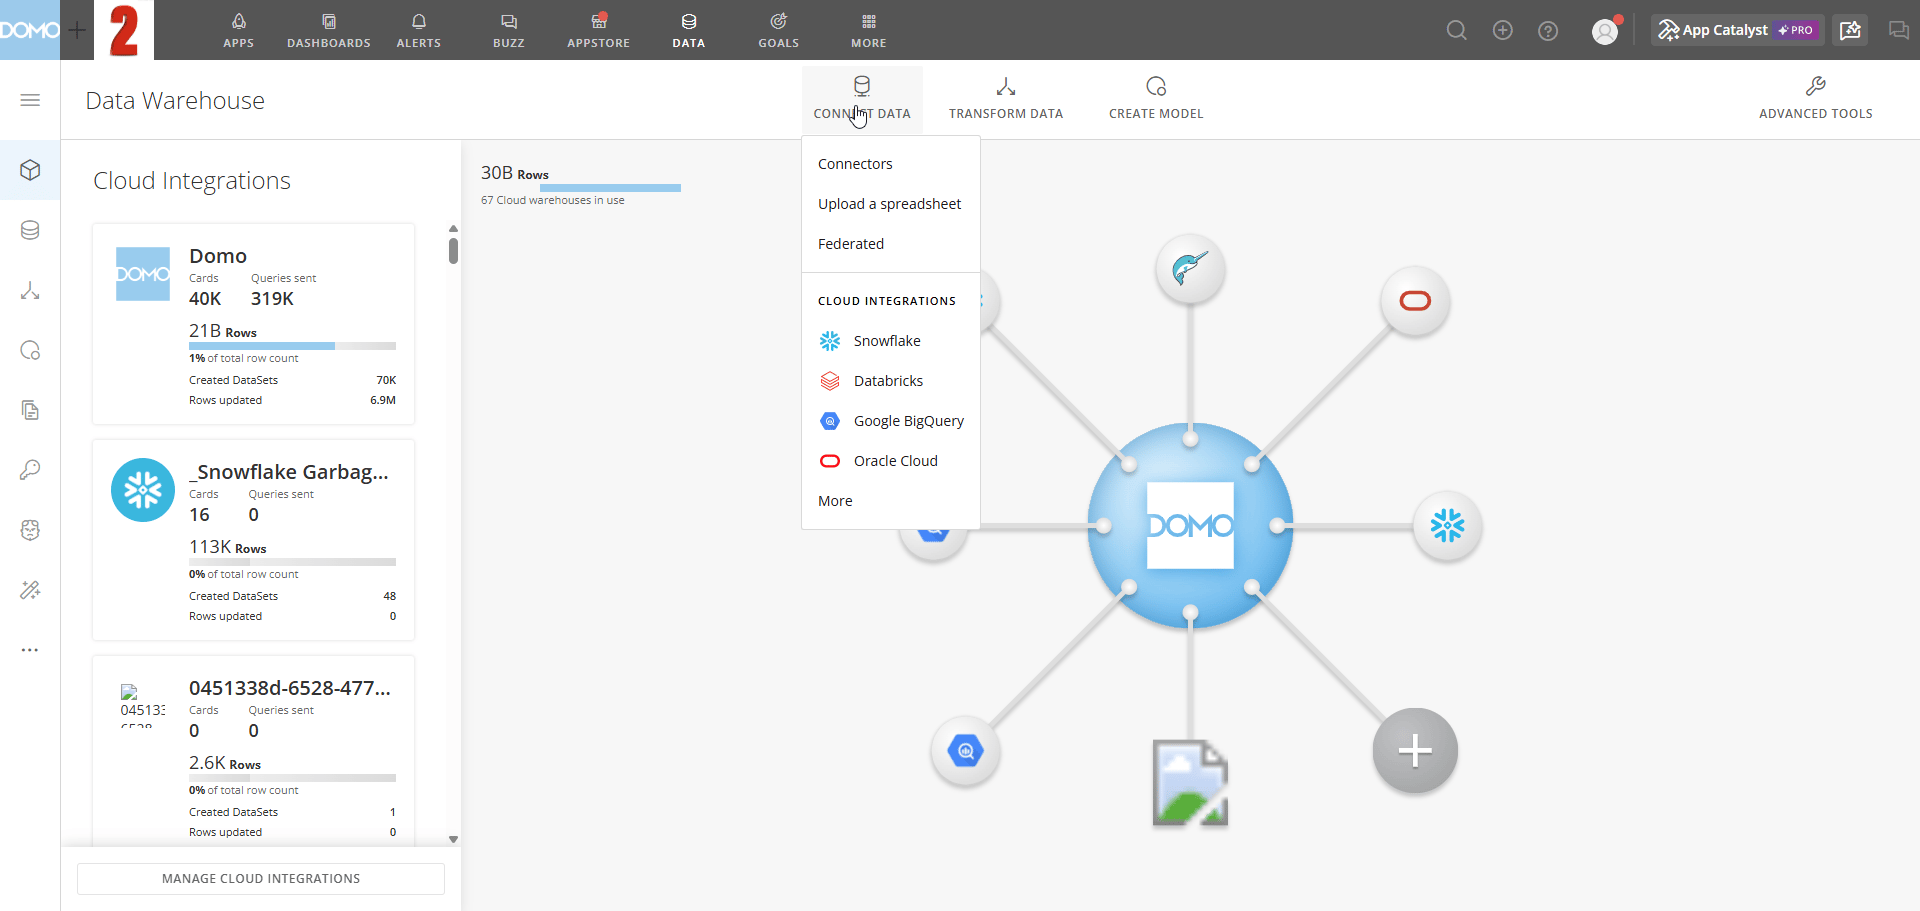
1. Navigate to **Data Warehouse**.
2. Select **Connect Data**.
3. Select **Snowflake** from the list of Cloud Integrations.
## Prerequisites
A Snowflake Cloud Integration setup consists of two parts: read-only or read/write.
After the read-only setup is complete, you may begin using virtual tables that read from Snowflake to create cards, set up Alerts, or serve as inputs in Magic ETL flows. You can set up read-only and return later to set up the write portion.
Before setting up the Snowflake connection, complete the following:
1. **Create a Snowflake service account —** Create a new Snowflake account specifically for this integration. This account must have read access to your default Snowflake environment in order to create virtual Snowflake tables in Domo. For the required permissions, see [Snowflake Minimum Permissions for Domo](/docs/s/article/Snowflake-Minimum-Permissions-for-Domo).
2. (Optional) **Create a Domo service account —** Create a new Domo account specifically for this integration. The account role must have the **Manage Cloud Accounts** and **Manage DataSet** grants enabled.
For more information about roles and grants, see [Managing Custom Roles](/docs/s/article/360043438973).
### Account Creation—Write
Before registering a Snowflake Cloud Integration for the write portion of the setup, you must complete the following:
1. **Create a default Snowflake database —** You need a Snowflake database that is exclusively for Domo to write Domo-managed tables. During setup, this database is the default.
**Note:** Any tables not managed by Domo in this database are not seen by the Snowflake Cloud Integration.
2. (Conditional) **Place IP Addresses on an allowlist —** If your Snowflake environment restricts access based on IP address, place Domo IPs on an allowlist.
For more information, see [Allow Domo IP Addresses for Network Connections](/docs/s/article/360043630093).
**Important:** During the write setup process, Domo provides SQL statements to create the integration. These statements must be executed against your Snowflake environment by a Snowflake administrator with the `ACCOUNTADMIN` role.
This is a Snowflake requirement that removes the need to store your Snowflake administrator credentials in Domo, which is especially important in larger organizations where your Snowflake administrator may not have Domo access. After the integration is established, you no longer need a Snowflake administrator account.
## Create or Manage Your Snowflake Integrations
To access the integration management interface:
1. Navigate to **Data Warehouse**.
2. Select **Connect Data**.
3. Select **Snowflake** from the list of Cloud Integrations.
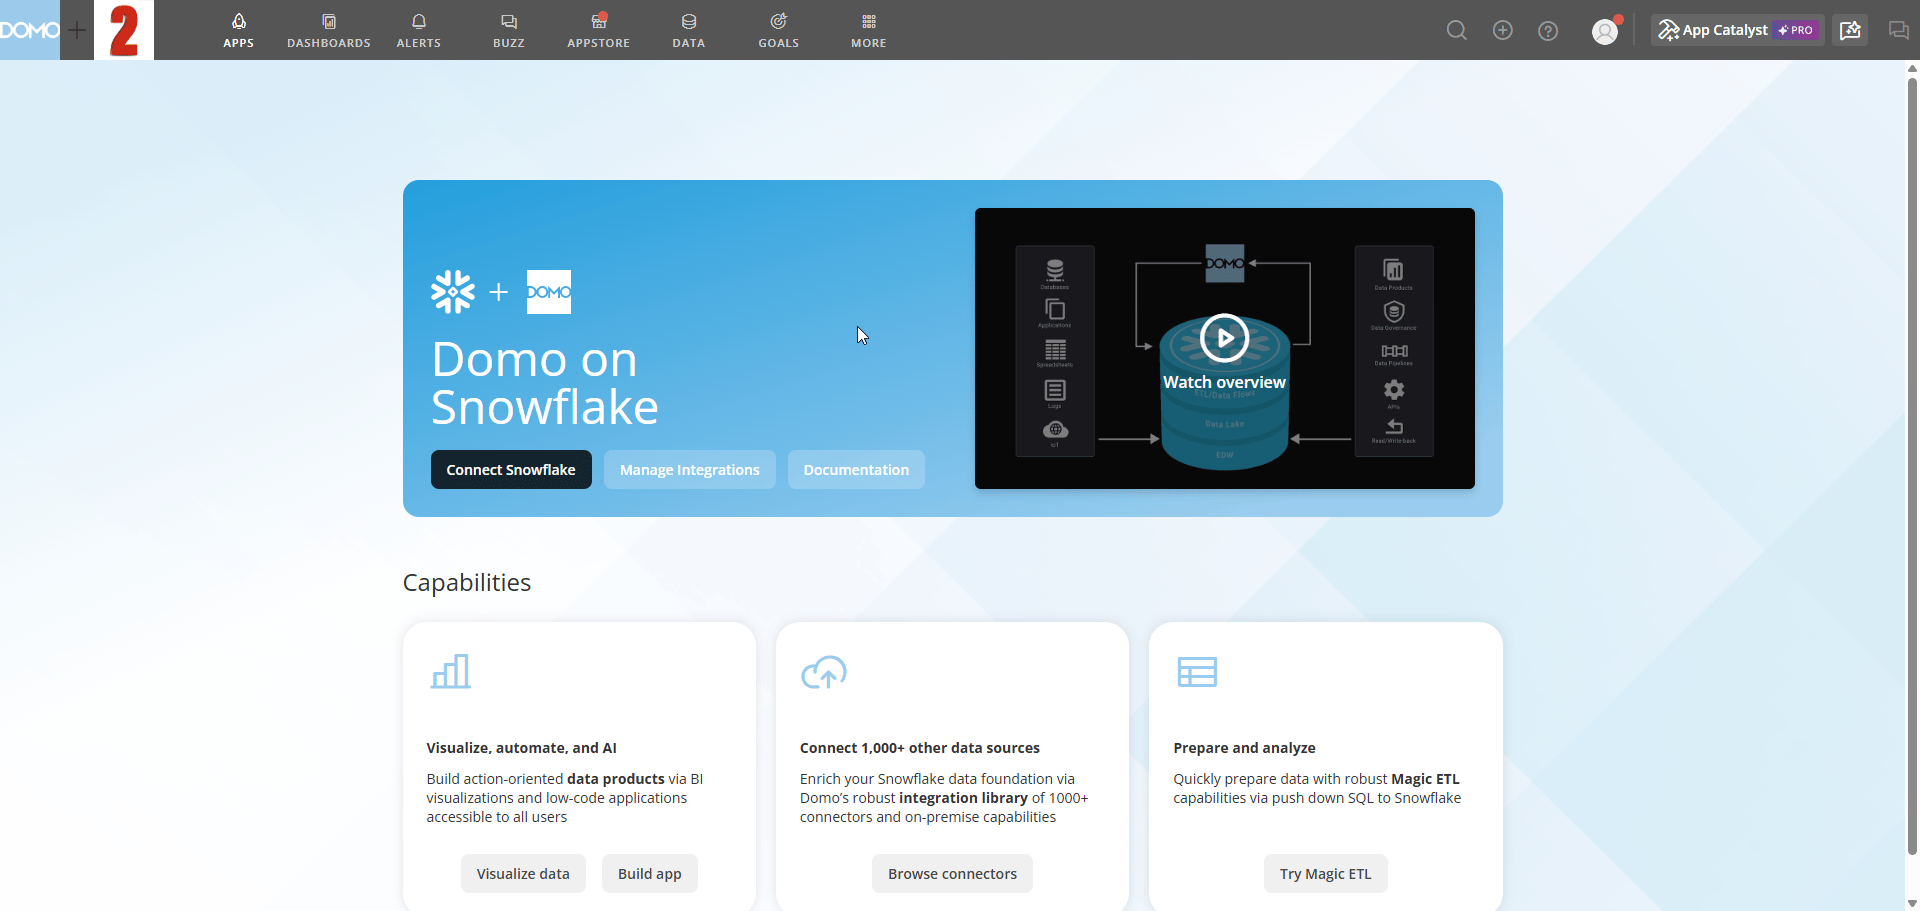
 4. The Domo on Snowflake page appears.
* To create a new integration, select **Connect Snowflake** and continue to [Create a Snowflake Integration](#create-a-snowflake-integration).
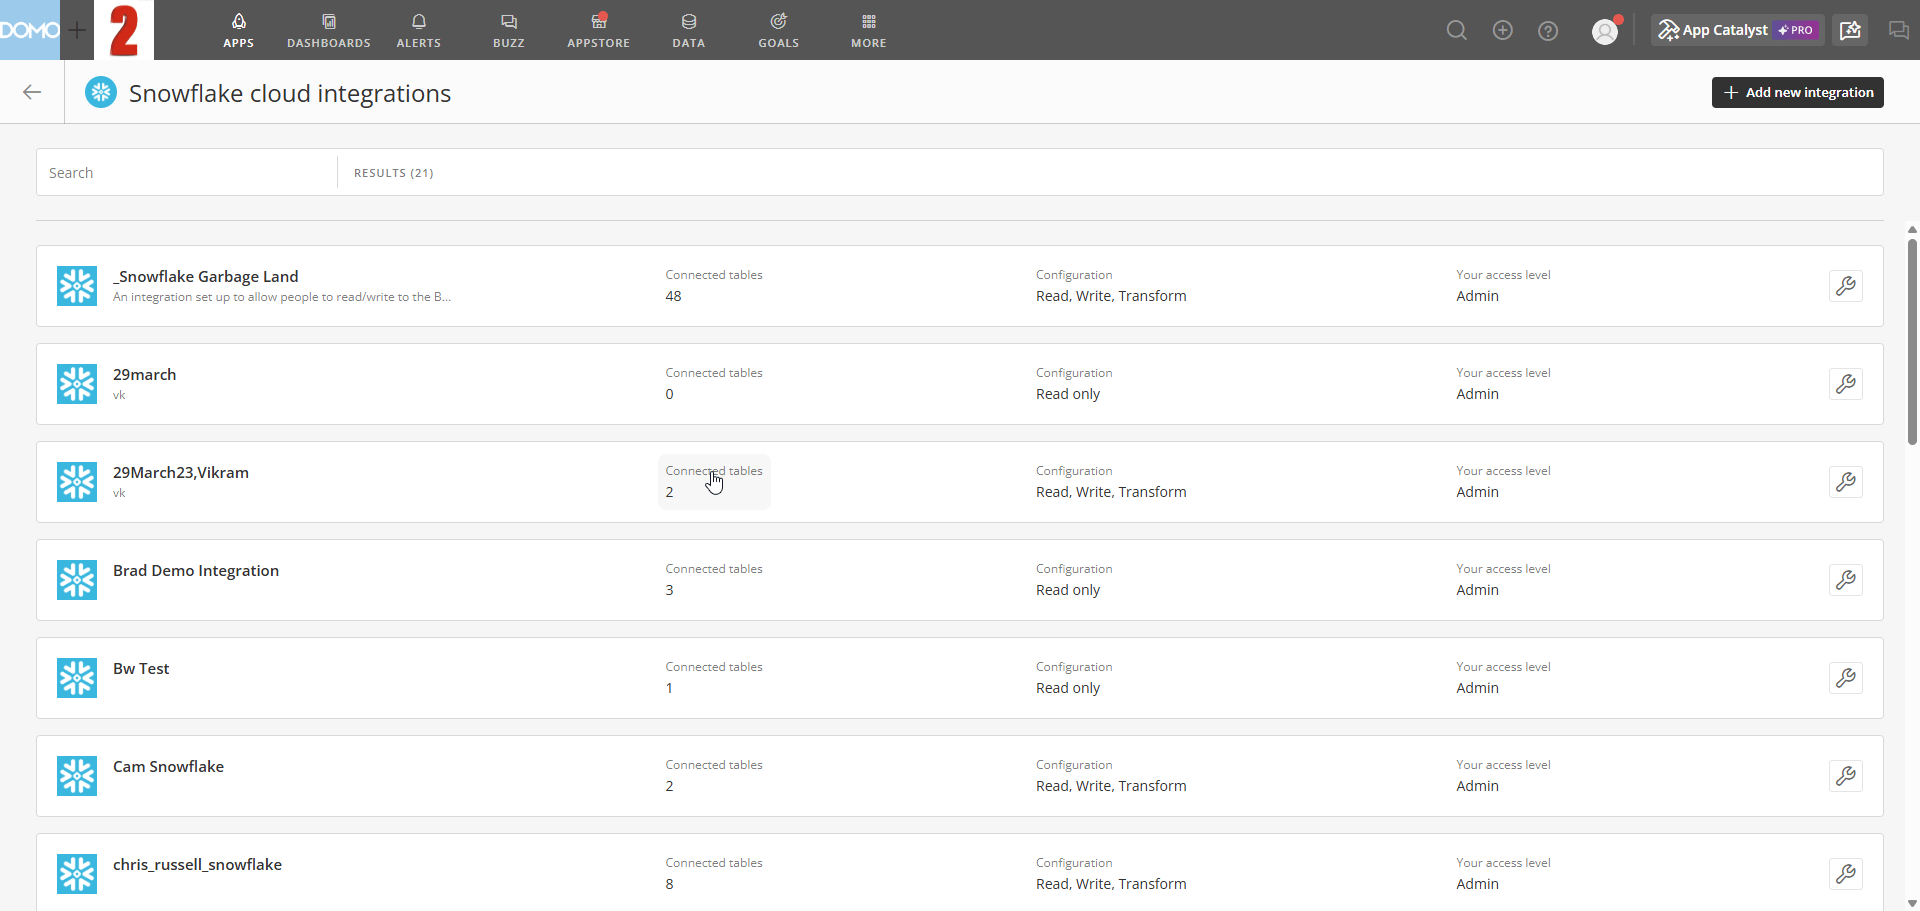
* To modify an existing integration, select **Manage Integrations**. The Snowflake cloud integrations list appears. Select the wrench icon next to an integration to see management options based on your access level.
4. The Domo on Snowflake page appears.
* To create a new integration, select **Connect Snowflake** and continue to [Create a Snowflake Integration](#create-a-snowflake-integration).
* To modify an existing integration, select **Manage Integrations**. The Snowflake cloud integrations list appears. Select the wrench icon next to an integration to see management options based on your access level.
 ### Create a Snowflake Integration
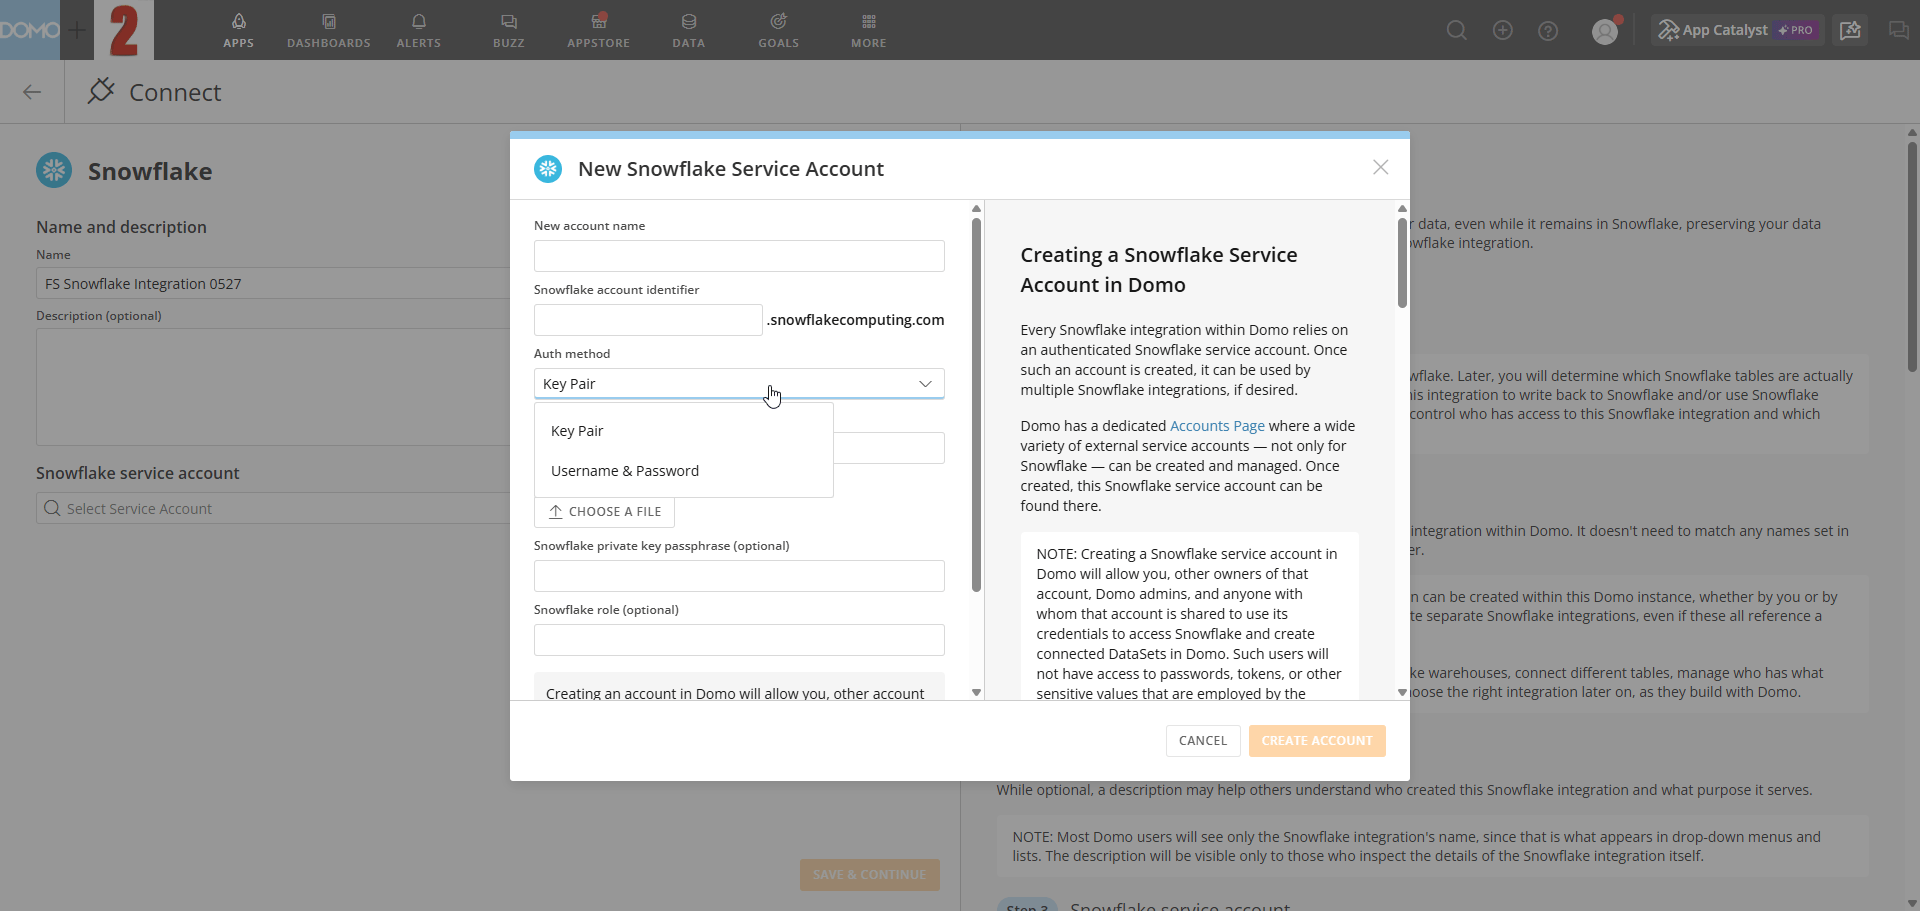 1. In the **Name** field, enter a label to identify this Snowflake integration in Domo.\
The name doesn't need to match anything in Snowflake and can be changed later.
2. (Optional) In the **Description** field, enter a description to help others understand the purpose of the integration.\
This is only visible in the integration details.
3. Select an existing Snowflake service account, or select **Add account** to create a new one.\
This account authenticates to Snowflake and determines access to tables. For guidance on creating a service account, see [Create a Snowflake Account](#create-a-snowflake-account).
1. In the **Name** field, enter a label to identify this Snowflake integration in Domo.\
The name doesn't need to match anything in Snowflake and can be changed later.
2. (Optional) In the **Description** field, enter a description to help others understand the purpose of the integration.\
This is only visible in the integration details.
3. Select an existing Snowflake service account, or select **Add account** to create a new one.\
This account authenticates to Snowflake and determines access to tables. For guidance on creating a service account, see [Create a Snowflake Account](#create-a-snowflake-account).
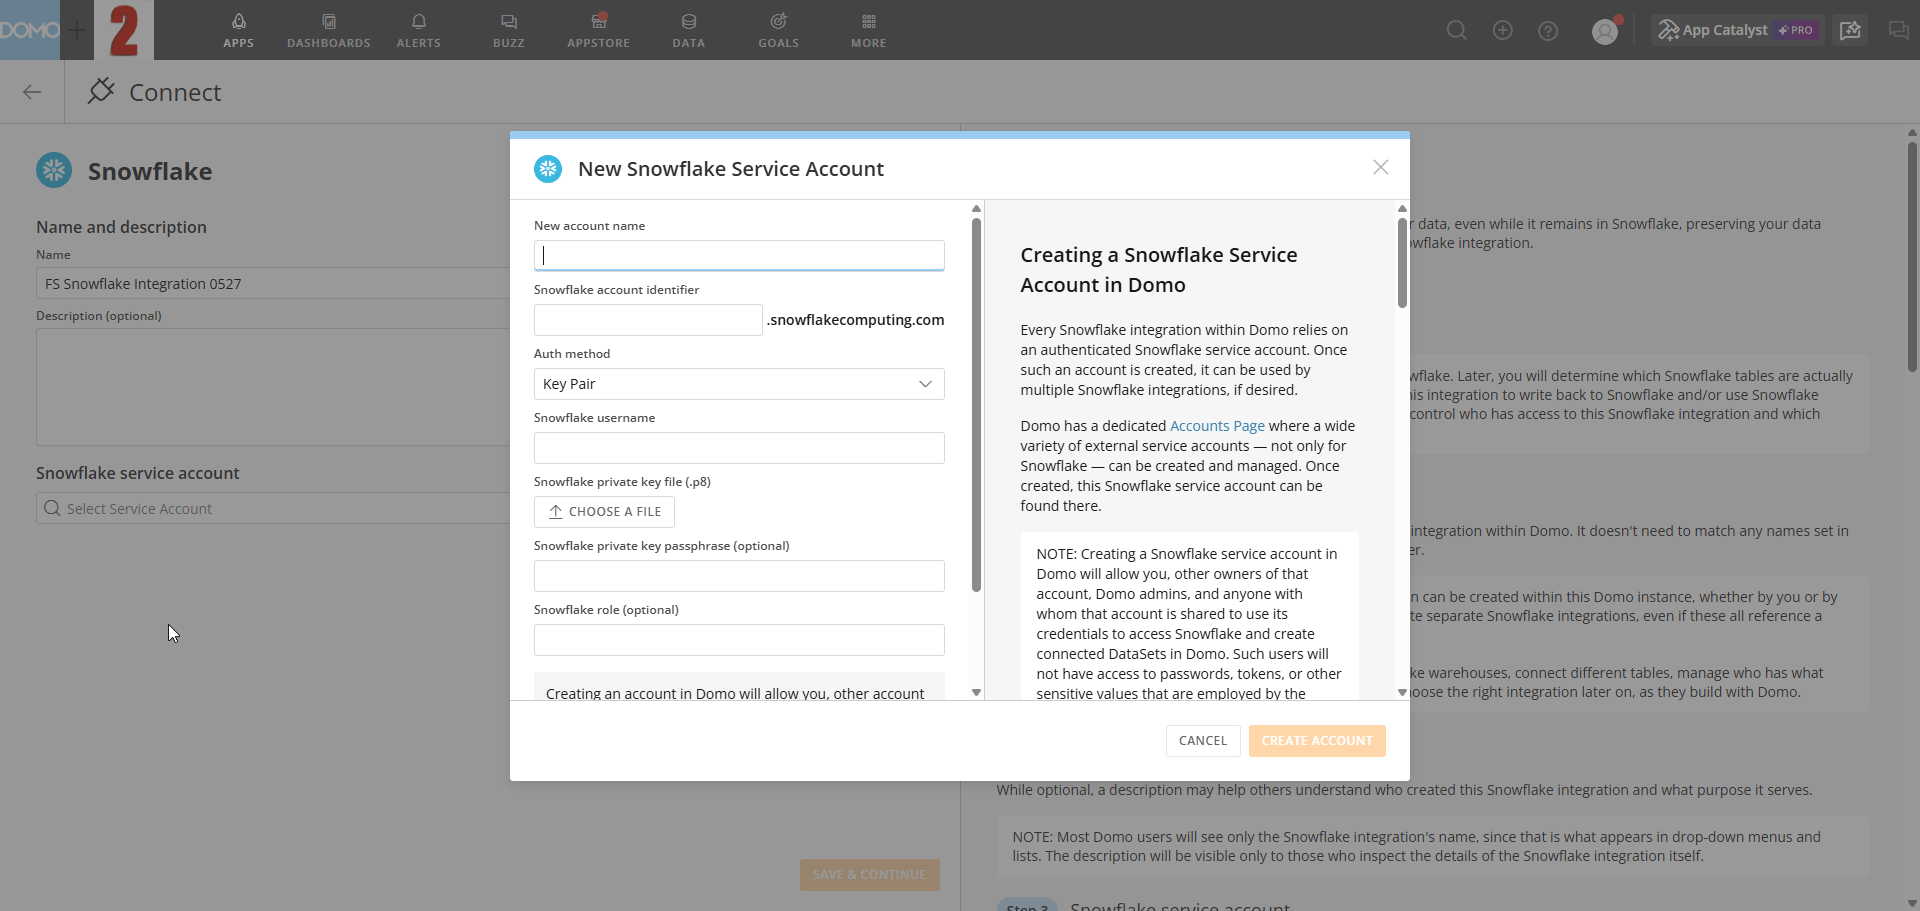 4. Select the warehouse to use for querying data.\
You can assign multiple warehouses later for optimization or specific use cases.
4. Select the warehouse to use for querying data.\
You can assign multiple warehouses later for optimization or specific use cases.
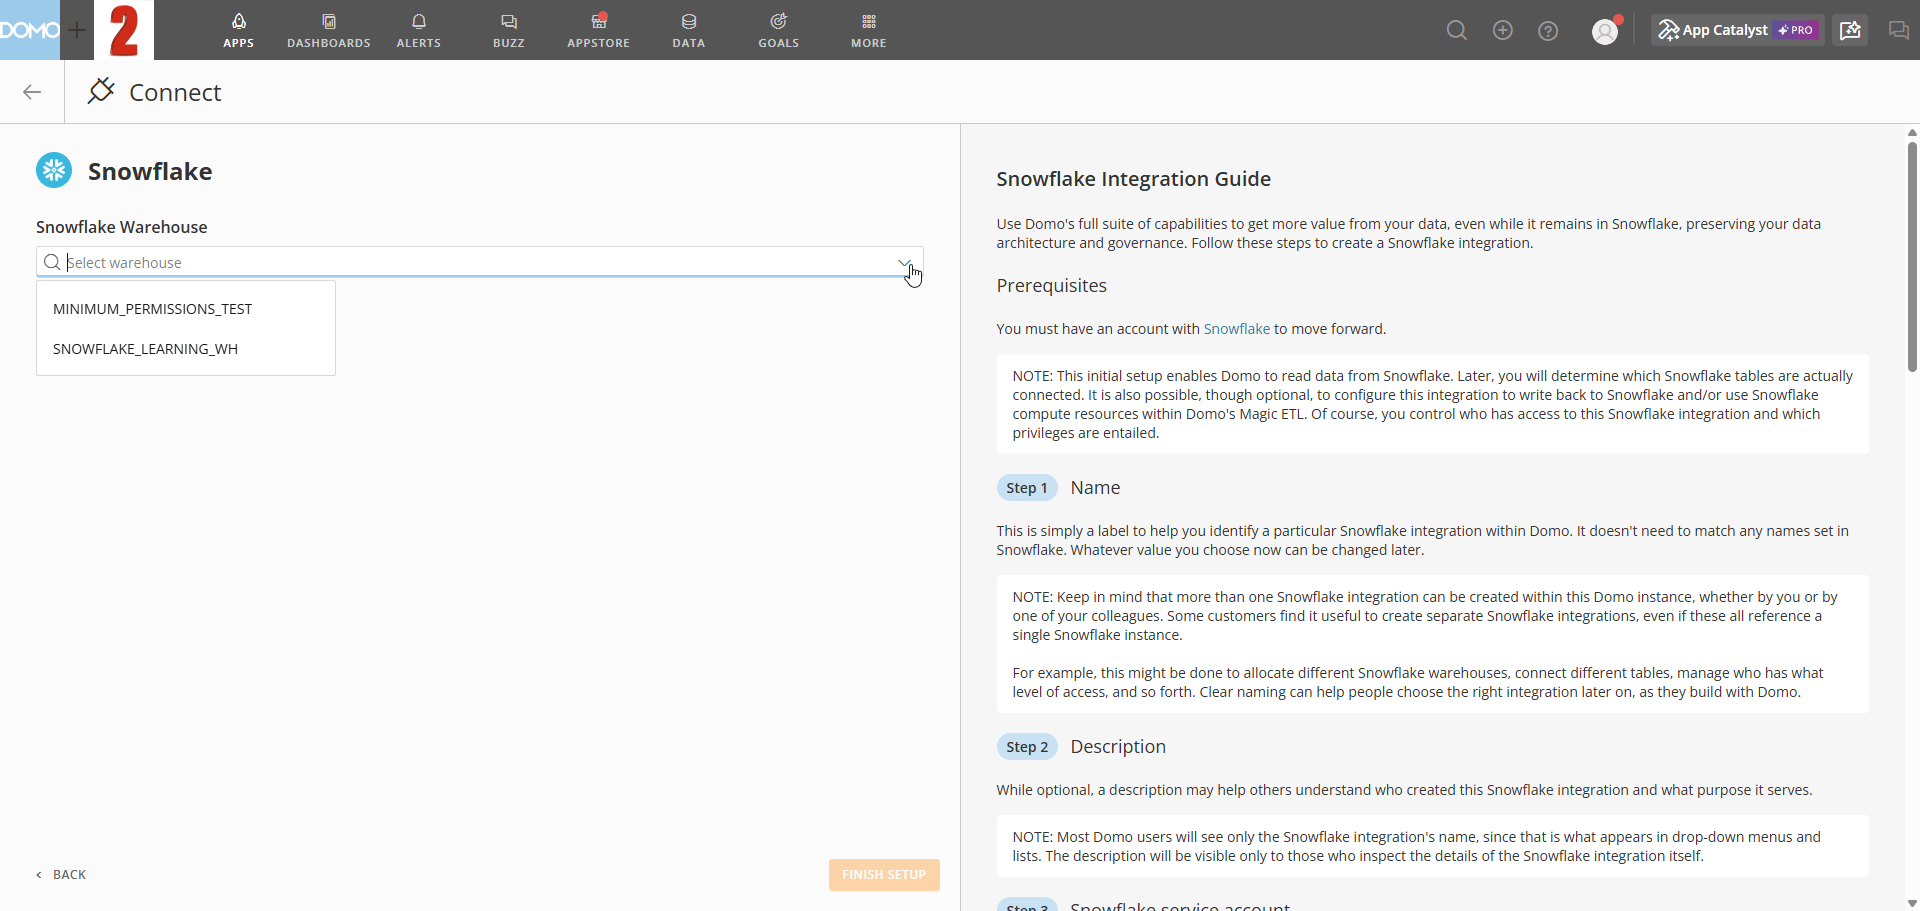 5. Select **Finish Setup**. When the integration is created successfully, a confirmation screen appears.
 ## Create a Snowflake Account
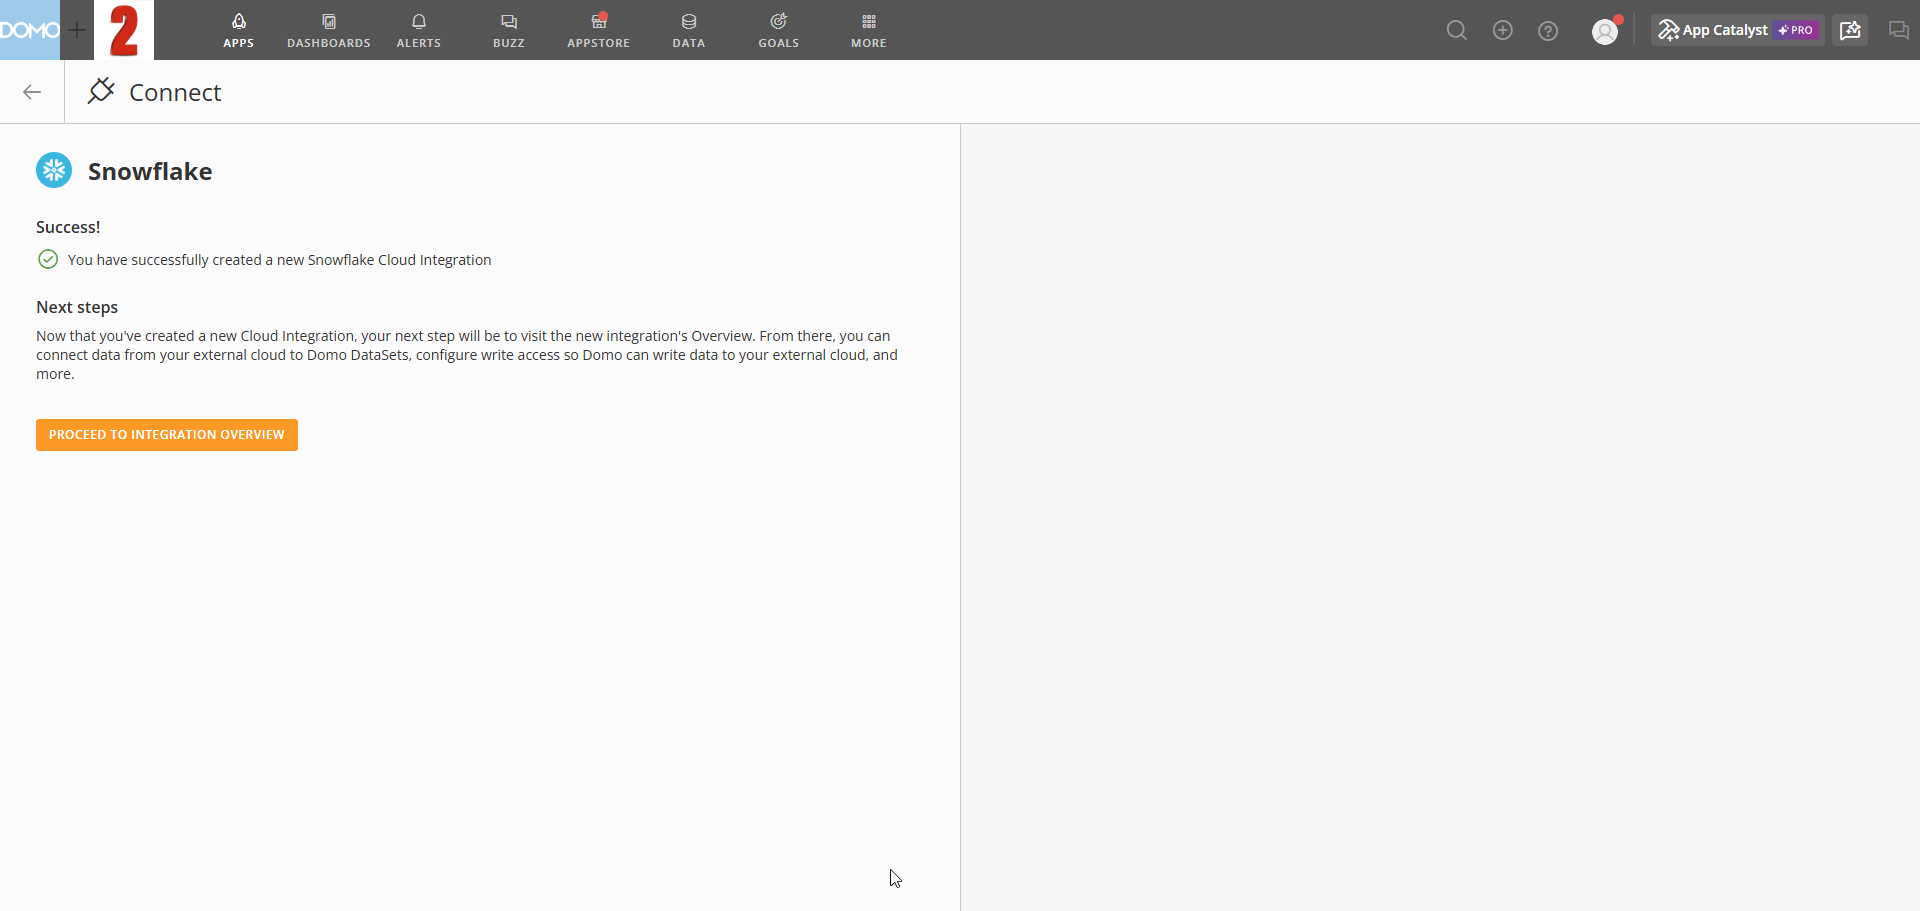
Every Snowflake integration in Domo relies on an authenticated Snowflake service account. After you create a service account, you can reuse it across multiple integrations.
To create a Snowflake service account in Domo:
1. In the **Name** field, enter a name to identify the Snowflake service account within Domo.\
This name can be changed later.
**Tip:** Use a clear and distinct name to differentiate between multiple service accounts and integrations.
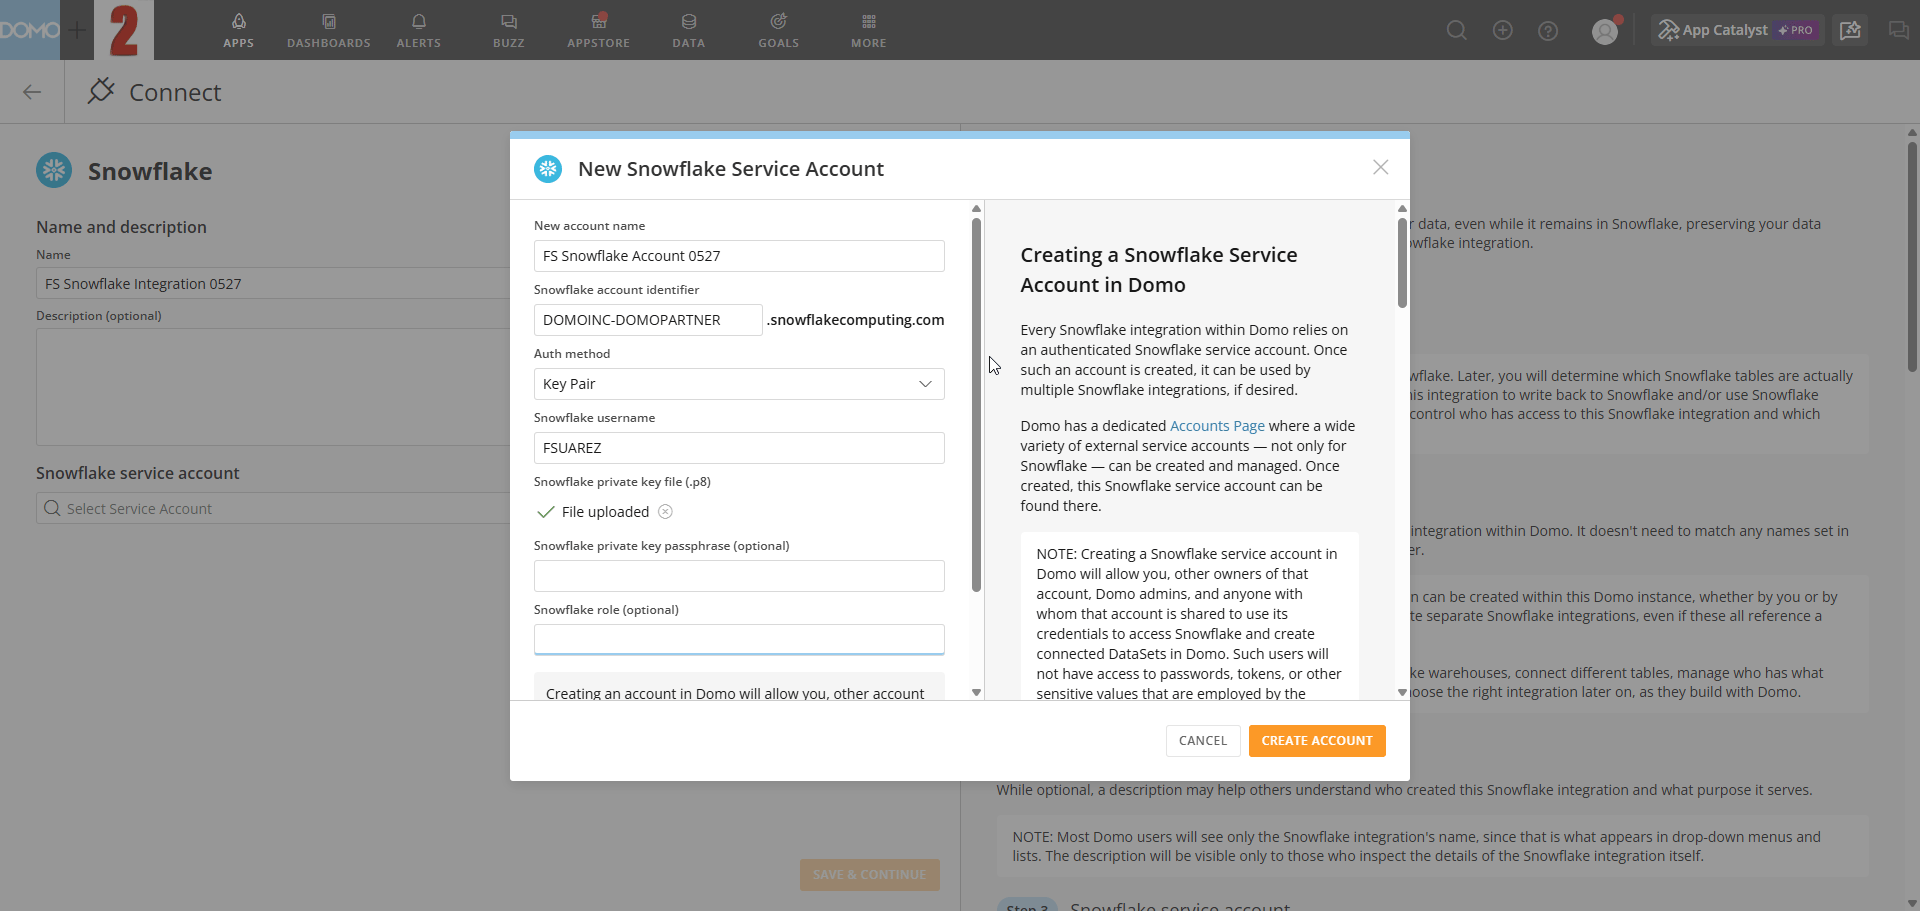
2. In the **Account Identifier** field, enter your Snowflake account identifier.
The account identifier is the subdomain that appears before `.snowflakecomputing.com` in your Snowflake URL. You can locate it in several ways:
* **From the Snowflake URL** — When you're signed in to Snowsight, the browser URL takes the form `https://.snowflakecomputing.com` (for example, `xy12345.us-east-1.snowflakecomputing.com`). The portion before `.snowflakecomputing.com` is your account identifier.
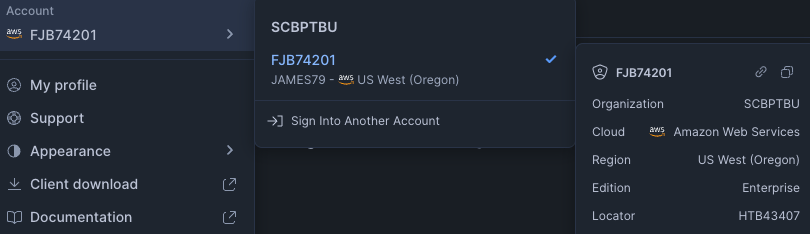
* **From Snowsight** — In the lower-left corner of Snowsight, hover over your account name to display the account details popover, which lists the account identifier and locator. You can also navigate to **Admin > Accounts** to view account identifiers for the accounts in your organization.
* **From a SQL worksheet** — Run `SELECT CURRENT_ACCOUNT();` to return the account locator, or `SELECT CURRENT_ORGANIZATION_NAME();` together with `SELECT CURRENT_ACCOUNT_NAME();` to return the organization-qualified identifier.
## Create a Snowflake Account
Every Snowflake integration in Domo relies on an authenticated Snowflake service account. After you create a service account, you can reuse it across multiple integrations.
To create a Snowflake service account in Domo:
1. In the **Name** field, enter a name to identify the Snowflake service account within Domo.\
This name can be changed later.
**Tip:** Use a clear and distinct name to differentiate between multiple service accounts and integrations.
2. In the **Account Identifier** field, enter your Snowflake account identifier.
The account identifier is the subdomain that appears before `.snowflakecomputing.com` in your Snowflake URL. You can locate it in several ways:
* **From the Snowflake URL** — When you're signed in to Snowsight, the browser URL takes the form `https://.snowflakecomputing.com` (for example, `xy12345.us-east-1.snowflakecomputing.com`). The portion before `.snowflakecomputing.com` is your account identifier.
* **From Snowsight** — In the lower-left corner of Snowsight, hover over your account name to display the account details popover, which lists the account identifier and locator. You can also navigate to **Admin > Accounts** to view account identifiers for the accounts in your organization.
* **From a SQL worksheet** — Run `SELECT CURRENT_ACCOUNT();` to return the account locator, or `SELECT CURRENT_ORGANIZATION_NAME();` together with `SELECT CURRENT_ACCOUNT_NAME();` to return the organization-qualified identifier.
 For full details on the available identifier formats, see the [Snowflake account identifier documentation](https://docs.snowflake.com/en/user-guide/admin-account-identifier).
3. Select your authentication method:
* **Key Pair (Recommended)**\
Snowflake is phasing out single-factor password sign-ins. Key-pair authentication is more secure and future-proof. See their [security MFA rollout](https://docs.snowflake.com/en/user-guide/security-mfa-rollout) and [key pair auth](https://docs.snowflake.com/en/user-guide/key-pair-auth) documentation.
Add the public key to your Snowflake user:
```sql theme={"dark"}
ALTER USER "" SET RSA_PUBLIC_KEY=''
```
Replace *username* and *public\_key* with your actual values.
In the **Private Key** field, upload your private key file (.p8 format).
Optionally, enter the passphrase if your key pair includes one.
For full details on the available identifier formats, see the [Snowflake account identifier documentation](https://docs.snowflake.com/en/user-guide/admin-account-identifier).
3. Select your authentication method:
* **Key Pair (Recommended)**\
Snowflake is phasing out single-factor password sign-ins. Key-pair authentication is more secure and future-proof. See their [security MFA rollout](https://docs.snowflake.com/en/user-guide/security-mfa-rollout) and [key pair auth](https://docs.snowflake.com/en/user-guide/key-pair-auth) documentation.
Add the public key to your Snowflake user:
```sql theme={"dark"}
ALTER USER "" SET RSA_PUBLIC_KEY=''
```
Replace *username* and *public\_key* with your actual values.
In the **Private Key** field, upload your private key file (.p8 format).
Optionally, enter the passphrase if your key pair includes one.
 * **Username & Password**\
Enter your Snowflake username and password.
* **Username & Password**\
Enter your Snowflake username and password.
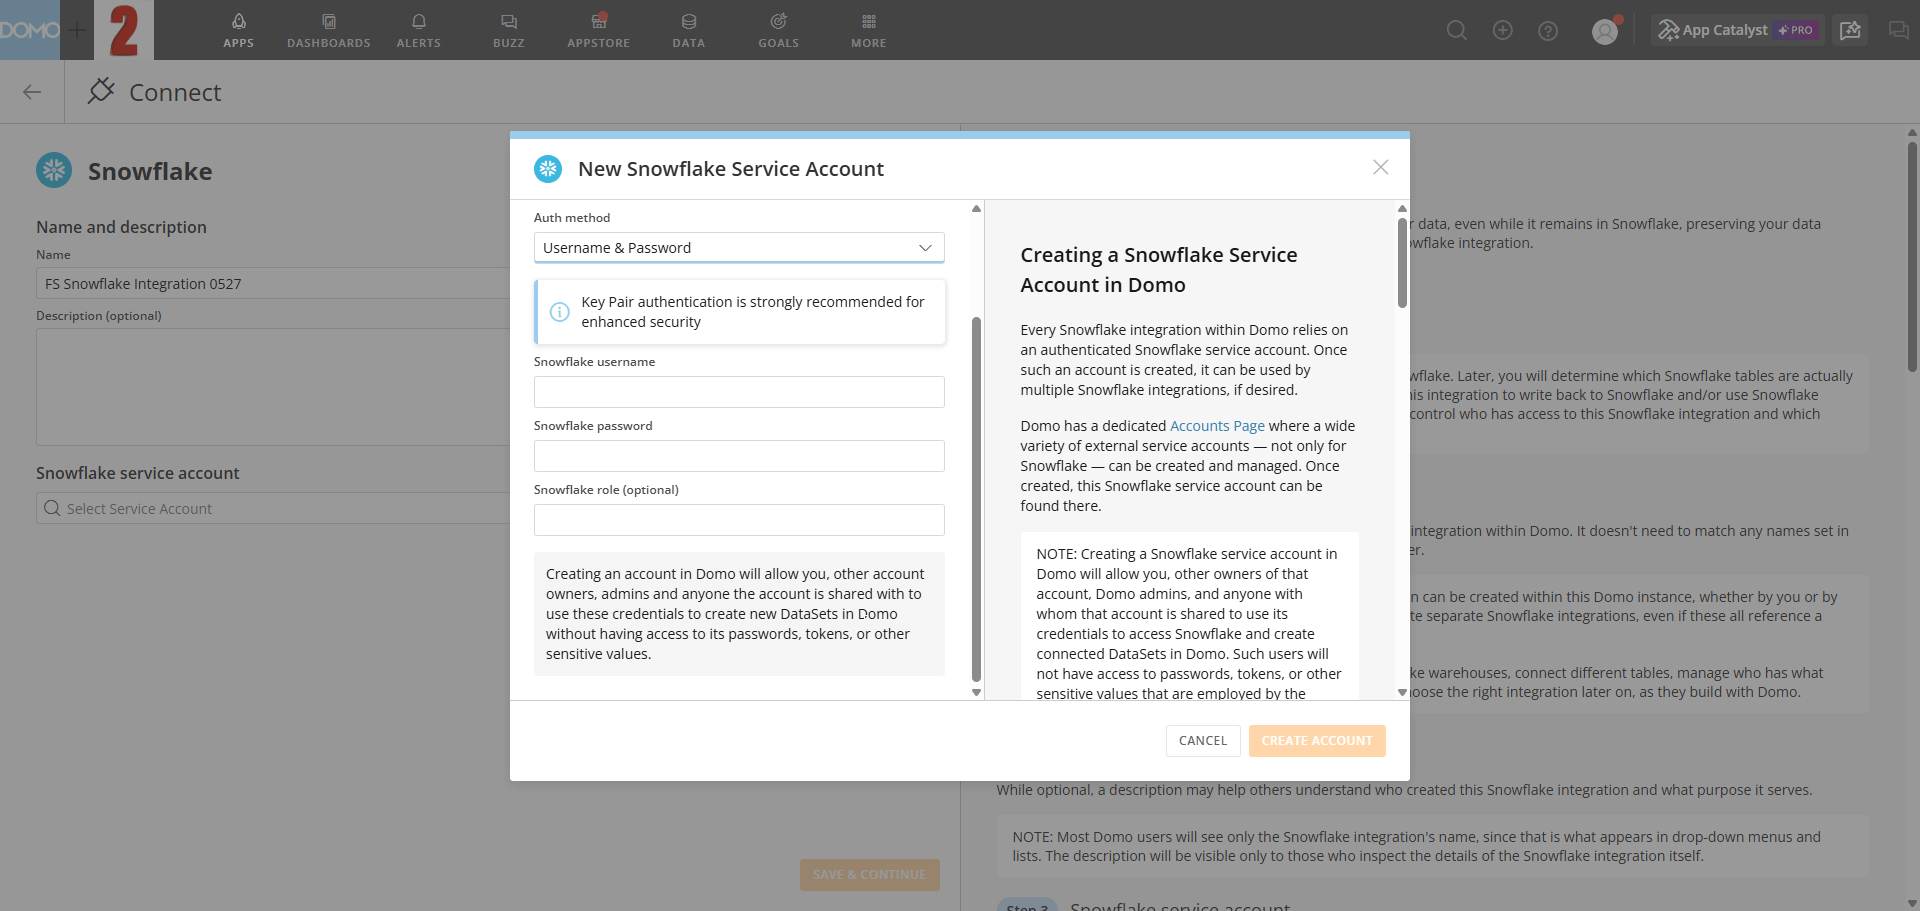 4. (Optional) In the **Default Role** field, enter the Snowflake role to assign to this service account.\
If left blank, Snowflake applies the default role configured for the user in Snowflake.
## Configure Write & Native Transform
To write data from Domo connectors to Snowflake, or run Magic ETL DataFlows directly in Snowflake, enable one or both of the following capabilities:
* **Write to Snowflake from connectors —** Allows Domo to create and update tables in Snowflake using data loaded through connectors.
* **Execute Magic ETL transformations natively —** Runs Magic ETL DataFlows directly in Snowflake rather than in Domo's execution environment.
Both capabilities are optional. Many integrations are read-only. Even when write or transform is enabled, access must be explicitly granted to individuals or groups. Basic access does not automatically include write or transform privileges.
You can manage access levels on the accounts page by selecting **Account sharing** next to the relevant Snowflake service account.
### Prerequisites
A Snowflake administrator (or someone with equivalent privileges) must be available to execute SQL queries that create a dedicated database and grant access to the service account. For the minimum permissions required and the SQL to configure them, see [Snowflake Minimum Permissions for Domo](/docs/s/article/Snowflake-Minimum-Permissions-for-Domo).
### Setup
From your integration's settings page, navigate to **Write & transform** and select **Set up write & transform**.
4. (Optional) In the **Default Role** field, enter the Snowflake role to assign to this service account.\
If left blank, Snowflake applies the default role configured for the user in Snowflake.
## Configure Write & Native Transform
To write data from Domo connectors to Snowflake, or run Magic ETL DataFlows directly in Snowflake, enable one or both of the following capabilities:
* **Write to Snowflake from connectors —** Allows Domo to create and update tables in Snowflake using data loaded through connectors.
* **Execute Magic ETL transformations natively —** Runs Magic ETL DataFlows directly in Snowflake rather than in Domo's execution environment.
Both capabilities are optional. Many integrations are read-only. Even when write or transform is enabled, access must be explicitly granted to individuals or groups. Basic access does not automatically include write or transform privileges.
You can manage access levels on the accounts page by selecting **Account sharing** next to the relevant Snowflake service account.
### Prerequisites
A Snowflake administrator (or someone with equivalent privileges) must be available to execute SQL queries that create a dedicated database and grant access to the service account. For the minimum permissions required and the SQL to configure them, see [Snowflake Minimum Permissions for Domo](/docs/s/article/Snowflake-Minimum-Permissions-for-Domo).
### Setup
From your integration's settings page, navigate to **Write & transform** and select **Set up write & transform**.
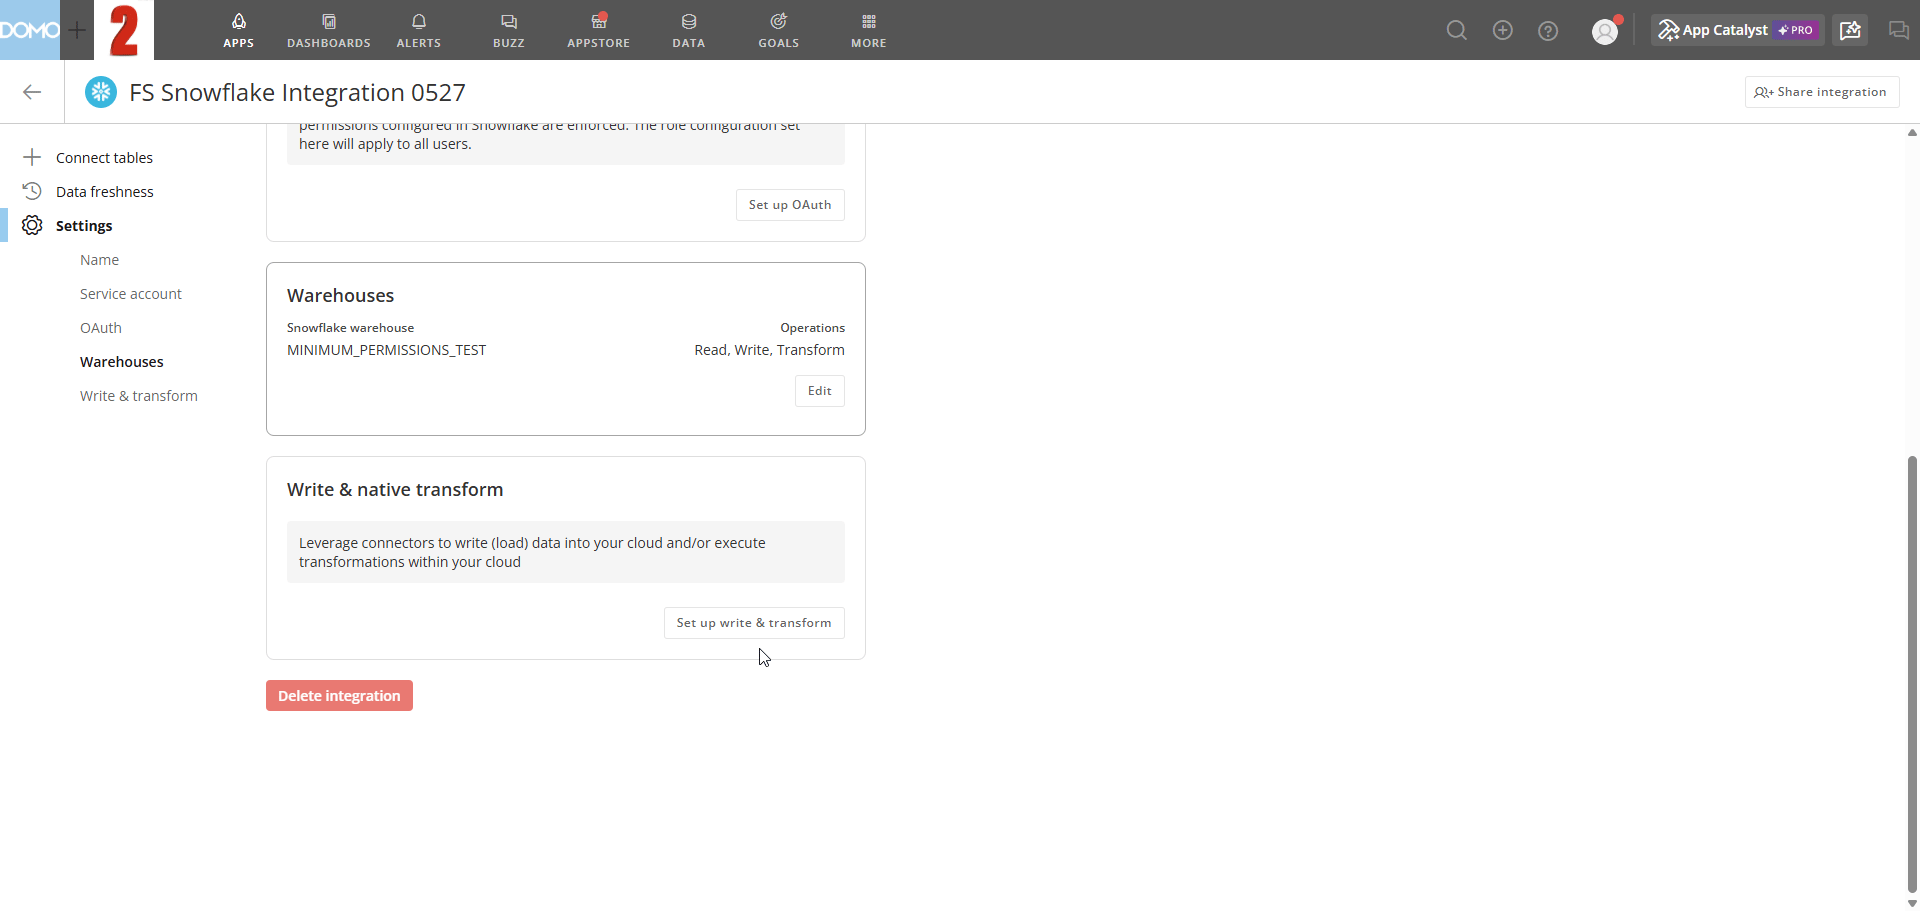 The Configure Write & Native Transform dialog appears.
1. Toggle on the capabilities you want to enable:
* **Write to Snowflake from connectors**
* **Execute Magic ETL transformations natively**
2. Select the default **Database** and **Schema** where Domo writes data.\
If the schema doesn't exist, Domo creates it when selected in Magic ETL.
**Tip:** You can select other databases and schemas in Magic ETL, but the service account must have the necessary grants.
The Configure Write & Native Transform dialog appears.
1. Toggle on the capabilities you want to enable:
* **Write to Snowflake from connectors**
* **Execute Magic ETL transformations natively**
2. Select the default **Database** and **Schema** where Domo writes data.\
If the schema doesn't exist, Domo creates it when selected in Magic ETL.
**Tip:** You can select other databases and schemas in Magic ETL, but the service account must have the necessary grants.
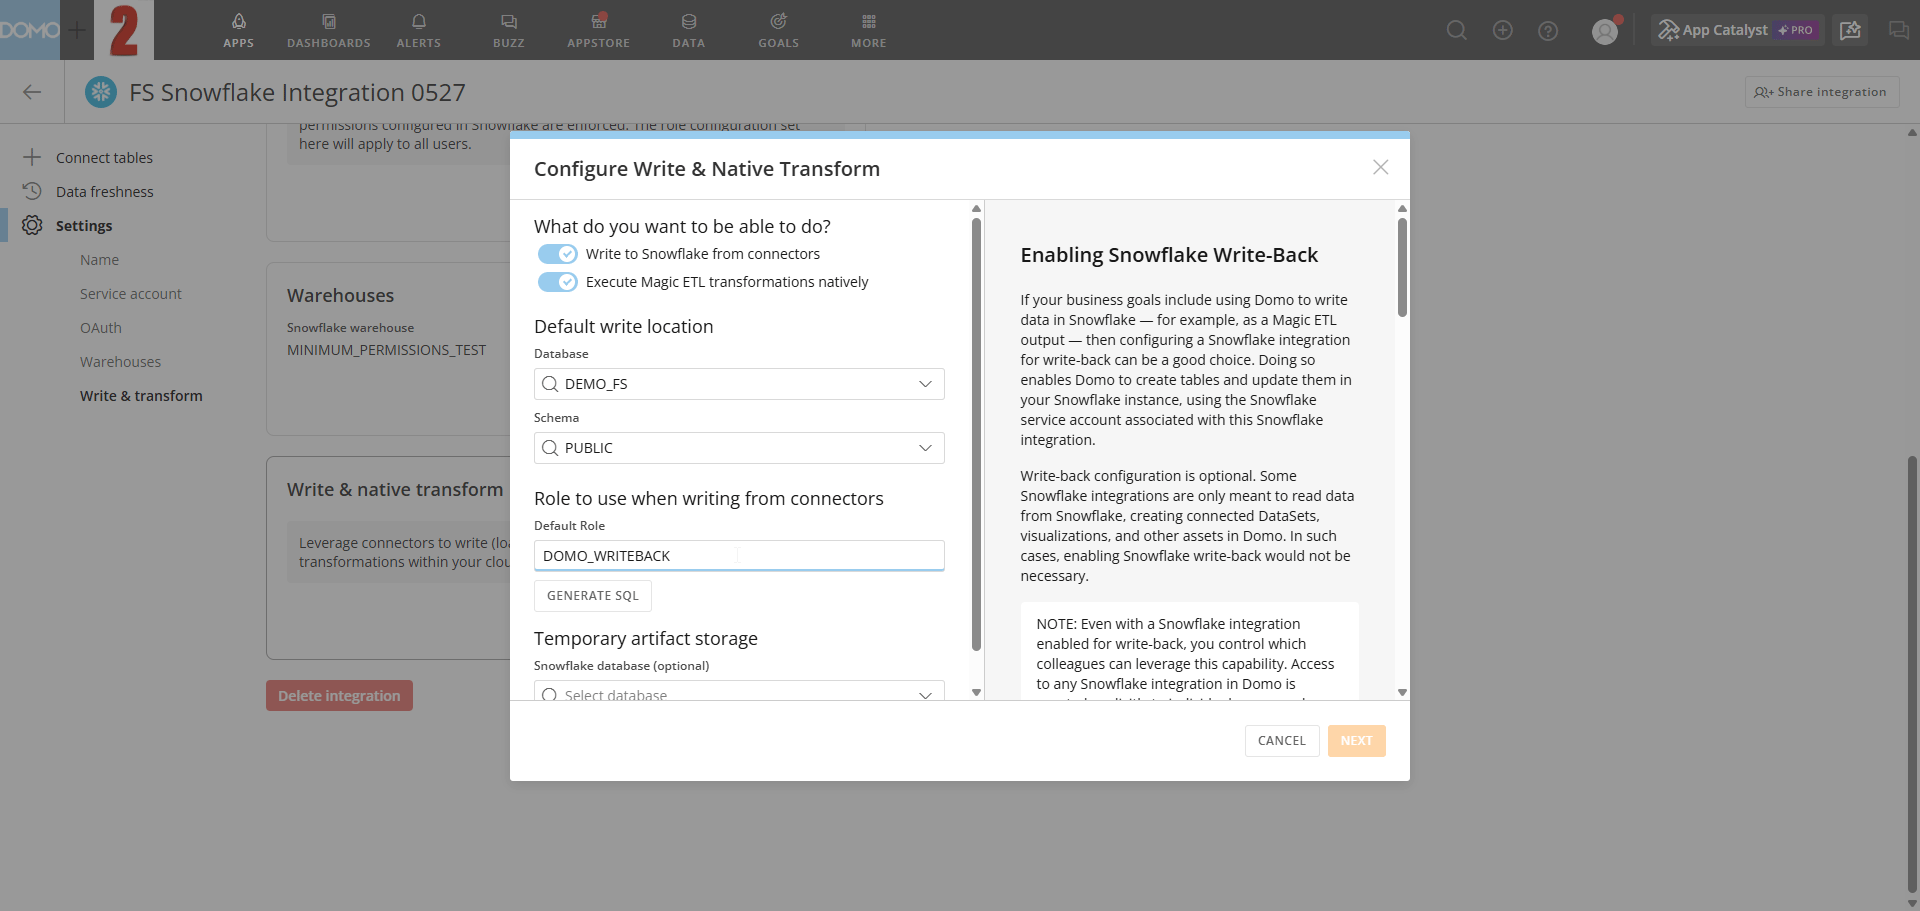 3. In the **Default Role** field, enter the Snowflake role Domo uses for write and transform operations.\
Domo uses this role to generate the SQL in the next step.
3. In the **Default Role** field, enter the Snowflake role Domo uses for write and transform operations.\
Domo uses this role to generate the SQL in the next step.
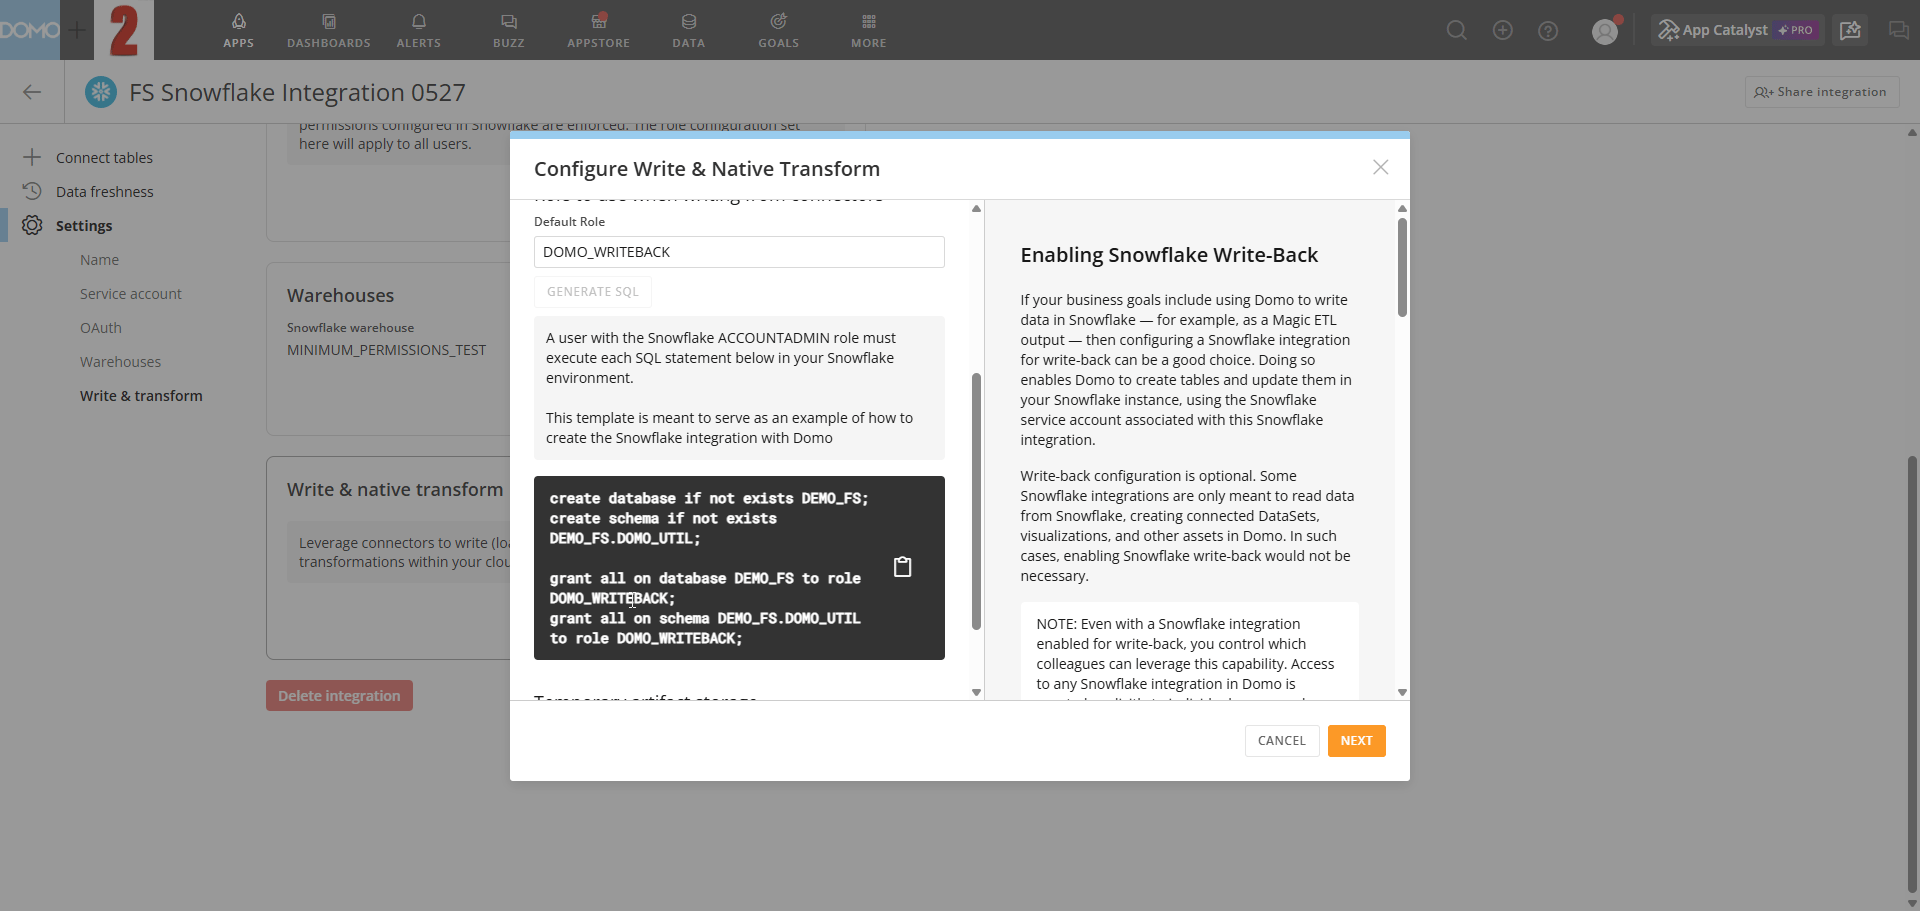 4. Have a Snowflake user with the `ACCOUNTADMIN` role run the generated SQL to:
* Create the write-back database
* Grant access to the service account
* Create a DOMO\_UTIL schema for Domo-managed resources
**Note:** You can configure access to multiple databases if needed, either now or later.
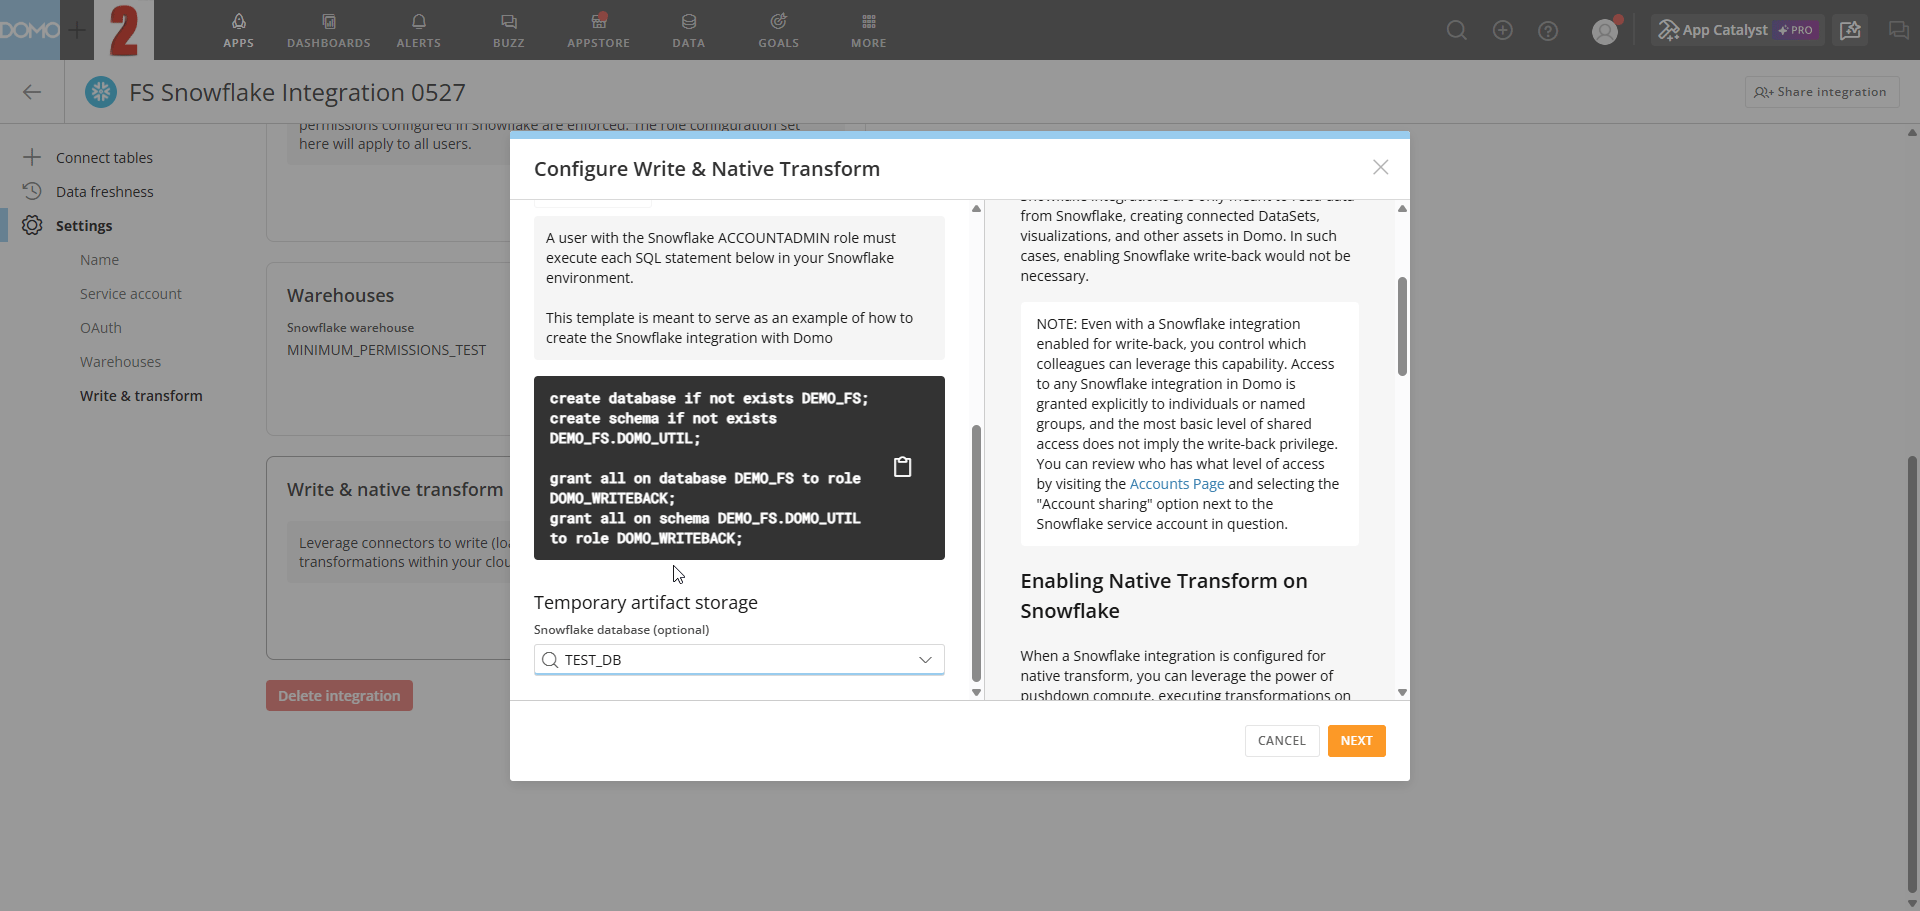
5. In the **Temporary artifact storage** field, specify the database Domo uses for temporary storage during native transform execution.\
This can be the same database selected in step 2, or a separate database if you prefer to isolate temporary artifacts.
4. Have a Snowflake user with the `ACCOUNTADMIN` role run the generated SQL to:
* Create the write-back database
* Grant access to the service account
* Create a DOMO\_UTIL schema for Domo-managed resources
**Note:** You can configure access to multiple databases if needed, either now or later.
5. In the **Temporary artifact storage** field, specify the database Domo uses for temporary storage during native transform execution.\
This can be the same database selected in step 2, or a separate database if you prefer to isolate temporary artifacts.
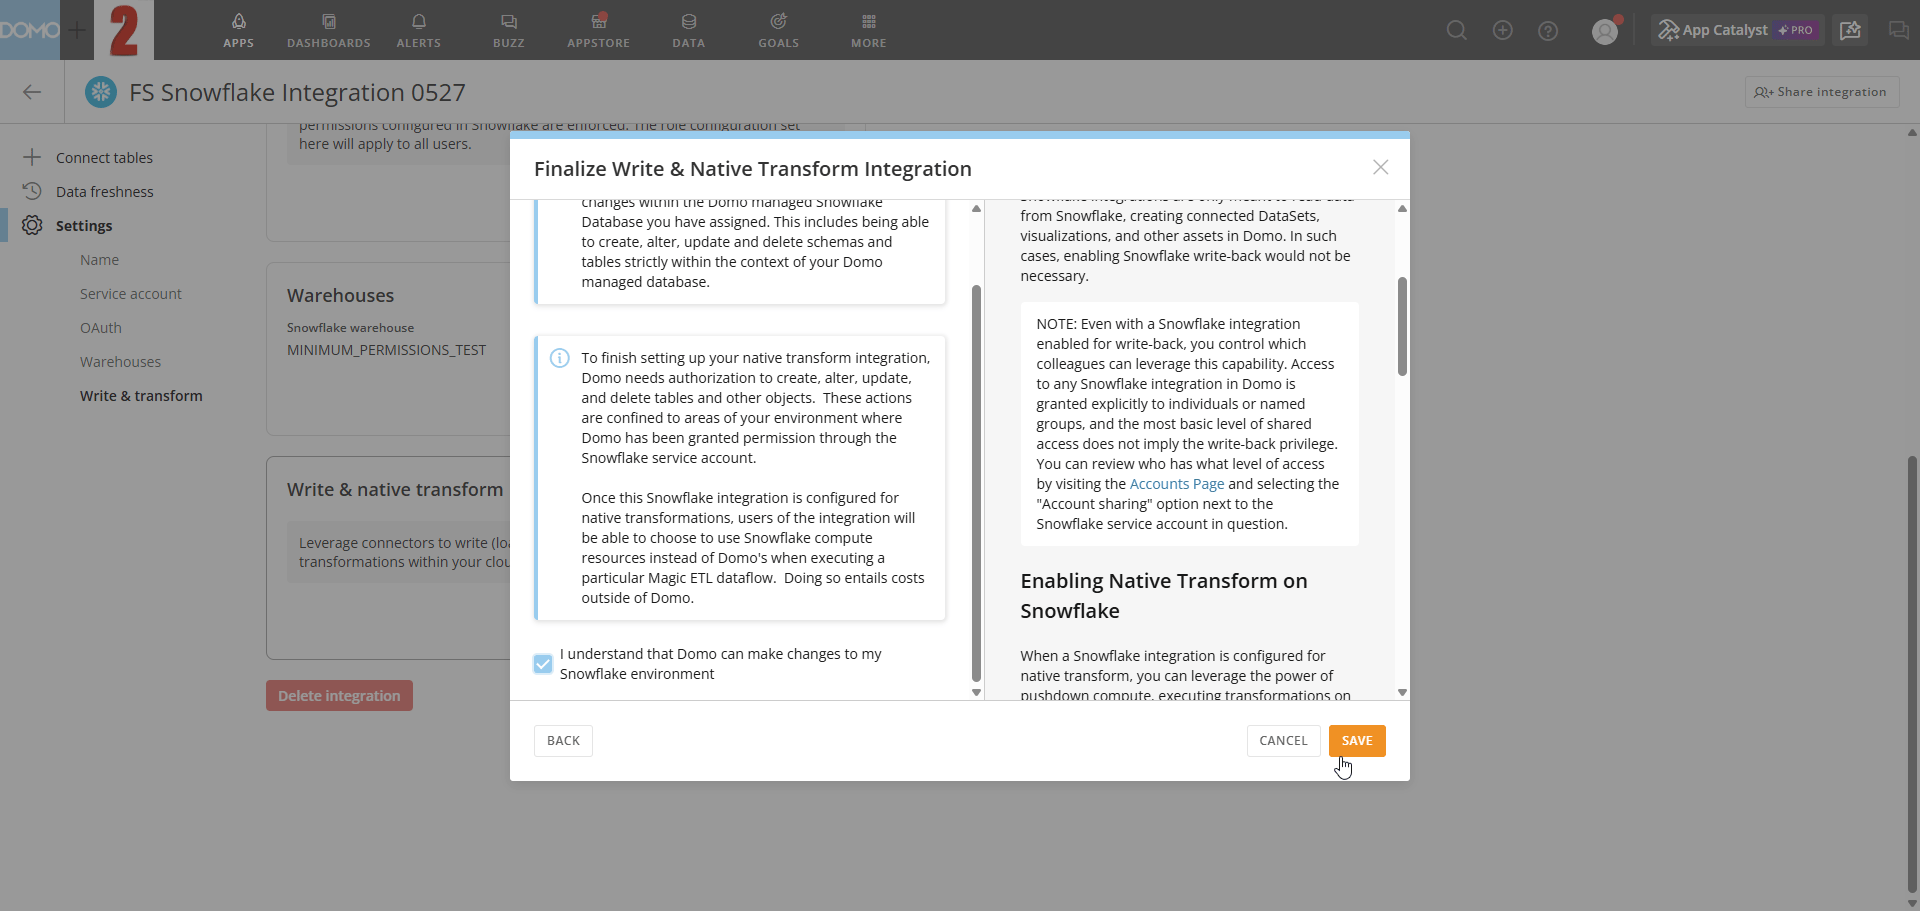
 6. On the **Finalize Write & Native Transform Integration** page, review the permissions Domo requires.\
Select **I understand that Domo can make changes to my Snowflake environment**, then select **Done**.
6. On the **Finalize Write & Native Transform Integration** page, review the permissions Domo requires.\
Select **I understand that Domo can make changes to my Snowflake environment**, then select **Done**.
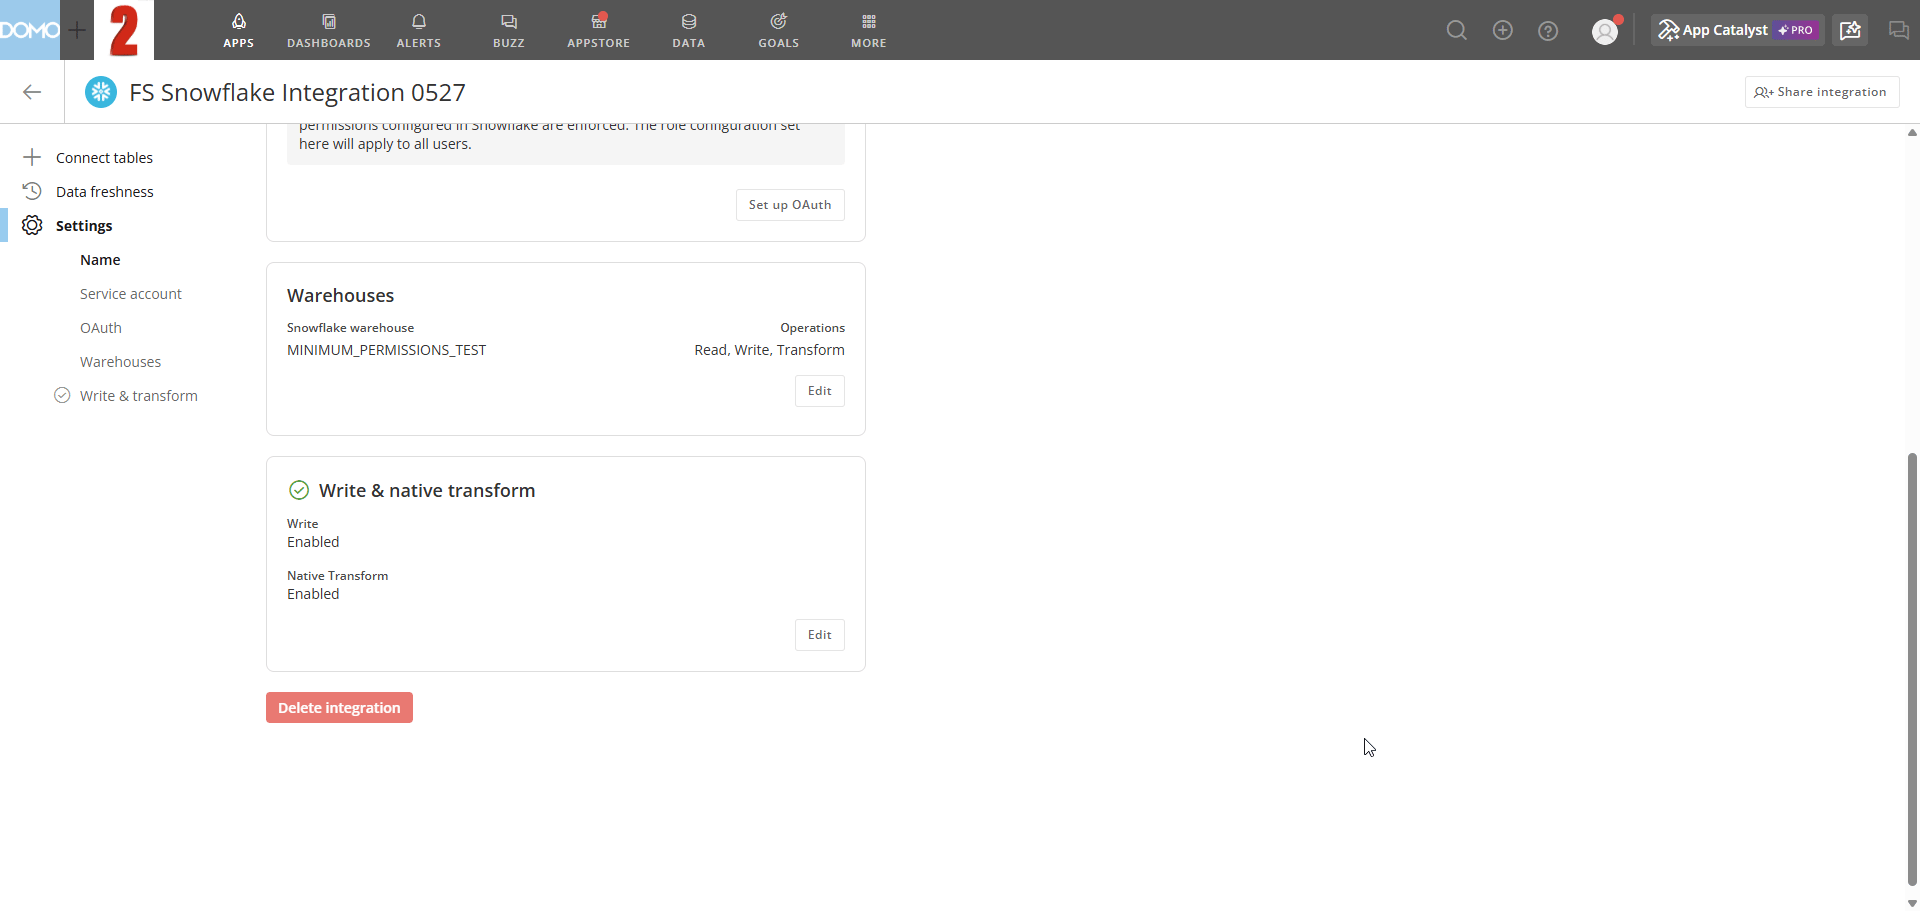
 After setup is complete, the integration's settings page shows **Write** and **Native Transform** as enabled.
 ## Configure OAuth
OAuth allows Domo to query Snowflake data in the context of individual users rather than a shared service account, and is optional. When enabled, users accessing cards or previewing DataSets connected via OAuth are prompted to authenticate with their Snowflake credentials.
**Note:** OAuth applies only to reading data from Snowflake. Other operations—including Magic ETL, write-back, and native transform—continue to use the Snowflake service account regardless of OAuth configuration.
### Prerequisites
A Snowflake administrator (or someone with equivalent privileges) must first configure a security integration in Snowflake.
### Configure OAuth in Snowflake
1. In Snowflake, modify and run the following query to define the security integration.\
Replace *name\_goes\_here* with a meaningful name—this name is used in subsequent queries.
```sql theme={"dark"}
create or replace security integration
type = oauth
enabled = true
oauth_client = custom
oauth_client_type = 'CONFIDENTIAL'
oauth_redirect_uri = 'https://oauth.domo.com/api/data/v1/oauth/providers/snowflake-oauth/exchange'
oauth_issue_refresh_tokens = true
oauth_refresh_token_validity = 86400;
```
2. Update `oauth_refresh_token_validity` to set how long refresh tokens remain valid:
* 1 day = 86400 seconds
* Max = 7776000 seconds (90 days)
* Min = 3600 seconds (1 hour)
3. Run the following query to verify the integration:
```sql theme={"dark"}
desc security integration ;
```
4. Run the following query to retrieve the client ID and secret:
```sql theme={"dark"}
select system$show_oauth_client_secrets('');
```
5. Copy the client ID and secret for use in Domo.
### Configure OAuth in Domo
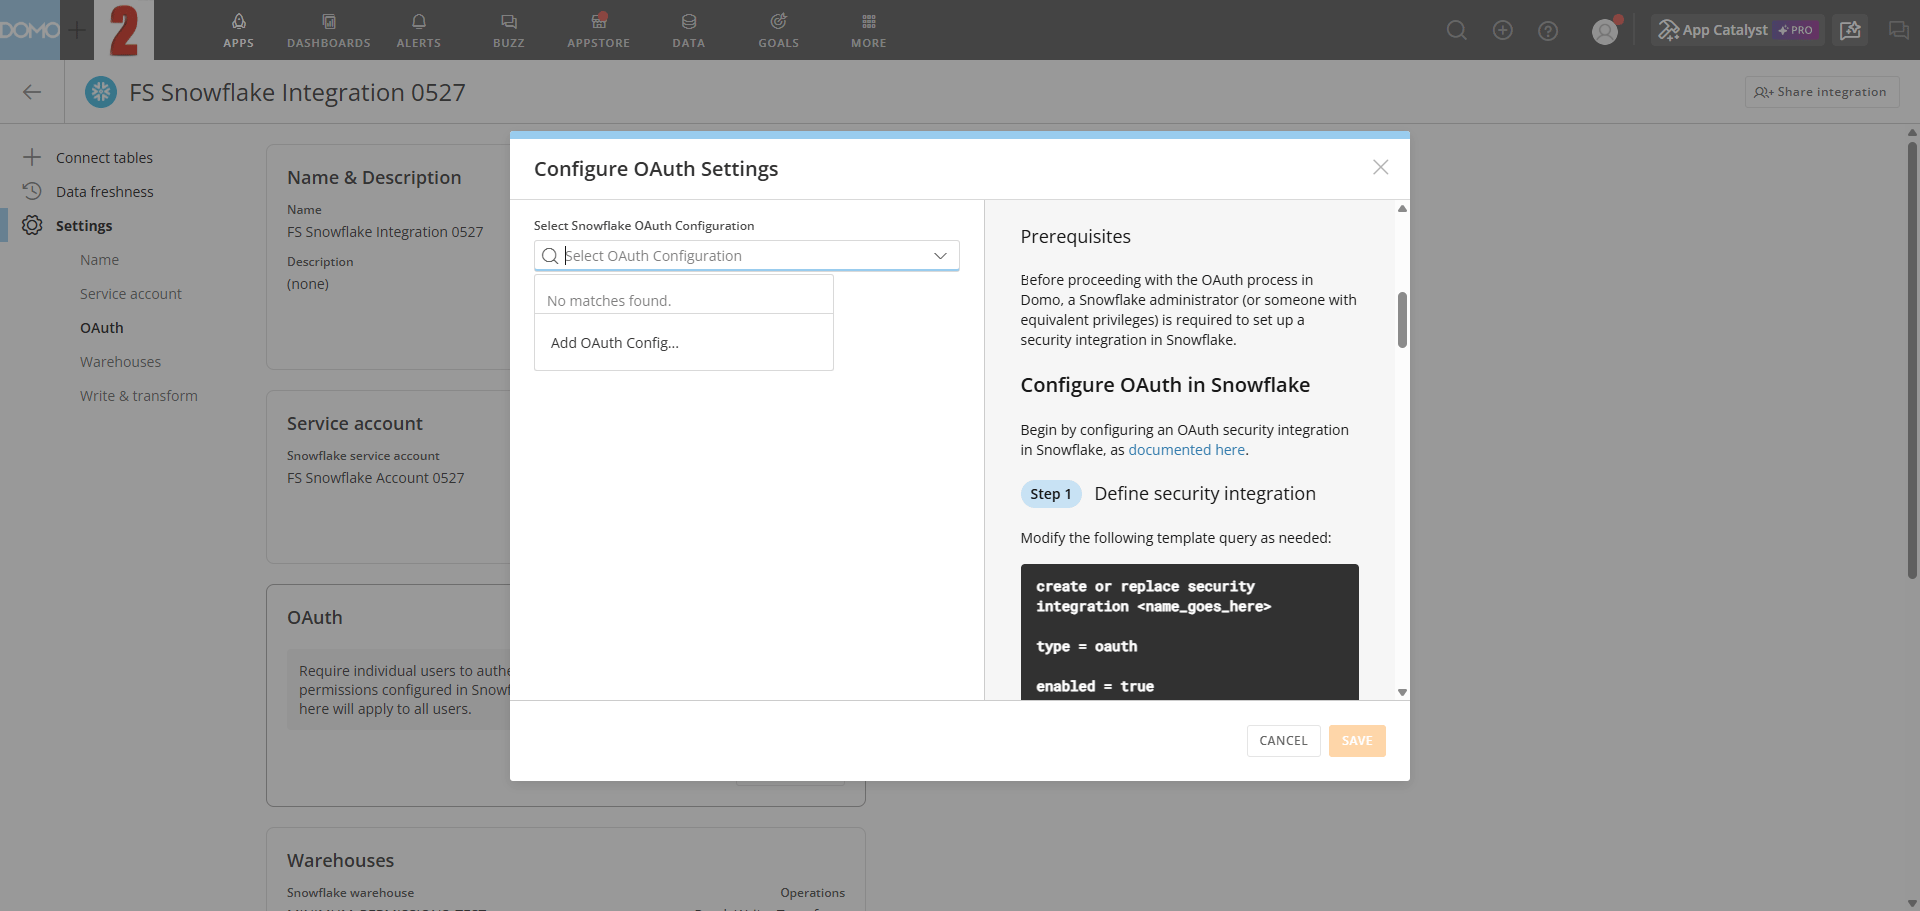
From your integration's settings page, navigate to **OAuth** and select **Set up OAuth**. Select **Add OAuth Config...** to create a new OAuth configuration.
## Configure OAuth
OAuth allows Domo to query Snowflake data in the context of individual users rather than a shared service account, and is optional. When enabled, users accessing cards or previewing DataSets connected via OAuth are prompted to authenticate with their Snowflake credentials.
**Note:** OAuth applies only to reading data from Snowflake. Other operations—including Magic ETL, write-back, and native transform—continue to use the Snowflake service account regardless of OAuth configuration.
### Prerequisites
A Snowflake administrator (or someone with equivalent privileges) must first configure a security integration in Snowflake.
### Configure OAuth in Snowflake
1. In Snowflake, modify and run the following query to define the security integration.\
Replace *name\_goes\_here* with a meaningful name—this name is used in subsequent queries.
```sql theme={"dark"}
create or replace security integration
type = oauth
enabled = true
oauth_client = custom
oauth_client_type = 'CONFIDENTIAL'
oauth_redirect_uri = 'https://oauth.domo.com/api/data/v1/oauth/providers/snowflake-oauth/exchange'
oauth_issue_refresh_tokens = true
oauth_refresh_token_validity = 86400;
```
2. Update `oauth_refresh_token_validity` to set how long refresh tokens remain valid:
* 1 day = 86400 seconds
* Max = 7776000 seconds (90 days)
* Min = 3600 seconds (1 hour)
3. Run the following query to verify the integration:
```sql theme={"dark"}
desc security integration ;
```
4. Run the following query to retrieve the client ID and secret:
```sql theme={"dark"}
select system$show_oauth_client_secrets('');
```
5. Copy the client ID and secret for use in Domo.
### Configure OAuth in Domo
From your integration's settings page, navigate to **OAuth** and select **Set up OAuth**. Select **Add OAuth Config...** to create a new OAuth configuration.
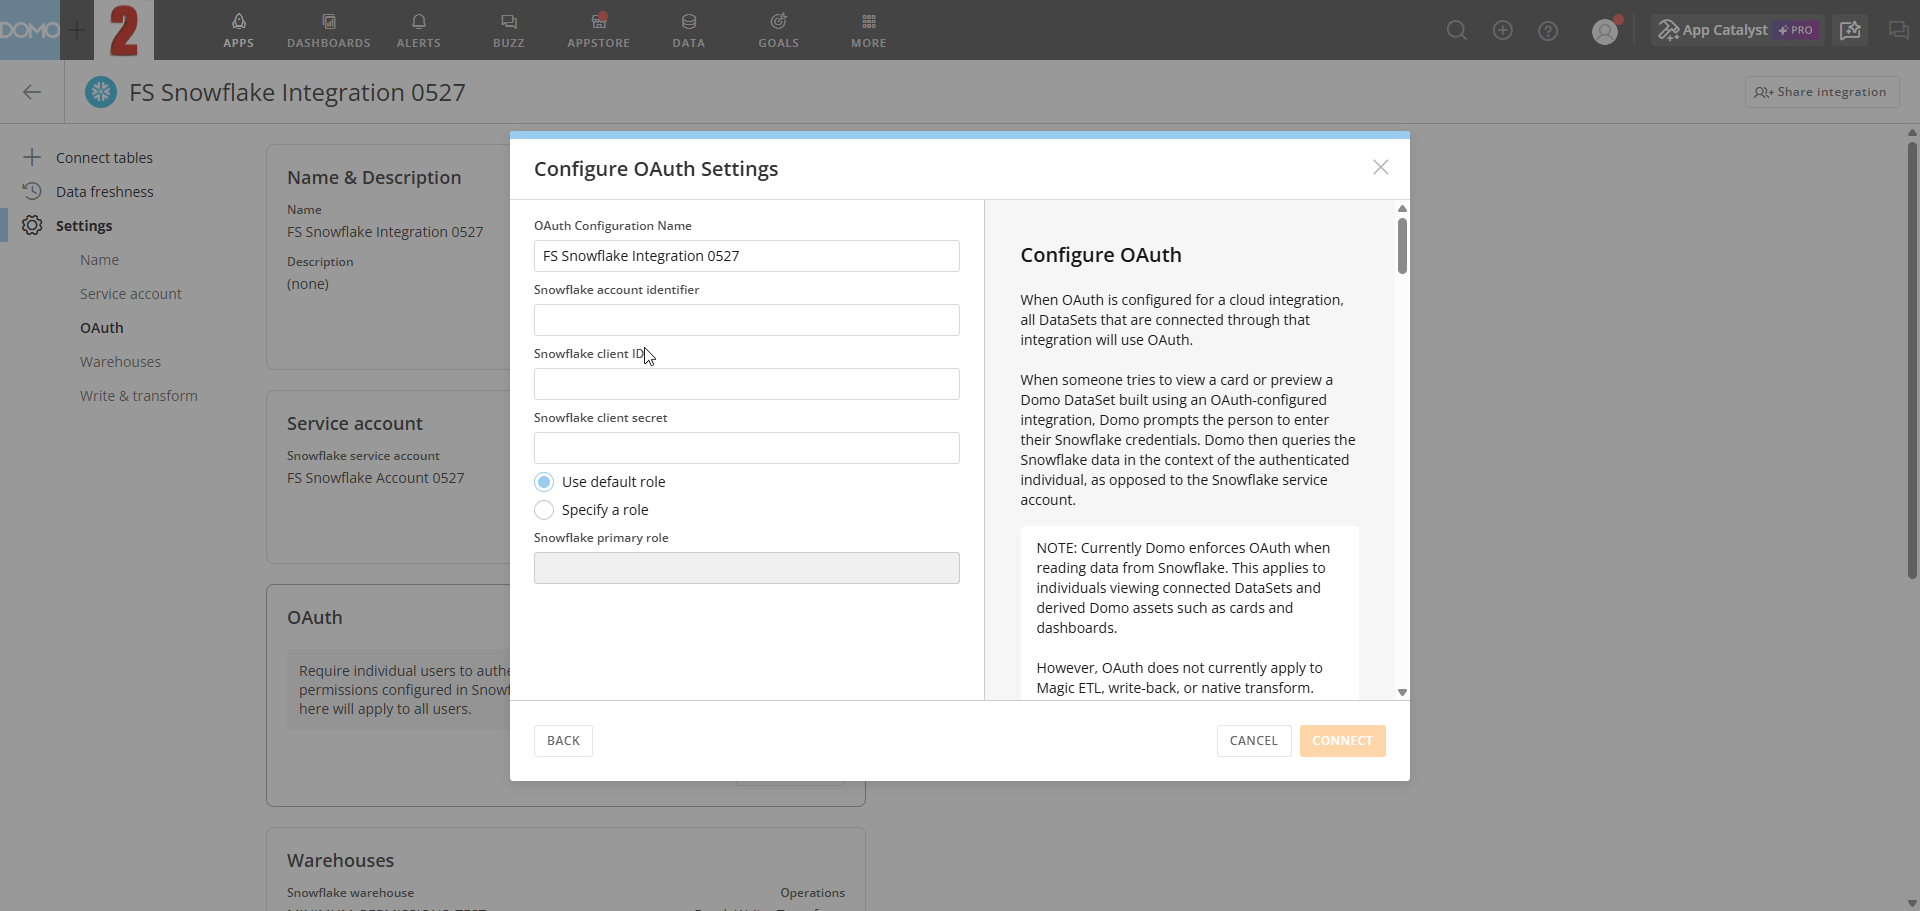
 1. In the **Name** field, enter a name to identify this OAuth configuration within Domo.
2. In the **Account Identifier** field, enter your Snowflake account identifier.\
You can find it under **Account** > **View Account Details** in Snowflake.
3. In the **Client ID** and **Client Secret** fields, paste the values retrieved from Snowflake.
4. In the **Primary Role** field, select the Snowflake role to apply to all Domo users.
1. In the **Name** field, enter a name to identify this OAuth configuration within Domo.
2. In the **Account Identifier** field, enter your Snowflake account identifier.\
You can find it under **Account** > **View Account Details** in Snowflake.
3. In the **Client ID** and **Client Secret** fields, paste the values retrieved from Snowflake.
4. In the **Primary Role** field, select the Snowflake role to apply to all Domo users.
 5. Select **Connect**, then sign in using your Snowflake credentials.
6. Review the requested permissions and select **Allow** to complete the setup.
## FAQ
Domo performs different activities within the Snowflake account, such as data loading, querying, and data transformation. For most use cases, a small-sized multi-cluster warehouse (multi-purpose for load, query, and transformation) set to scale up automatically is recommended. You can choose the max cluster size to put an upper bound on scaling and limit the cost envelope.
When you are ready for production workloads and are considering whether to use existing functional warehouses or set up new warehouses for the Domo integration, see the [Domo blog post on optimizing a Snowflake Cloud Integration](https://www.domo.com/blog/how-to-optimize-data-warehouse-strategy-with-cloud-amplifier).
With your data in Snowflake, Domo supports two different mechanisms for transforming data:
1. **DataSet Views —** DataSet Views provide the Views Explorer tool to create data transformations on your Snowflake DataSets. You can perform operations such as filtering, grouping, aggregation, `JOIN`s, `UNION`s, and creating calculated columns from a graphic user interface. DataSet Views are created as virtual DataSets, with queries sent back to the parent DataSets.
**Note:** Creating a DataSet View in Domo does not create a View (normal or materialized) in Snowflake. The View definition is stored in Domo, and the resulting query is sent to Snowflake table(s) when needed.
2. **Magic ETL DataFlows —** Magic ETL is supported with Domo running on a Snowflake Cloud Integration. Using Magic ETL with Snowflake data results in data being exported from Snowflake to Magic ETL in a transient state, processed, and written back to Snowflake. Domo only operates on this data in a transient fashion and does not store DataFlow outputs in Domo. (They are sent to the Snowflake warehouse.)
**Note:** Data is cached in the Magic ETL execution environment for seven days, or the two most recent data versions from that Magic ETL execution.
When you connect Domo to your Snowflake account, Domo operates over two classes of databases and underlying tables. Tables you create and update directly through independent pipelines or ingestion mechanisms can be explored and registered in Domo, accessible in a read-only fashion. Domo can read and directly query these customer-managed databases.
Domo recommends creating a new database for read/write access. Domo uses this Domo-managed database to write data that comes in through the Domo ingestion pipeline, using the thousands of connectors available to bring data into Snowflake. Domo also uses this Domo-managed database to create outputs of data transformations (DataFlow outputs).
Permissions originating in Snowflake are not programmatically passed into Domo. However, you can use Domo's native permission model and Personalized Data Permissions (PDP) for data security to manage data access to underlying assets in Snowflake.
* **Leaving data in Snowflake —** The key difference is that all Snowflake connectors copy data from Snowflake into Domo, while a Snowflake Cloud Integration leaves the data in Snowflake.
* **Bulk create —** A Snowflake Cloud Integration lets you look up and bulk select multiple tables to immediately create multiple unique DataSets. To do this with connectors, you would have to configure each DataSet individually with a connector.
This is the standard behavior for Snowflake views. Snowflake endpoints do not provide the number of rows unless the data is explicitly queried.
Make sure that you own the user or have the `SECURITY/ADMIN` Snowflake role.
Follow the instructions in the [Snowflake key pair authentication documentation](https://docs.snowflake.com/en/user-guide/key-pair-auth). Make sure that the passphrase matches the one you used to create your key pair and that you have executed the ALTER USER statement successfully.
## Troubleshoot
If you experience a problem with your Snowflake Cloud Integration, the following information may help resolve the issue. You can also submit a request to [Domo Support](https://domo-support.domo.com/).
### Missing Tables
If you cannot find tables that your account has access to, ensure the table is materialized. Transient or Temporary tables on the Snowflake side cannot be used to create DataSets through a Snowflake Cloud Integration.
### Setup Problems
If you have problems setting up your Snowflake Cloud Integration, follow the steps below:
#### Check Snowflake Service Account
1. Log in to Snowflake with the service account credentials.
2. Ensure you can view the default Snowflake Database and query the tables you expect to import.
#### Assign Correct Role
Ensure that a Snowflake administrator with the `ACCOUNTADMIN` role executes the SQL provided by Domo in Snowflake.
#### Use the Correct URL
Make sure that the Snowflake connection URL in Domo matches the Snowflake login URL.
You can find the URL on the Snowflake login page. The URL is in this format: *instancename*.*region*.snowflakecomputing.com.
## Next Steps
Now that you're integrated, learn how to use [Magic ETL on Snowflake](/docs/s/article/000005455) or how to [Create a Magic ETL DataFlow](/docs/s/article/360055259234).
5. Select **Connect**, then sign in using your Snowflake credentials.
6. Review the requested permissions and select **Allow** to complete the setup.
## FAQ
Domo performs different activities within the Snowflake account, such as data loading, querying, and data transformation. For most use cases, a small-sized multi-cluster warehouse (multi-purpose for load, query, and transformation) set to scale up automatically is recommended. You can choose the max cluster size to put an upper bound on scaling and limit the cost envelope.
When you are ready for production workloads and are considering whether to use existing functional warehouses or set up new warehouses for the Domo integration, see the [Domo blog post on optimizing a Snowflake Cloud Integration](https://www.domo.com/blog/how-to-optimize-data-warehouse-strategy-with-cloud-amplifier).
With your data in Snowflake, Domo supports two different mechanisms for transforming data:
1. **DataSet Views —** DataSet Views provide the Views Explorer tool to create data transformations on your Snowflake DataSets. You can perform operations such as filtering, grouping, aggregation, `JOIN`s, `UNION`s, and creating calculated columns from a graphic user interface. DataSet Views are created as virtual DataSets, with queries sent back to the parent DataSets.
**Note:** Creating a DataSet View in Domo does not create a View (normal or materialized) in Snowflake. The View definition is stored in Domo, and the resulting query is sent to Snowflake table(s) when needed.
2. **Magic ETL DataFlows —** Magic ETL is supported with Domo running on a Snowflake Cloud Integration. Using Magic ETL with Snowflake data results in data being exported from Snowflake to Magic ETL in a transient state, processed, and written back to Snowflake. Domo only operates on this data in a transient fashion and does not store DataFlow outputs in Domo. (They are sent to the Snowflake warehouse.)
**Note:** Data is cached in the Magic ETL execution environment for seven days, or the two most recent data versions from that Magic ETL execution.
When you connect Domo to your Snowflake account, Domo operates over two classes of databases and underlying tables. Tables you create and update directly through independent pipelines or ingestion mechanisms can be explored and registered in Domo, accessible in a read-only fashion. Domo can read and directly query these customer-managed databases.
Domo recommends creating a new database for read/write access. Domo uses this Domo-managed database to write data that comes in through the Domo ingestion pipeline, using the thousands of connectors available to bring data into Snowflake. Domo also uses this Domo-managed database to create outputs of data transformations (DataFlow outputs).
Permissions originating in Snowflake are not programmatically passed into Domo. However, you can use Domo's native permission model and Personalized Data Permissions (PDP) for data security to manage data access to underlying assets in Snowflake.
* **Leaving data in Snowflake —** The key difference is that all Snowflake connectors copy data from Snowflake into Domo, while a Snowflake Cloud Integration leaves the data in Snowflake.
* **Bulk create —** A Snowflake Cloud Integration lets you look up and bulk select multiple tables to immediately create multiple unique DataSets. To do this with connectors, you would have to configure each DataSet individually with a connector.
This is the standard behavior for Snowflake views. Snowflake endpoints do not provide the number of rows unless the data is explicitly queried.
Make sure that you own the user or have the `SECURITY/ADMIN` Snowflake role.
Follow the instructions in the [Snowflake key pair authentication documentation](https://docs.snowflake.com/en/user-guide/key-pair-auth). Make sure that the passphrase matches the one you used to create your key pair and that you have executed the ALTER USER statement successfully.
## Troubleshoot
If you experience a problem with your Snowflake Cloud Integration, the following information may help resolve the issue. You can also submit a request to [Domo Support](https://domo-support.domo.com/).
### Missing Tables
If you cannot find tables that your account has access to, ensure the table is materialized. Transient or Temporary tables on the Snowflake side cannot be used to create DataSets through a Snowflake Cloud Integration.
### Setup Problems
If you have problems setting up your Snowflake Cloud Integration, follow the steps below:
#### Check Snowflake Service Account
1. Log in to Snowflake with the service account credentials.
2. Ensure you can view the default Snowflake Database and query the tables you expect to import.
#### Assign Correct Role
Ensure that a Snowflake administrator with the `ACCOUNTADMIN` role executes the SQL provided by Domo in Snowflake.
#### Use the Correct URL
Make sure that the Snowflake connection URL in Domo matches the Snowflake login URL.
You can find the URL on the Snowflake login page. The URL is in this format: *instancename*.*region*.snowflakecomputing.com.
## Next Steps
Now that you're integrated, learn how to use [Magic ETL on Snowflake](/docs/s/article/000005455) or how to [Create a Magic ETL DataFlow](/docs/s/article/360055259234).