> ## Documentation Index
> Fetch the complete documentation index at: https://www.domo.com/docs/llms.txt
> Use this file to discover all available pages before exploring further.
# Jupyter Workspaces | User Guide
## Intro
Jupyter Workspaces in Domo is a web-based interactive development environment for Jupyter notebooks, code, and data. Workspaces are tightly integrated with Domo to allow users to easily explore their Domo DataSets, leverage instantaneous code execution to develop pipelines for data science and machine learning, document their processes, create custom visualizations, and write transformed data back into Domo.
Jupyter Workspaces use the JupyterLab interface. For more information about JupyterLab, see the [JupyterLab Documentation](http://jupyterlab.readthedocs.io/en/latest/)  .
Jupyter Workspaces is a premium Domo feature. Contact your Domo account team to get access. For help, reach out to [support@domo.com](mailto:support@domo.com)
***
This article provides information on integrating Jupyter Workspaces with Domo in the following topics:
***
## Required Grants
To access Jupyter, you need one of the following two grants enabled: Create Jupyter Workspace or Manage Jupyter Workspace. You can add these grants to a custom Domo role.
* \*\*Create Jupyter Workspace —\*\*Allows a user to create, edit, and delete Jupyter Workspaces to which they have access.
* **Manage Jupyter Workspace**(Jupyter Admin) **—** Allows a user to view, edit, and delete any Jupyter Workspaces in the instance. This grant is needed to enable workspace sharing for other users.
To use the [File Share](#file-sharing) feature of Jupyter Workspaces, you need one of the following two grants enabled: Create Fileshare Directories or Manage Fileshare Directories. You can add these grants to a custom Domo role.
* \*\*Create Fileshare Directories —\*\*Allows a user to create, edit, and delete File Share directories to which they have access.
* \*\*Manage Fileshare Directories —\*\*Allows you to view, edit, and delete any File Share directory in this instance.
## Enable Jupyter
To start using Jupyter, a Jupyter Admin must enable the feature for your instance. Admins can follow the steps below:
1. In the navigation header, go to **More** > **Admin**.
2. In the **Features** menu, select**Jupyter**.
3. Activate the feature by adjusting the toggle next to **Jupyter Account Inactive.**
Your account is activated.
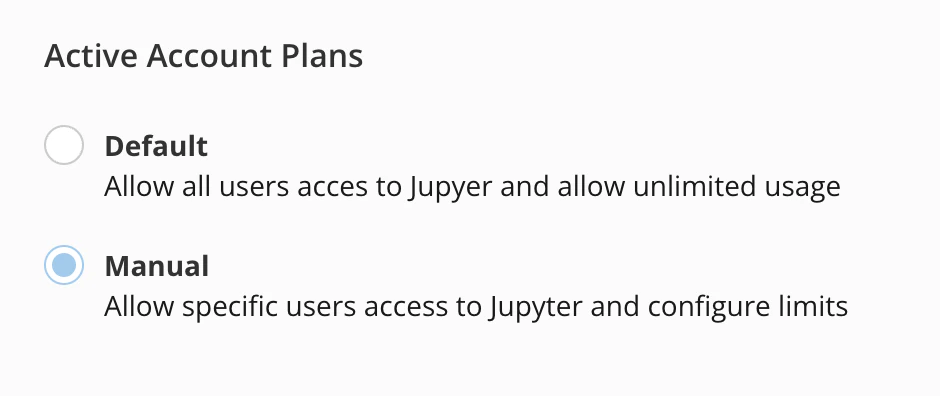
4. After activating the account, choose the account plan you want:
* The Default account plan allows all users access to Jupyter and gives all users unlimited usage.
* The Manual account plan allows specific users access to Jupyter and gives you the option to configure usage limits.
.
Jupyter Workspaces is a premium Domo feature. Contact your Domo account team to get access. For help, reach out to [support@domo.com](mailto:support@domo.com)
***
This article provides information on integrating Jupyter Workspaces with Domo in the following topics:
***
## Required Grants
To access Jupyter, you need one of the following two grants enabled: Create Jupyter Workspace or Manage Jupyter Workspace. You can add these grants to a custom Domo role.
* \*\*Create Jupyter Workspace —\*\*Allows a user to create, edit, and delete Jupyter Workspaces to which they have access.
* **Manage Jupyter Workspace**(Jupyter Admin) **—** Allows a user to view, edit, and delete any Jupyter Workspaces in the instance. This grant is needed to enable workspace sharing for other users.
To use the [File Share](#file-sharing) feature of Jupyter Workspaces, you need one of the following two grants enabled: Create Fileshare Directories or Manage Fileshare Directories. You can add these grants to a custom Domo role.
* \*\*Create Fileshare Directories —\*\*Allows a user to create, edit, and delete File Share directories to which they have access.
* \*\*Manage Fileshare Directories —\*\*Allows you to view, edit, and delete any File Share directory in this instance.
## Enable Jupyter
To start using Jupyter, a Jupyter Admin must enable the feature for your instance. Admins can follow the steps below:
1. In the navigation header, go to **More** > **Admin**.
2. In the **Features** menu, select**Jupyter**.
3. Activate the feature by adjusting the toggle next to **Jupyter Account Inactive.**
Your account is activated.
4. After activating the account, choose the account plan you want:
* The Default account plan allows all users access to Jupyter and gives all users unlimited usage.
* The Manual account plan allows specific users access to Jupyter and gives you the option to configure usage limits.
 5. Select a **Compute Tier Limit.** To learn more about tier limits, contact your Domo account team.
6. Select **Save.**
Jupyter is enabled, and workspaces can be created.
## Access Jupyter Workspaces
In the navigation header, select **Data**.\
The Data Center displays.
In the left navigation, select
5. Select a **Compute Tier Limit.** To learn more about tier limits, contact your Domo account team.
6. Select **Save.**
Jupyter is enabled, and workspaces can be created.
## Access Jupyter Workspaces
In the navigation header, select **Data**.\
The Data Center displays.
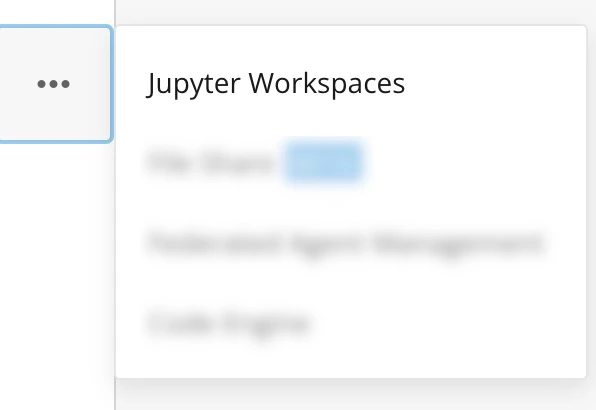
In the left navigation, select  **More** > **Jupyter Workspaces**.
 ###
## Jupyter Workspaces Tasks
The next sections describe certain tasks within Jupyter Workspaces, including creating a workspace, enabling workspace sharing, sharing a workspace, viewing instances in a shared workspace, running a workspace, editing a workspace, and deleting a workspace.
### Create a Workspace
To create a workspace, Jupyter must be enabled for your instance. See the headings for [Required Grants](#required-grants) and [Enable Jupyter](#enable-jupyter) for instructions.
1. In the navigation header, select **Data**.
2. In the left side rail, select **More** > **Jupyter Workspaces**.
3. Select **+ New Workspace**\*\*.\*\*\
The **Create Jupyter Workspace** modal displays.
4. Customize the workspace by configuring the following:
* In the **Name** and **Description**fields, enter a workspace name and optional description.
* Enter values in the **Kernel**, **Compute Tier Limit**,and **Timeout** fields.
* (Optional) Select Input DataSets
* (Optional) Select Output DataSets
* (Optional) Add an Account.In this step, you can add a third-party account, such as your Google account, to reference in your workspace.
* (Optional) Add a File Share. See [Create a File Share](#create-a-file-share) for instructions.
**Note:** If you share your workspace with other users, they can see third-party accounts referenced in the workspace. However, they cannot read any account keys or values. ***To share an account with a user, navigate to Data > Accounts.*** Input and Output DataSets are also shared with Co-Owners.
The following table describes options to be configured when creating a new workspace:
| Option | Description | |
| ------------------------------------------ | -------------------------------------------------------------------------------------------------------------------------------------------------------------------------------- | -- |
| **Name** | The name of the Jupyter workspace The following characters are not supported in the name: \[:\*?"\<> | ]" |
| **Description** | Optional description to provide more details about the workspace | |
| **Computer Tier Limit** | The computer size that is allocated to the workspace and any data flows that are associated with this workspace | |
| **Timeout** | The amount of time with no user activity in the Jupyter UI before the workspace automatically stops. | |
| **Kernel** | Python or R Kernels are available | |
| **Start workspace on successful creation** | Once created, the process to start the workspace will be performed | |
| **Input DataSets** | Optional Domo data sources that are available to use in the Jupyter workspace | |
| **Output DataSets** | Optional DataSets that are available to write data as part of the Jupyter processing | |
| **Account** | Optional third-party account(s) to reference in your workspace | |
| **File Share** | Optional avenue to share files within your workspace. To learn more, see the headings for [Create a File Share](#create-a-file-share) and [Use a File Share](#use-a-file-share). | |
5. Select **Save.**
The new workspace is created and added to a list of workspaces on the main Jupyter page.
### Enable Workspace Sharing
In order for a workspace to be shared, an Admin or user with the Manage Jupyter Workspace grant must enable sharing.
1. From the Jupyter Workspaces list, navigate to the workspace you wish to share.
2. Hover to the right of the workspace. The
###
## Jupyter Workspaces Tasks
The next sections describe certain tasks within Jupyter Workspaces, including creating a workspace, enabling workspace sharing, sharing a workspace, viewing instances in a shared workspace, running a workspace, editing a workspace, and deleting a workspace.
### Create a Workspace
To create a workspace, Jupyter must be enabled for your instance. See the headings for [Required Grants](#required-grants) and [Enable Jupyter](#enable-jupyter) for instructions.
1. In the navigation header, select **Data**.
2. In the left side rail, select **More** > **Jupyter Workspaces**.
3. Select **+ New Workspace**\*\*.\*\*\
The **Create Jupyter Workspace** modal displays.
4. Customize the workspace by configuring the following:
* In the **Name** and **Description**fields, enter a workspace name and optional description.
* Enter values in the **Kernel**, **Compute Tier Limit**,and **Timeout** fields.
* (Optional) Select Input DataSets
* (Optional) Select Output DataSets
* (Optional) Add an Account.In this step, you can add a third-party account, such as your Google account, to reference in your workspace.
* (Optional) Add a File Share. See [Create a File Share](#create-a-file-share) for instructions.
**Note:** If you share your workspace with other users, they can see third-party accounts referenced in the workspace. However, they cannot read any account keys or values. ***To share an account with a user, navigate to Data > Accounts.*** Input and Output DataSets are also shared with Co-Owners.
The following table describes options to be configured when creating a new workspace:
| Option | Description | |
| ------------------------------------------ | -------------------------------------------------------------------------------------------------------------------------------------------------------------------------------- | -- |
| **Name** | The name of the Jupyter workspace The following characters are not supported in the name: \[:\*?"\<> | ]" |
| **Description** | Optional description to provide more details about the workspace | |
| **Computer Tier Limit** | The computer size that is allocated to the workspace and any data flows that are associated with this workspace | |
| **Timeout** | The amount of time with no user activity in the Jupyter UI before the workspace automatically stops. | |
| **Kernel** | Python or R Kernels are available | |
| **Start workspace on successful creation** | Once created, the process to start the workspace will be performed | |
| **Input DataSets** | Optional Domo data sources that are available to use in the Jupyter workspace | |
| **Output DataSets** | Optional DataSets that are available to write data as part of the Jupyter processing | |
| **Account** | Optional third-party account(s) to reference in your workspace | |
| **File Share** | Optional avenue to share files within your workspace. To learn more, see the headings for [Create a File Share](#create-a-file-share) and [Use a File Share](#use-a-file-share). | |
5. Select **Save.**
The new workspace is created and added to a list of workspaces on the main Jupyter page.
### Enable Workspace Sharing
In order for a workspace to be shared, an Admin or user with the Manage Jupyter Workspace grant must enable sharing.
1. From the Jupyter Workspaces list, navigate to the workspace you wish to share.
2. Hover to the right of the workspace. The  **Manage Workspace** menu displays.
3. Select the **Manage Workspace** menu and choose **Enable Sharing.**
The **Enable Sharing** modal displays.
4. Select **Continue**and **Confirm**. By selecting **Confirm**, you are acknowledging the risks associated with sharing notebooks and workspaces.
In the **Workspace Sharing** column, the status is **Enabled.** The workspace can now be shared with other users by admins or the workspace owner.
###
### Share a Workspace
In order for a workspace to be shared, an Admin or user with the Manage Jupyter Workspace grant must enable sharing. See [Enable Workspace Sharing.](#enable-workspace-sharing)
1. From the Jupyter Workspaces list, navigate to the workspace you wish to share.
2. Hover to the right of the workspace. The **Manage Workspace** menu displays.
3. Select the **Manage Workspace** menu and choose **Share this Workspace.**
The **Manage Sharing** modal displays.
4. Enter the recipient's name, select the appropriate permissions, and select **Add.**
5. Select **Save**.
The workspace is shared with the recipient(s). They can now add instances to the workspace, and the status of those instances can be viewed in the **Status** column on the main Jupyter page.
**Important:** - Simultaneous editing is not supported. Please check with other users before editing the same file.
* If you share your workspace with other users, they can see third-party accounts referenced in the workspace. However, they cannot read any account keys or values. Input and Output DataSets are also shared with Co-Owners.
###
### View Instances in a Shared Workspace
When a workspace is shared, other users can add an instance to the workspace.
In the image below, the workspace has sharing enabled and has been shared with one other user.
**Manage Workspace** menu displays.
3. Select the **Manage Workspace** menu and choose **Enable Sharing.**
The **Enable Sharing** modal displays.
4. Select **Continue**and **Confirm**. By selecting **Confirm**, you are acknowledging the risks associated with sharing notebooks and workspaces.
In the **Workspace Sharing** column, the status is **Enabled.** The workspace can now be shared with other users by admins or the workspace owner.
###
### Share a Workspace
In order for a workspace to be shared, an Admin or user with the Manage Jupyter Workspace grant must enable sharing. See [Enable Workspace Sharing.](#enable-workspace-sharing)
1. From the Jupyter Workspaces list, navigate to the workspace you wish to share.
2. Hover to the right of the workspace. The **Manage Workspace** menu displays.
3. Select the **Manage Workspace** menu and choose **Share this Workspace.**
The **Manage Sharing** modal displays.
4. Enter the recipient's name, select the appropriate permissions, and select **Add.**
5. Select **Save**.
The workspace is shared with the recipient(s). They can now add instances to the workspace, and the status of those instances can be viewed in the **Status** column on the main Jupyter page.
**Important:** - Simultaneous editing is not supported. Please check with other users before editing the same file.
* If you share your workspace with other users, they can see third-party accounts referenced in the workspace. However, they cannot read any account keys or values. Input and Output DataSets are also shared with Co-Owners.
###
### View Instances in a Shared Workspace
When a workspace is shared, other users can add an instance to the workspace.
In the image below, the workspace has sharing enabled and has been shared with one other user.
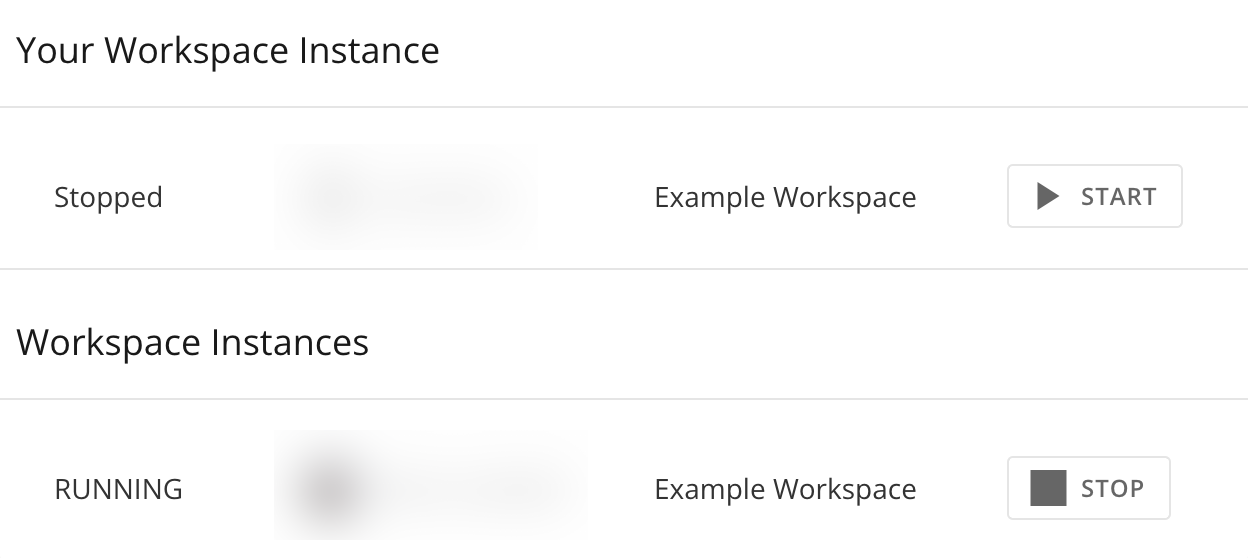
 To see which instances are running in the workspace, select **others.**
**
To see which instances are running in the workspace, select **others.**
** **
In the image below, only one instance is running in the workspace.
**
In the image below, only one instance is running in the workspace.
 ### Run a Workspace
1. From the **Jupyter Workspaces** list, select the workspace you want to run.
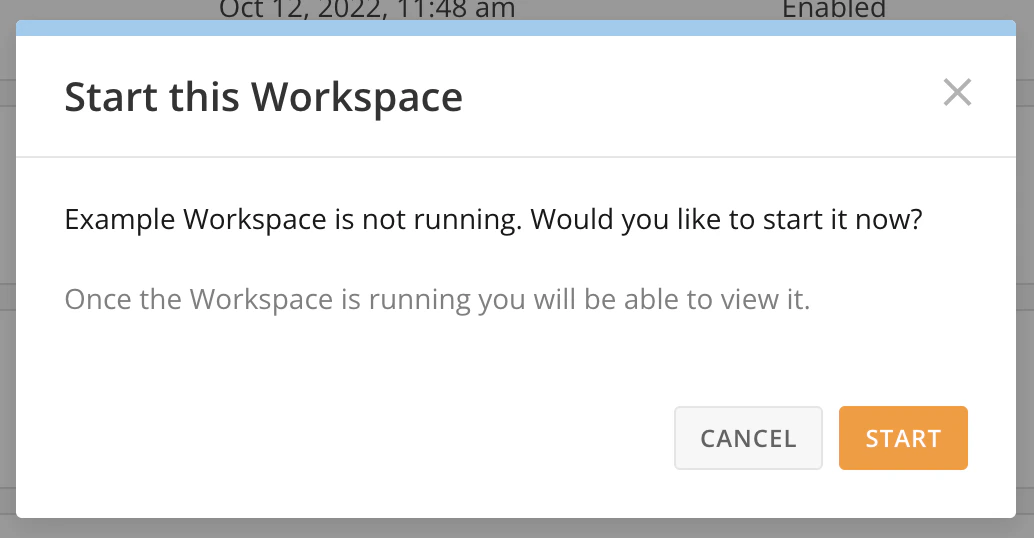
The **Start this Workspace** modal displays.
2. Select **Start.**
### Run a Workspace
1. From the **Jupyter Workspaces** list, select the workspace you want to run.
The **Start this Workspace** modal displays.
2. Select **Start.**
 The workspace will load for several seconds. This is normal.
 3. After the workspace is done loading, select the workspace title.
The workspace opens, and the notebook can be edited.
3. After the workspace is done loading, select the workspace title.
The workspace opens, and the notebook can be edited.
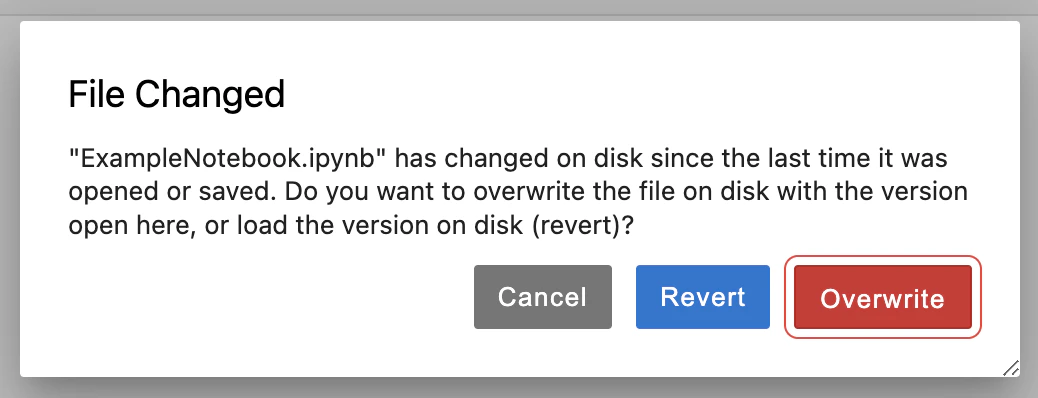
 If two users edit the same file, the **File Changed** modal displays. You can overwrite changes the other user made or revert your changes.
 ### Edit a Workspace
1. From the **Jupyter Workspaces** list, locate the workspace you wish to edit.
2. Hover to the right of the workspace. The **Manage Workspace** menu displays.
3. Select the **Manage Workspace** menu and choose **Edit.**
The **Edit Jupyter Workspace** modal displays.
4. Add new specifications to the workspace and select **Save.**
The workspace is updated with new details.
### Delete a Workspace
1. From the Jupyter Workspaces list, navigate to the workspace you wish to delete.
2. Hover to the right of the workspace. The **Manage Workspace** menu displays.
3. Select **Manage Workspace** menu and choose **Delete.**
The **Delete Test?** modal displays.
4. Confirm that you wish to delete the workspace by selecting the **Delete** button.
The workspace is deleted. This action cannot be undone.
## File Sharing
You can create and add a File Share to your Jupyter Workspace. The following headings describe how to create a File Share, add it to your workspace, and delete a File Share from your workspace.
### Create a File Share
Follow these steps to create a File Share to use in Jupyter Workspaces. See the heading for [Use a File Share](#use-a-file-share) to learn how to connect a File Share with Jupyter Workspaces.
1. In the Domo navigation header, select **Data**.
2. In the left side rail, select
### Edit a Workspace
1. From the **Jupyter Workspaces** list, locate the workspace you wish to edit.
2. Hover to the right of the workspace. The **Manage Workspace** menu displays.
3. Select the **Manage Workspace** menu and choose **Edit.**
The **Edit Jupyter Workspace** modal displays.
4. Add new specifications to the workspace and select **Save.**
The workspace is updated with new details.
### Delete a Workspace
1. From the Jupyter Workspaces list, navigate to the workspace you wish to delete.
2. Hover to the right of the workspace. The **Manage Workspace** menu displays.
3. Select **Manage Workspace** menu and choose **Delete.**
The **Delete Test?** modal displays.
4. Confirm that you wish to delete the workspace by selecting the **Delete** button.
The workspace is deleted. This action cannot be undone.
## File Sharing
You can create and add a File Share to your Jupyter Workspace. The following headings describe how to create a File Share, add it to your workspace, and delete a File Share from your workspace.
### Create a File Share
Follow these steps to create a File Share to use in Jupyter Workspaces. See the heading for [Use a File Share](#use-a-file-share) to learn how to connect a File Share with Jupyter Workspaces.
1. In the Domo navigation header, select **Data**.
2. In the left side rail, select  **More** > **File Share**.
3. Select **+ New File Share**.\
The **Create a File Share** modal displays.
**More** > **File Share**.
3. Select **+ New File Share**.\
The **Create a File Share** modal displays.
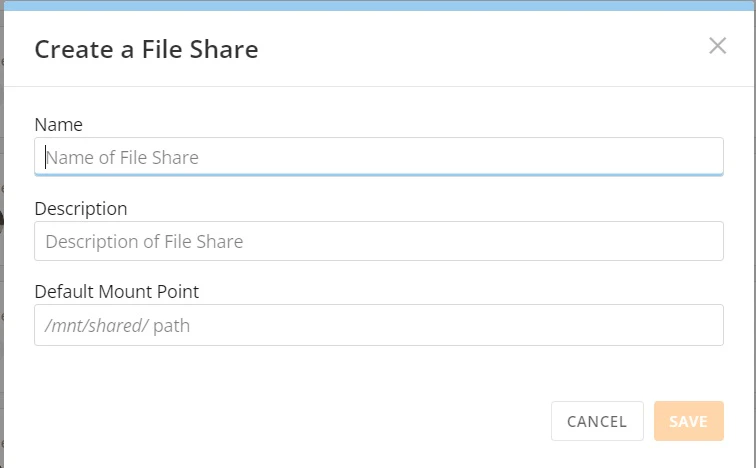 4. Customize the File Share by configuring the following:
* In the **Name** and **Description** fields, enter a File Share name and optional description.
* In the **Default Mount Point** field, enter a ***path**.* This can be whatever you would like.
5. Select **Save** to create the new File Share.
### Use a File Share
**Note:** If the workspace is already running and you add a File Share, you must restart the workspace before the File Share displays in the list.
The process outlined below allows you to use a File Share that you have created. To learn how to make a File Share, see the heading for [Create a File Share](#create-a-file-share).
While you are creating or editing a Jupyter Workspace, you can add a File Share that you have created.
Follow the steps below to add a File Share in the **Create Jupyter Workspace** or **Edit Jupyter Workspace** modal. To learn how to access these modals, see the headings for [Create a Workspace](#create-a-workspace) and [Edit a Workspace](#edit-a-workspace).
1. In the **File Share** section of the modal, select **Add File Share**.
2. In the search field, search for and locate the File Share you want to add to the workspace.
3. Select the File Share.
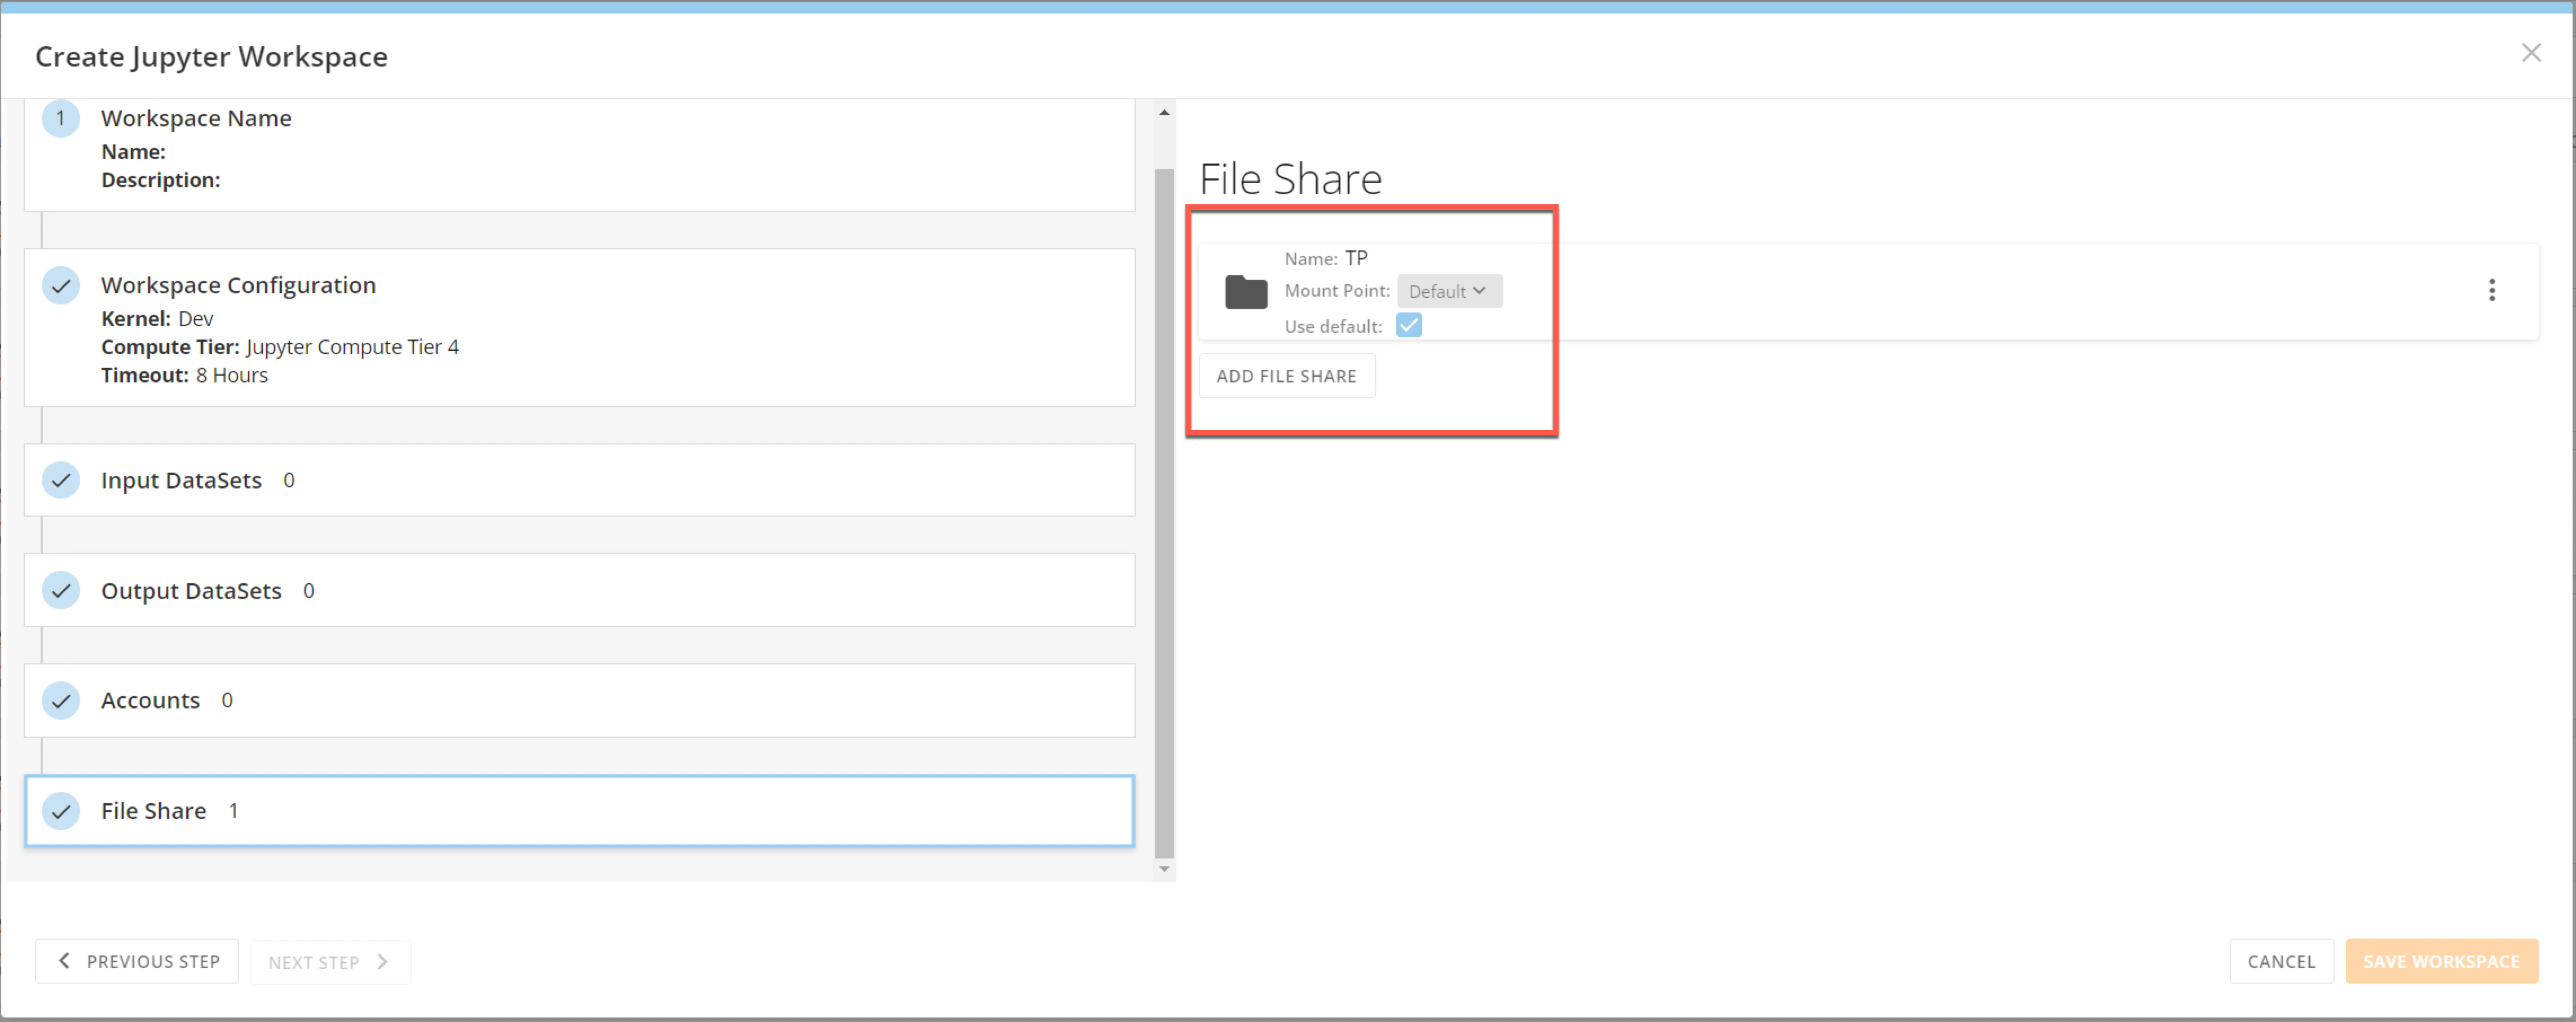
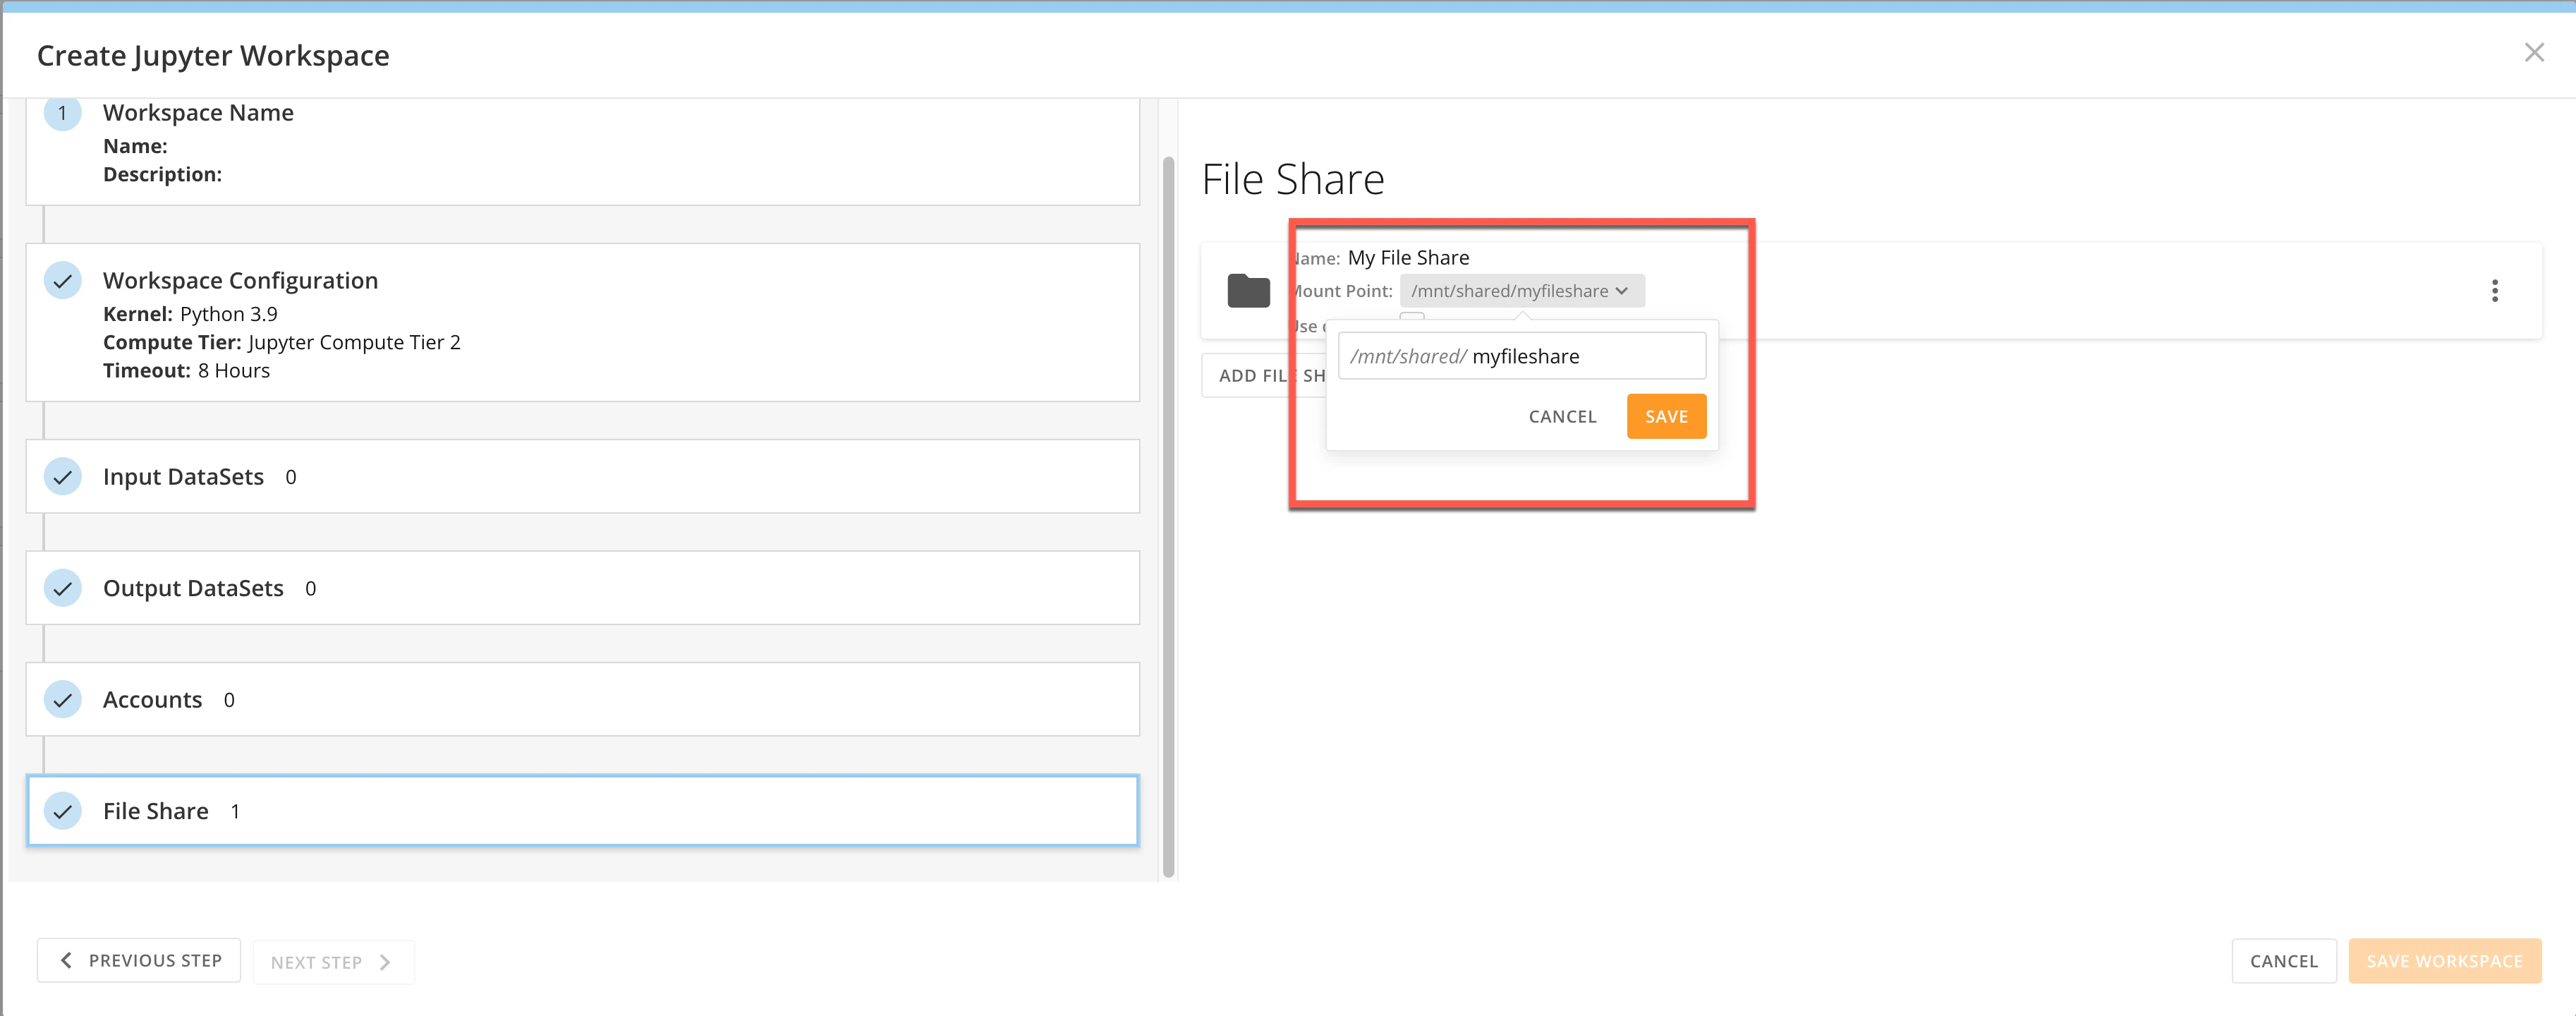
4. The File Share displays in the modal. By default, the Mount Point is the default Mount Point, and the checkbox for **Use default** is checked. To use a different Mount Point, uncheck the **Use default** checkbox and expand the list to select the Mount Point you want to use.
4. Customize the File Share by configuring the following:
* In the **Name** and **Description** fields, enter a File Share name and optional description.
* In the **Default Mount Point** field, enter a ***path**.* This can be whatever you would like.
5. Select **Save** to create the new File Share.
### Use a File Share
**Note:** If the workspace is already running and you add a File Share, you must restart the workspace before the File Share displays in the list.
The process outlined below allows you to use a File Share that you have created. To learn how to make a File Share, see the heading for [Create a File Share](#create-a-file-share).
While you are creating or editing a Jupyter Workspace, you can add a File Share that you have created.
Follow the steps below to add a File Share in the **Create Jupyter Workspace** or **Edit Jupyter Workspace** modal. To learn how to access these modals, see the headings for [Create a Workspace](#create-a-workspace) and [Edit a Workspace](#edit-a-workspace).
1. In the **File Share** section of the modal, select **Add File Share**.
2. In the search field, search for and locate the File Share you want to add to the workspace.
3. Select the File Share.
4. The File Share displays in the modal. By default, the Mount Point is the default Mount Point, and the checkbox for **Use default** is checked. To use a different Mount Point, uncheck the **Use default** checkbox and expand the list to select the Mount Point you want to use.
 5. Select **Save Workspace**.
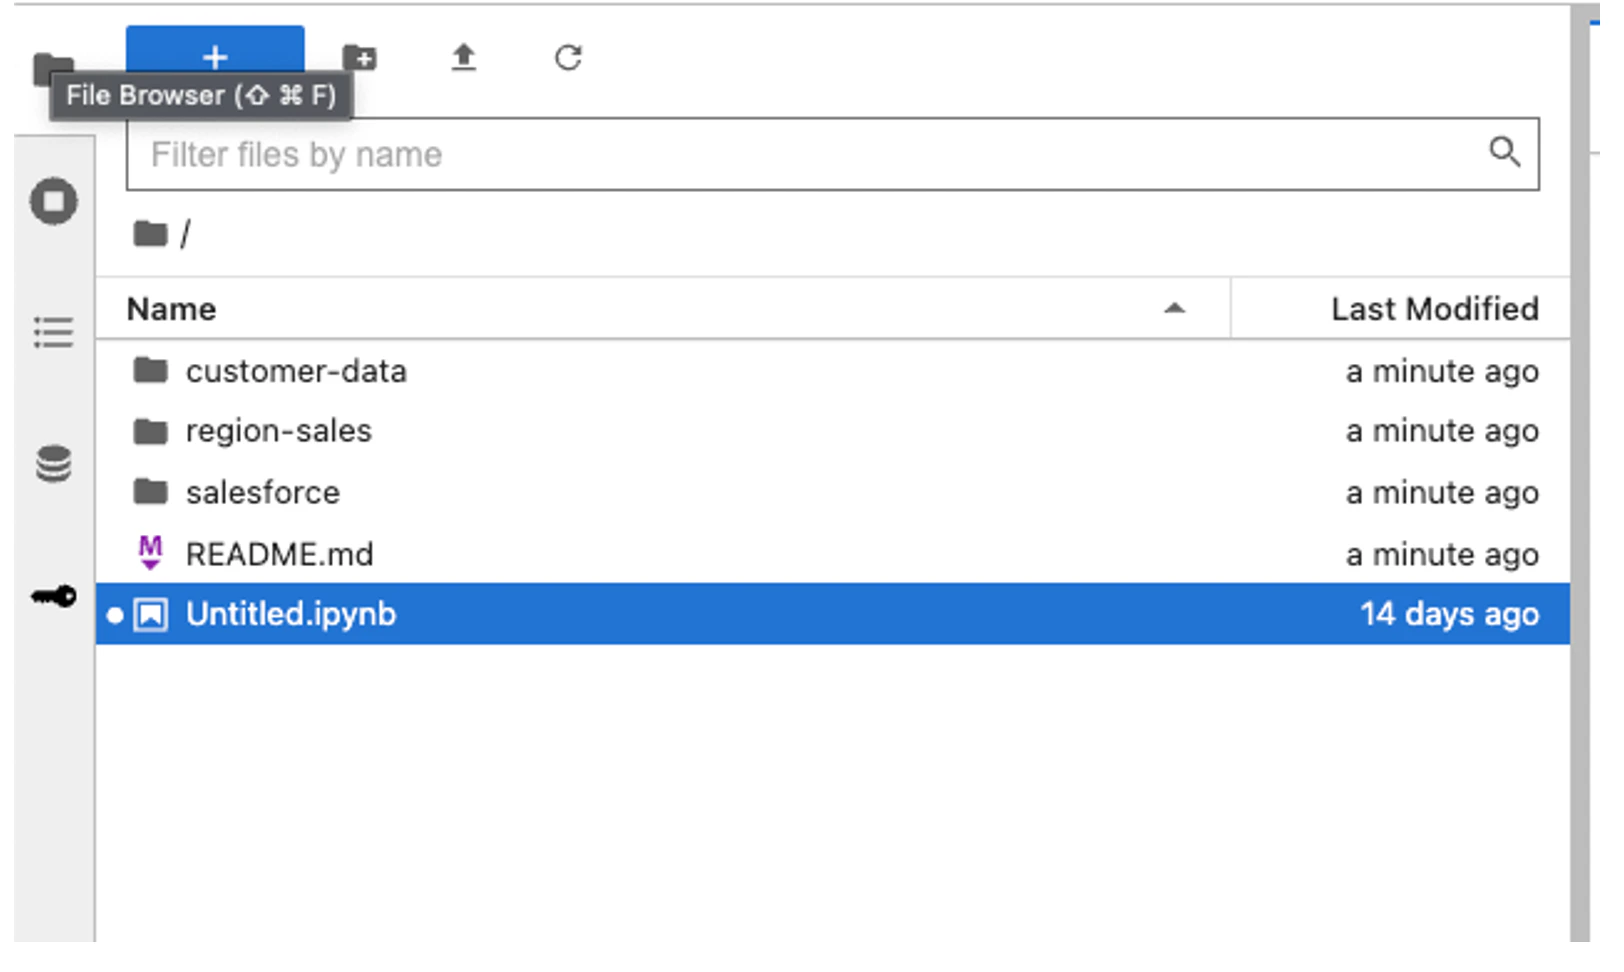
The File Share is added to the workspace and can also be viewed in the **File Browser** in [Jupyter Notebooks](#jupyter-notebooks).
5. Select **Save Workspace**.
The File Share is added to the workspace and can also be viewed in the **File Browser** in [Jupyter Notebooks](#jupyter-notebooks).
 ### Delete a File Share
1. Access the \*\*Create Jupyter Workspace **or**Edit Jupyter Workspace \*\*modal.\*\*\*\*To learn how to access these modals, see the headings for [Create a Workspace](#create-a-workspace) and [Edit a Workspace](#edit-a-workspace).
2. In the **File Share** section of the modal, identify the File Share you want to delete and select the
### Delete a File Share
1. Access the \*\*Create Jupyter Workspace **or**Edit Jupyter Workspace \*\*modal.\*\*\*\*To learn how to access these modals, see the headings for [Create a Workspace](#create-a-workspace) and [Edit a Workspace](#edit-a-workspace).
2. In the **File Share** section of the modal, identify the File Share you want to delete and select the  kebab menu.
3. Select **Delete**.
kebab menu.
3. Select **Delete**.
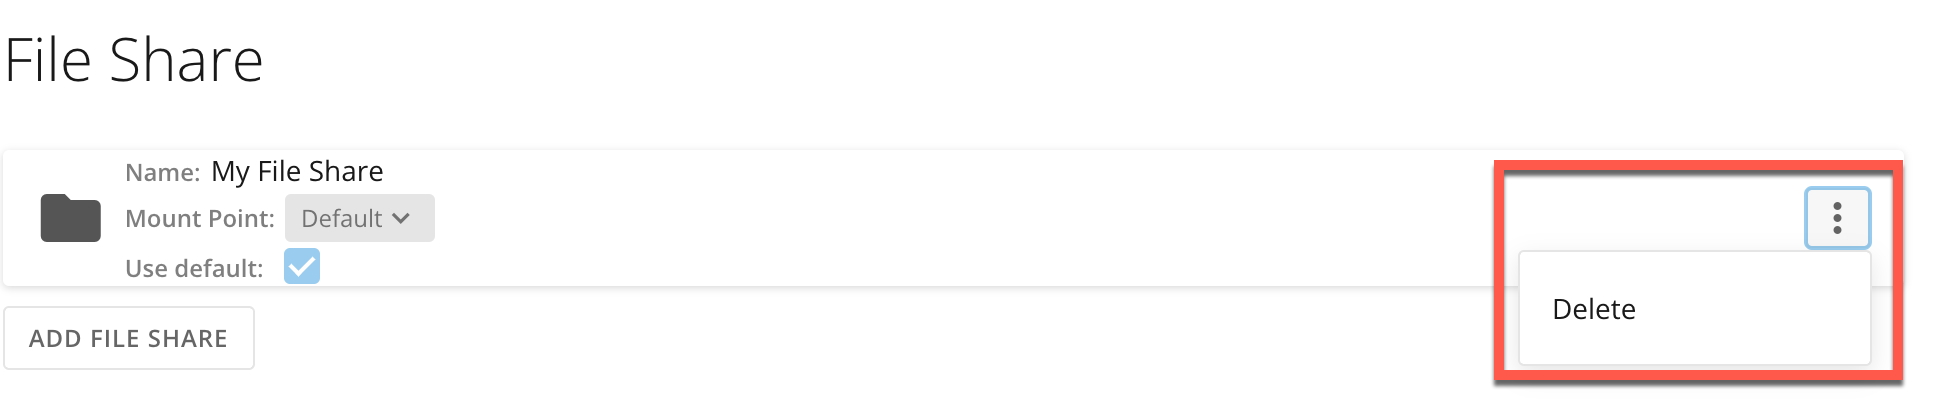 The File Share is deleted from the workspace.
## Jupyter Notebooks
A Jupyter notebook is a file that consists of one or more cells. In these cells, you can write and format text, as well as write code using Python or R programming languages. When you execute the contents of a cell, the resulting output associated with the text or code displays directly in the notebook. The output can take various forms such as text, figures, tables, and images. You can add, edit, move, duplicate, re-run, and delete cells within a notebook at your discretion. You can also run cells sequentially to perform different phases of your project one after the other. For example, the first cell in your notebook could contain code to read in your DataSet; the second cell could then contain code that specifies what analysis to run on the DataSet.
See [Cells](#cells) to learn about the types of cells, how to add them to a notebook, and how to execute them.
Because a Jupyter notebook file can display executable code and the associated code output, along with explanatory text and images, a notebook can serve as a complete record of your interactive session.
You can save a Jupyter notebook to your Jupyter workspace, enabling you to access your notebook and its contents in the future. Jupyter notebooks are internally JSON files and are saved with the .ipynb extension.
You can also download a notebook from your workspace and save it elsewhere or share it.
**Note:** You can create and save multiple Jupyter notebooks within a single Jupyter workspace.
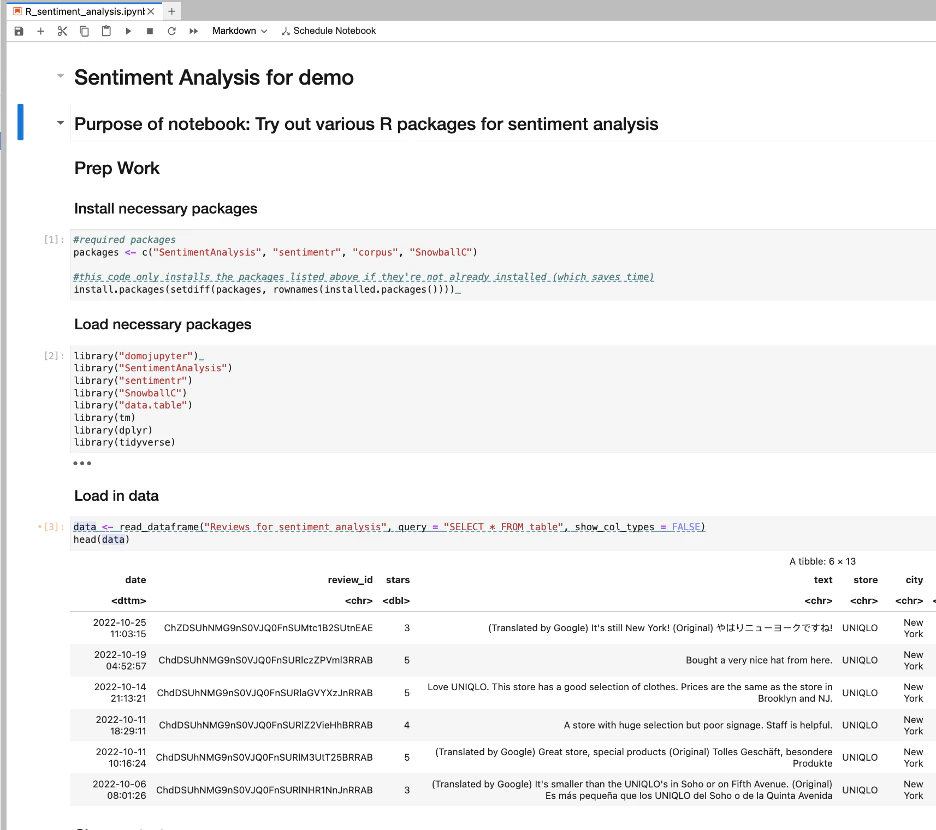
This image displays an example of a Jupyter notebook.
The File Share is deleted from the workspace.
## Jupyter Notebooks
A Jupyter notebook is a file that consists of one or more cells. In these cells, you can write and format text, as well as write code using Python or R programming languages. When you execute the contents of a cell, the resulting output associated with the text or code displays directly in the notebook. The output can take various forms such as text, figures, tables, and images. You can add, edit, move, duplicate, re-run, and delete cells within a notebook at your discretion. You can also run cells sequentially to perform different phases of your project one after the other. For example, the first cell in your notebook could contain code to read in your DataSet; the second cell could then contain code that specifies what analysis to run on the DataSet.
See [Cells](#cells) to learn about the types of cells, how to add them to a notebook, and how to execute them.
Because a Jupyter notebook file can display executable code and the associated code output, along with explanatory text and images, a notebook can serve as a complete record of your interactive session.
You can save a Jupyter notebook to your Jupyter workspace, enabling you to access your notebook and its contents in the future. Jupyter notebooks are internally JSON files and are saved with the .ipynb extension.
You can also download a notebook from your workspace and save it elsewhere or share it.
**Note:** You can create and save multiple Jupyter notebooks within a single Jupyter workspace.
This image displays an example of a Jupyter notebook.
 In the **File Browser** in Jupyter Notebooks, you can navigate between notebooks and even see associated File Shares.
### Edit Jupyter Notebooks
**Important:** To edit a notebook, you first have to create and then start (or run) a workspace. See [Create a Workspace](#create-a-workspace) and [Run a Workspace](#run-a-workspace) for more information.
### Create a Notebook
Follow these steps to create a notebook:
1. In the Jupyter workspace, select **File** > **New** > **Notebook**.\
The **Select Kernel**modal displays.
In the **File Browser** in Jupyter Notebooks, you can navigate between notebooks and even see associated File Shares.
### Edit Jupyter Notebooks
**Important:** To edit a notebook, you first have to create and then start (or run) a workspace. See [Create a Workspace](#create-a-workspace) and [Run a Workspace](#run-a-workspace) for more information.
### Create a Notebook
Follow these steps to create a notebook:
1. In the Jupyter workspace, select **File** > **New** > **Notebook**.\
The **Select Kernel**modal displays.
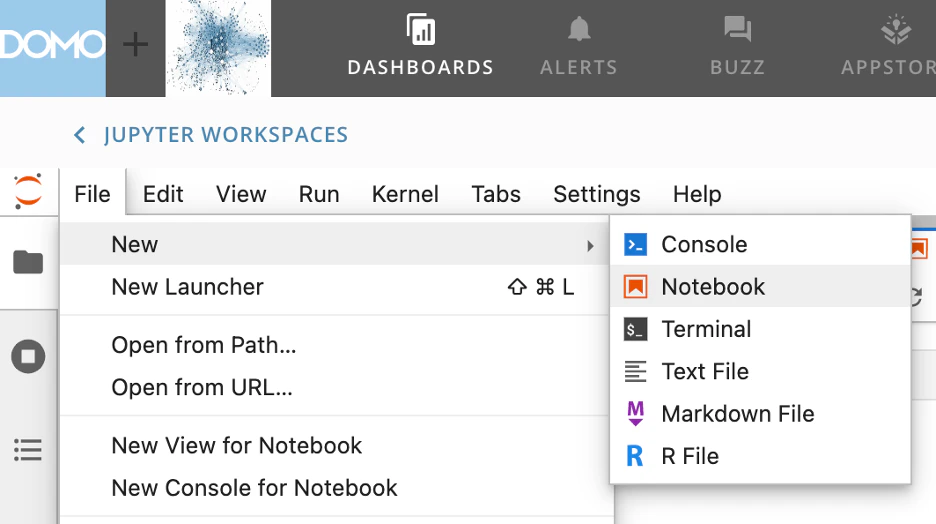 2. Press **Select**.\
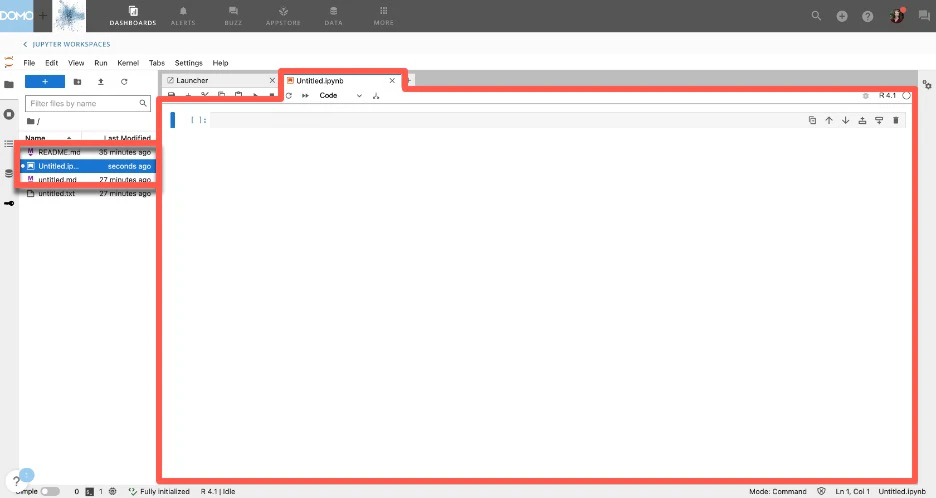
A notebook named *Untitled.ipynb* opens in the main work area. The untitled notebook also displays in the **File Browser** in the workspace side panel.
2. Press **Select**.\
A notebook named *Untitled.ipynb* opens in the main work area. The untitled notebook also displays in the **File Browser** in the workspace side panel.
 ### Rename a Notebook
You can rename a notebook either from the main work area or from the **File Browser**, depending on whether the notebook is open or closed. Select the appropriate option below:
* \*\*Notebook open —\*\*In the main work area, right-click the title of the notebook to display the notebook options and select **Rename Notebook**. The **Rename File** dialog displays. Enter a new name for the notebook and select **Rename**.
### Rename a Notebook
You can rename a notebook either from the main work area or from the **File Browser**, depending on whether the notebook is open or closed. Select the appropriate option below:
* \*\*Notebook open —\*\*In the main work area, right-click the title of the notebook to display the notebook options and select **Rename Notebook**. The **Rename File** dialog displays. Enter a new name for the notebook and select **Rename**.
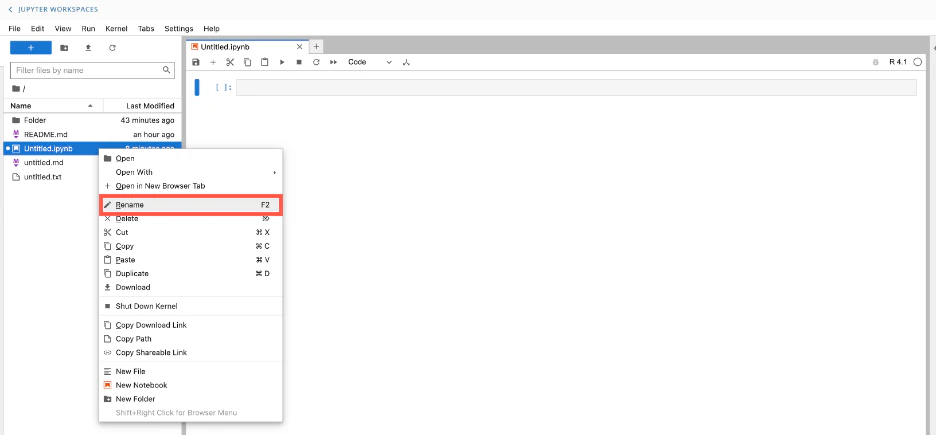
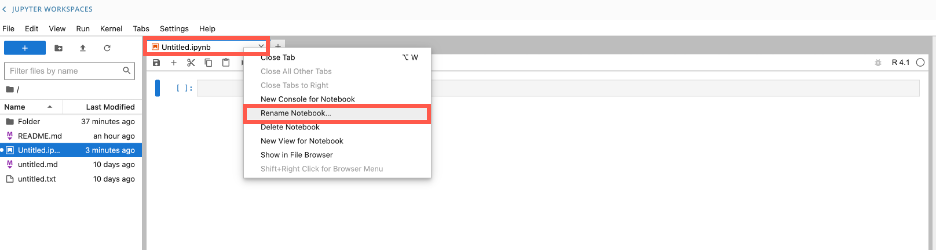 * \*\*Notebook closed —\*\*In the **File Browser**, right-click the title of the notebook that you want to rename to display the file options, then select **Rename**. Enter a new name for the notebook.
 ### Save a Notebook
To save a notebook to your Jupyter workspace, select **Save**in the main work area.
### Save a Notebook
To save a notebook to your Jupyter workspace, select **Save**in the main work area.
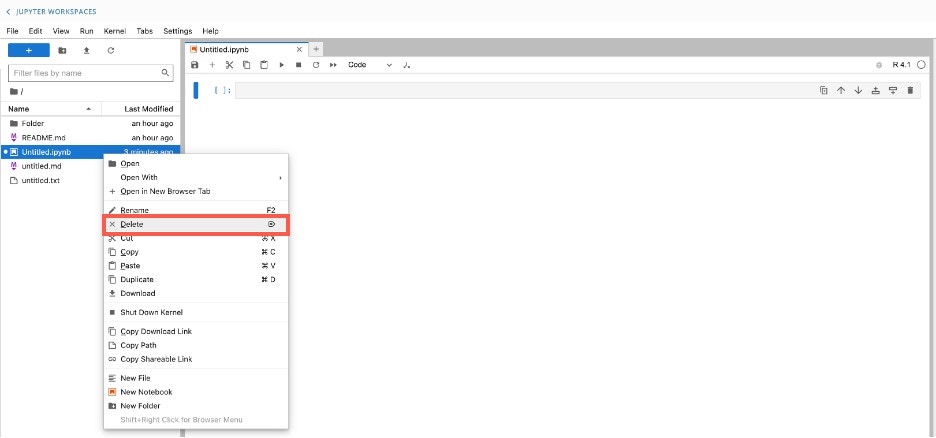
 ### Delete a Notebook
You can delete a notebook either from the main work area or from the **File Browser**, depending on whether the notebook is open or closed. Select the appropriate option below:
* **Notebook open —** In the main work area, right-click the title of the notebook to display the notebook options and select **Delete Notebook**. A dialog displays. Select **Delete**.
### Delete a Notebook
You can delete a notebook either from the main work area or from the **File Browser**, depending on whether the notebook is open or closed. Select the appropriate option below:
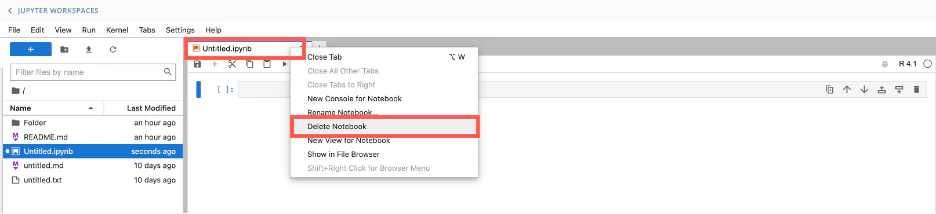
* **Notebook open —** In the main work area, right-click the title of the notebook to display the notebook options and select **Delete Notebook**. A dialog displays. Select **Delete**.
 * **Notebook closed —** In the left panel, right-click the title of the notebook you want to delete to display the notebook options and select **Delete**. A dialog displays. Select **Delete**.
 ### Schedule a Notebook
You can schedule a Jupyter notebook to run automatically at a set cadence. The available cadence options are listed below:
* Once a day at a set time
* Multiple times a day at set times
* Every day
* Specific days of the week
* Specific days of the month
* Every month
* During specific months
You can also [manually run a scheduled notebook](#manually-run-a-scheduled-notebook).
Scheduling a notebook by following the steps below creates an associated Jupyter DataFlow that automatically runs your Jupyter notebook. The Jupyter DataFlow has other useful functionalities, which are also described in this section.
Follow these steps to schedule a notebook or make changes to the schedule:
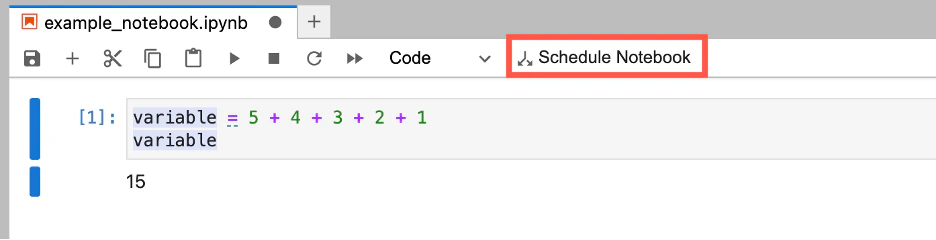
1. Open the notebook you want to schedule. In the toolbar, select **Schedule Notebook**. The **Create DataFlow**modal displays.
### Schedule a Notebook
You can schedule a Jupyter notebook to run automatically at a set cadence. The available cadence options are listed below:
* Once a day at a set time
* Multiple times a day at set times
* Every day
* Specific days of the week
* Specific days of the month
* Every month
* During specific months
You can also [manually run a scheduled notebook](#manually-run-a-scheduled-notebook).
Scheduling a notebook by following the steps below creates an associated Jupyter DataFlow that automatically runs your Jupyter notebook. The Jupyter DataFlow has other useful functionalities, which are also described in this section.
Follow these steps to schedule a notebook or make changes to the schedule:
1. Open the notebook you want to schedule. In the toolbar, select **Schedule Notebook**. The **Create DataFlow**modal displays.
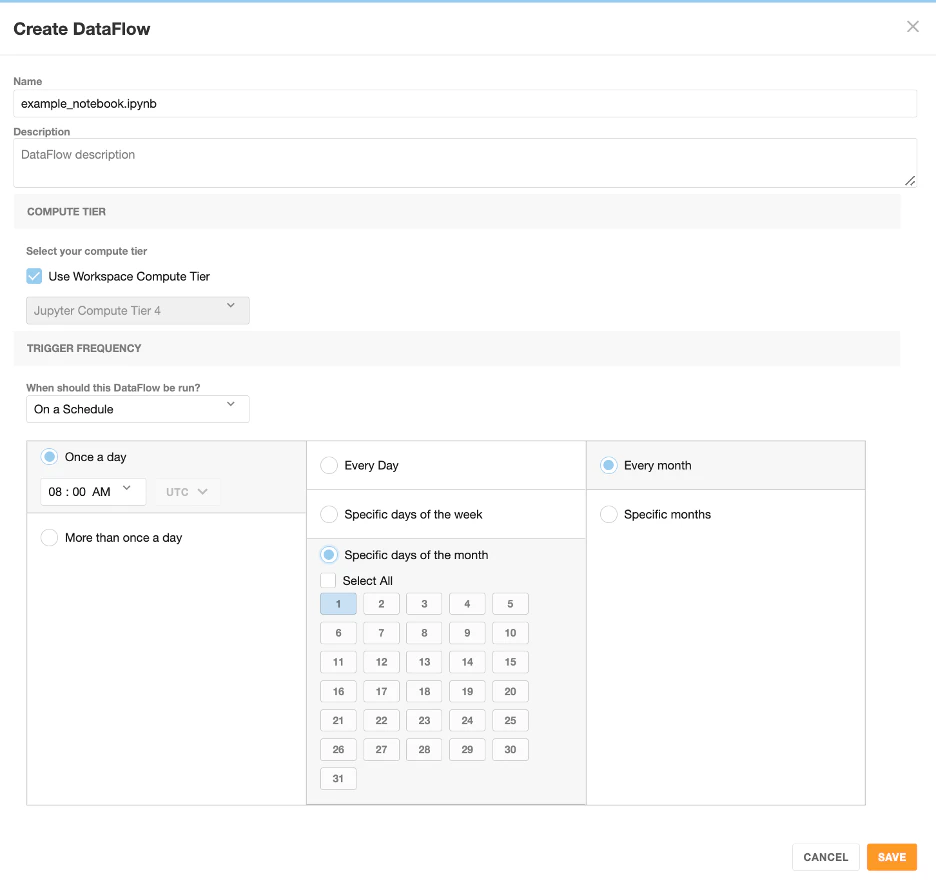
 2. In the modal, fill in the **Name** and optional **Description** fields.
3. Select a **Compute Tier**.
4. In the \*\*When should this DataFlow be run?\*\*menu, select **On a Schedule.**
5. Set the schedule for the notebook.
6. Select **Save**.
2. In the modal, fill in the **Name** and optional **Description** fields.
3. Select a **Compute Tier**.
4. In the \*\*When should this DataFlow be run?\*\*menu, select **On a Schedule.**
5. Set the schedule for the notebook.
6. Select **Save**.
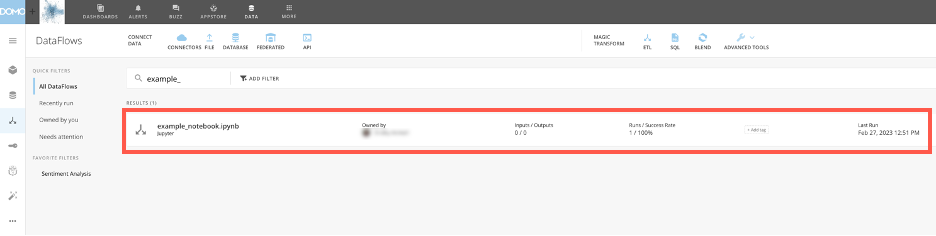
 The DataFlow now displays in the **DataFlows** section of your Data Center. To view it, select **Data** in the navigation header and then select
 **DataFlows** in the Data Center sidebar. Select your Jupyter DataFlow to see the Details view.
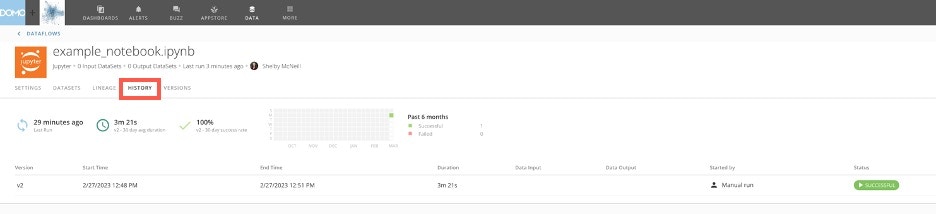
 In the **History** tab of the Details view, you can see the execution details for the DataFlow. You can also [download notebook output](#download-notebook-output).
In the **Versions** tab, you can see the versions list for the DataFlow.
There is no information in the **Settings**, **DataSets**, or **Lineage** tabs.
You can open the Jupyter notebook associated with the DataFlow by selecting **Edit in Jupyter** from the Details view.
In the **History** tab of the Details view, you can see the execution details for the DataFlow. You can also [download notebook output](#download-notebook-output).
In the **Versions** tab, you can see the versions list for the DataFlow.
There is no information in the **Settings**, **DataSets**, or **Lineage** tabs.
You can open the Jupyter notebook associated with the DataFlow by selecting **Edit in Jupyter** from the Details view.
 ####
#### Download Notebook Output
You can download notebook output for a specific execution of a Jupyter DataFlow by following these steps:
1. Navigate to the **History**tab of the Details view for that DataFlow.
####
#### Download Notebook Output
You can download notebook output for a specific execution of a Jupyter DataFlow by following these steps:
1. Navigate to the **History**tab of the Details view for that DataFlow.
 2. Identify the row in the log that represents the run for which you want output information.
3. Select the
2. Identify the row in the log that represents the run for which you want output information.
3. Select the  action menu for that row.
4. Select **View Details**in the action menu.\
A dialog displays where you can select to download the output as an IPYNB, HTML, or PDF file.
action menu for that row.
4. Select **View Details**in the action menu.\
A dialog displays where you can select to download the output as an IPYNB, HTML, or PDF file.
 In this example, the notebook output was downloaded as a PDF file:
 #### Manually Run a Scheduled Notebook
Manually run a scheduled Jupyter notebook by following these steps:
1. Locate the Jupyter DataFlow for the scheduled Jupyter notebook in the **DataFlows** section of the Data Center.
2. Select
#### Manually Run a Scheduled Notebook
Manually run a scheduled Jupyter notebook by following these steps:
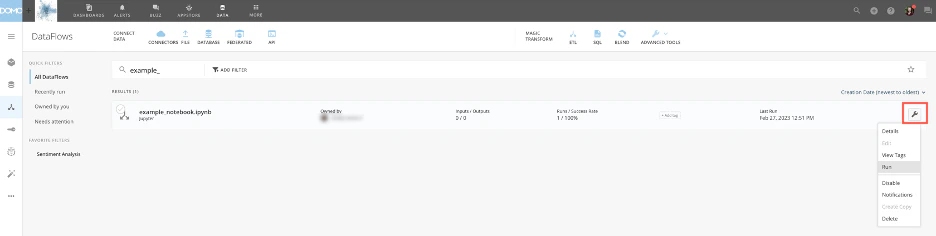
1. Locate the Jupyter DataFlow for the scheduled Jupyter notebook in the **DataFlows** section of the Data Center.
2. Select  **DataFlow options**in the row for the Jupyter DataFlow. In the list of options, select **Run**.
 ### Cells
A Jupyter notebook file consists of one or more gray, rectangular fields called cells.
### Cells
A Jupyter notebook file consists of one or more gray, rectangular fields called cells.
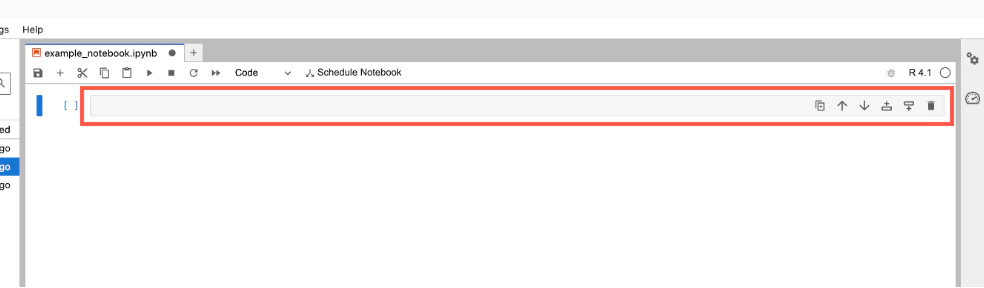 You can enter various kinds of input into a cell and then execute it to receive output. What you can enter into a cell, as well the cell's output on execution, is determined by the cell type. There are three types of cells: code cells, markdown cells, and raw cells, described below.
* \*\*Code cells —\*\*In these cells, you can write and edit code. The programming language that you use to write code depends on the type of kernel (either Python or R) that you selected when creating your Jupyter workspace. After you execute or run a code cells, the output of the code displays directly below the code cell. The output can take various forms such as text, figures, tables, and images.
* **Markdown cells —** In these cells, you can write text. You can also use Markdown language to mark up or format text, including italicizing and bolding, specifying lists, and creating headings. After you execute or run a markdown cell, the text you wrote is formatted into rich text. You can learn about [basic Markdown synxtax](https://www.markdownguide.org/basic-syntax/)
You can enter various kinds of input into a cell and then execute it to receive output. What you can enter into a cell, as well the cell's output on execution, is determined by the cell type. There are three types of cells: code cells, markdown cells, and raw cells, described below.
* \*\*Code cells —\*\*In these cells, you can write and edit code. The programming language that you use to write code depends on the type of kernel (either Python or R) that you selected when creating your Jupyter workspace. After you execute or run a code cells, the output of the code displays directly below the code cell. The output can take various forms such as text, figures, tables, and images.
* **Markdown cells —** In these cells, you can write text. You can also use Markdown language to mark up or format text, including italicizing and bolding, specifying lists, and creating headings. After you execute or run a markdown cell, the text you wrote is formatted into rich text. You can learn about [basic Markdown synxtax](https://www.markdownguide.org/basic-syntax/)  here.
* \*\*Raw cells —\*\*In these cells, you can write output directly or save code that you don't want to run.
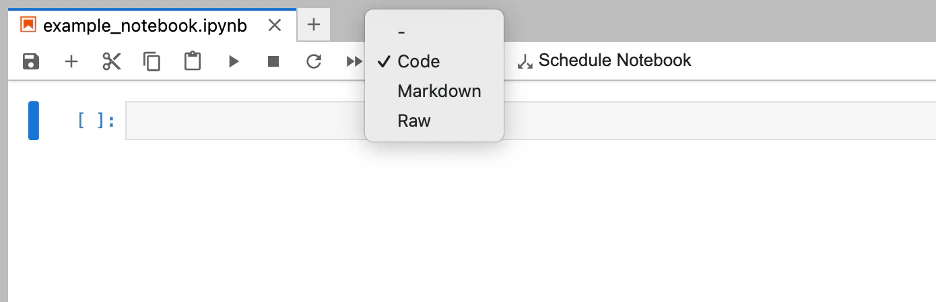
You can determine a cell's type by selecting the cell and viewing the list in the toolbar at the top of the notebook. In this example, the notebook contains a code cell. See [Change Cell Type](#change-cell-type) for more information.
#### Change Cell Type
You can change a cell's type by selecting the cell and then selecting the cell type menu in the toolbar and choosing the cell type you want: code, markdown, or raw. To learn more about the cell types, see [Cells](#cells).
**Note:** By default, new cells are code cells.
here.
* \*\*Raw cells —\*\*In these cells, you can write output directly or save code that you don't want to run.
You can determine a cell's type by selecting the cell and viewing the list in the toolbar at the top of the notebook. In this example, the notebook contains a code cell. See [Change Cell Type](#change-cell-type) for more information.
#### Change Cell Type
You can change a cell's type by selecting the cell and then selecting the cell type menu in the toolbar and choosing the cell type you want: code, markdown, or raw. To learn more about the cell types, see [Cells](#cells).
**Note:** By default, new cells are code cells.
 #### Add Cells to a Notebook
You can add cells to a notebook using one of these two options:
* \*\*Add —\*\*Select
#### Add Cells to a Notebook
You can add cells to a notebook using one of these two options:
* \*\*Add —\*\*Select  **Add** in the toolbar. This adds a cell to the end of the notebook.
* \*\*Insert cell —\*\*Select
**Add** in the toolbar. This adds a cell to the end of the notebook.
* \*\*Insert cell —\*\*Select  **Insert cell above** or
  **insert cell below** to add a cell above or below the currently selected cell.
**Note:** All new cells are code cells. See [Cells](#cells) for information about cell types, and see [Change Cell Type](#change-cell-type) for how to change a cell's type.
**insert cell below** to add a cell above or below the currently selected cell.
**Note:** All new cells are code cells. See [Cells](#cells) for information about cell types, and see [Change Cell Type](#change-cell-type) for how to change a cell's type.
 #### Other Cell Options
You can make other changes to cells such as delete, move, copy, cut, paste, merge, or split.
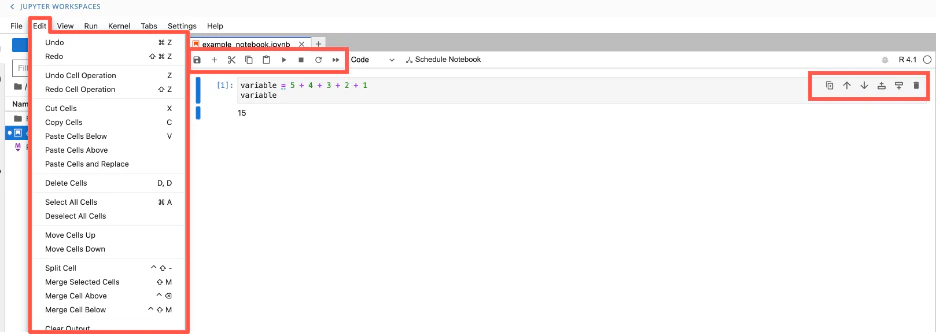
Select **Edit**in the workspace toolbar and then select the option you want or enter the corresponding keyboard shortcut. You can also use the notebook and cell controls to make changes to cells.
#### Other Cell Options
You can make other changes to cells such as delete, move, copy, cut, paste, merge, or split.
Select **Edit**in the workspace toolbar and then select the option you want or enter the corresponding keyboard shortcut. You can also use the notebook and cell controls to make changes to cells.
 #### Add Input to Cells
To add input such as text or code (Python, R, or Markdown) to a cell, select the cell in the notebook and enter your input.
**Note:** The content you can put in your cell depends on the cell's type. See [Cells](#cells) for more information.
####
#### Add Input to Cells
To add input such as text or code (Python, R, or Markdown) to a cell, select the cell in the notebook and enter your input.
**Note:** The content you can put in your cell depends on the cell's type. See [Cells](#cells) for more information.
####  #### Execute/Run Cells
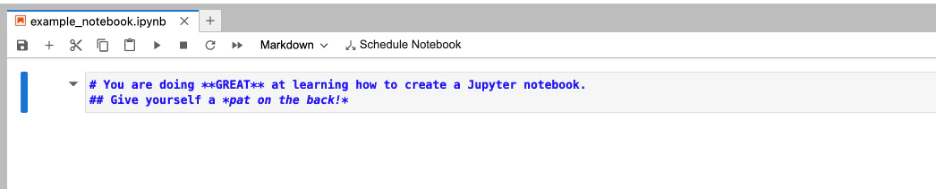
When you execute or "run" the contents of a cell, the resulting output associated with the input text or code displays directly in the notebook. The output can take forms such as text, figured, tables, and images, depending on the input and cell type. See [Cells](#cells) for more information. You can execute one or more cells at the same time.
To execute an individual cell, select the cell and press
#### Execute/Run Cells
When you execute or "run" the contents of a cell, the resulting output associated with the input text or code displays directly in the notebook. The output can take forms such as text, figured, tables, and images, depending on the input and cell type. See [Cells](#cells) for more information. You can execute one or more cells at the same time.
To execute an individual cell, select the cell and press  **Play** in the toolbar.
To execute multiple cells, follow these steps:
1. Press **Esc** on your keyboard.
2. Press **Shift** + **Up/Down arrow** to select the cells you want to execute.
3. Press **Play**in the toolbar.
**Play** in the toolbar.
To execute multiple cells, follow these steps:
1. Press **Esc** on your keyboard.
2. Press **Shift** + **Up/Down arrow** to select the cells you want to execute.
3. Press **Play**in the toolbar.  To execute all the cells at the same time, select **Run** > **Run All Cells** in the workspace toolbar.
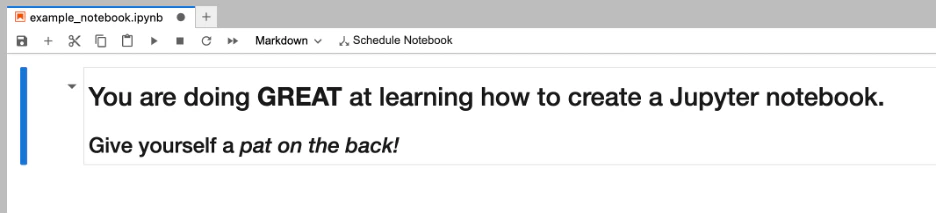
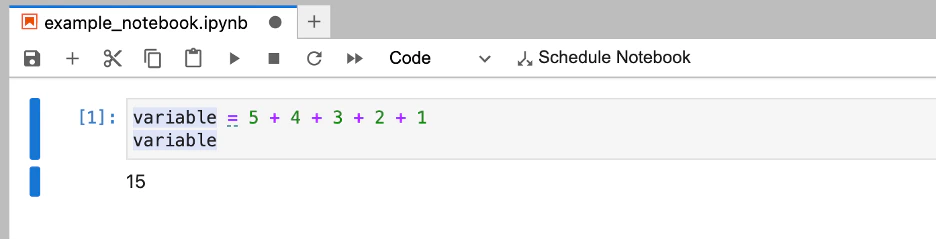
If the cell(s) execute successfully, the output displays in the notebook. See examples of a markdown cell and a code cell below.
To execute all the cells at the same time, select **Run** > **Run All Cells** in the workspace toolbar.
If the cell(s) execute successfully, the output displays in the notebook. See examples of a markdown cell and a code cell below.
 ### Executions via Workflows
You can execute a Jupyter Notebook in Workflows by creating a new workflow and adding the Domo Jupyter automated function task.
Learn more about [Workflows](/docs/s/article/000005108).
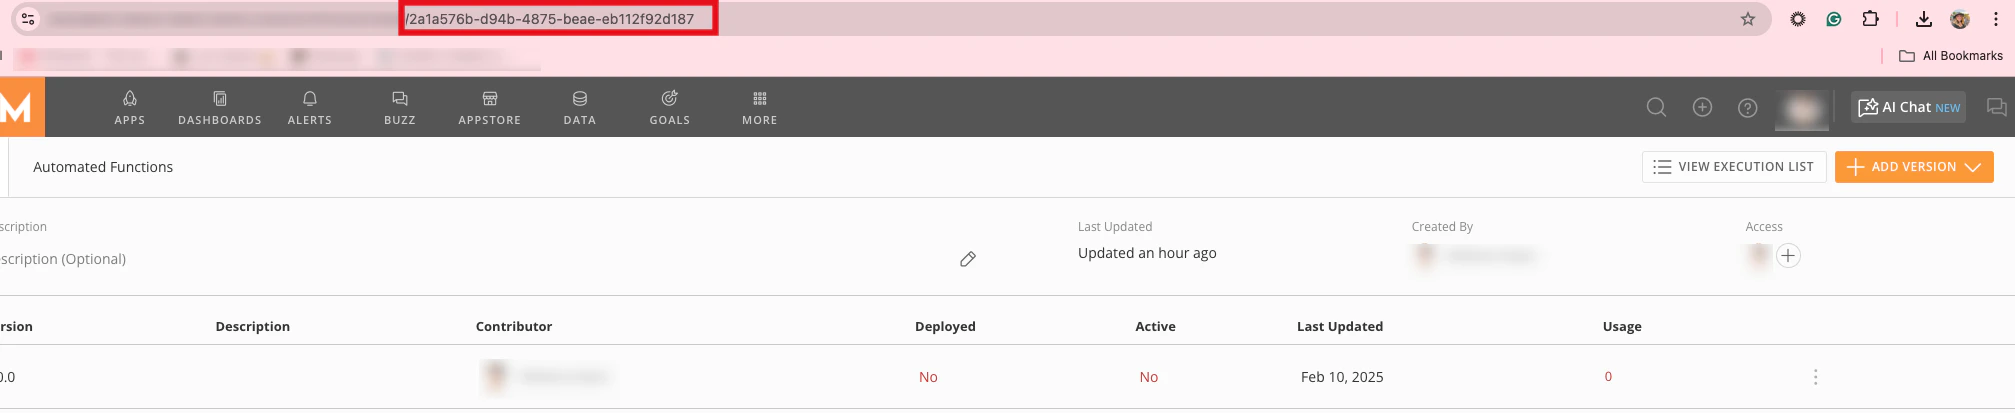
To set up your Jupyter Notebook execution in Workflows, you need the Workspace ID, the path to the Notebook, and the payload to execute against. You can retrieve the Workflow ID from your browser's navigation bar after selecting the Workflow.
### Executions via Workflows
You can execute a Jupyter Notebook in Workflows by creating a new workflow and adding the Domo Jupyter automated function task.
Learn more about [Workflows](/docs/s/article/000005108).
To set up your Jupyter Notebook execution in Workflows, you need the Workspace ID, the path to the Notebook, and the payload to execute against. You can retrieve the Workflow ID from your browser's navigation bar after selecting the Workflow.
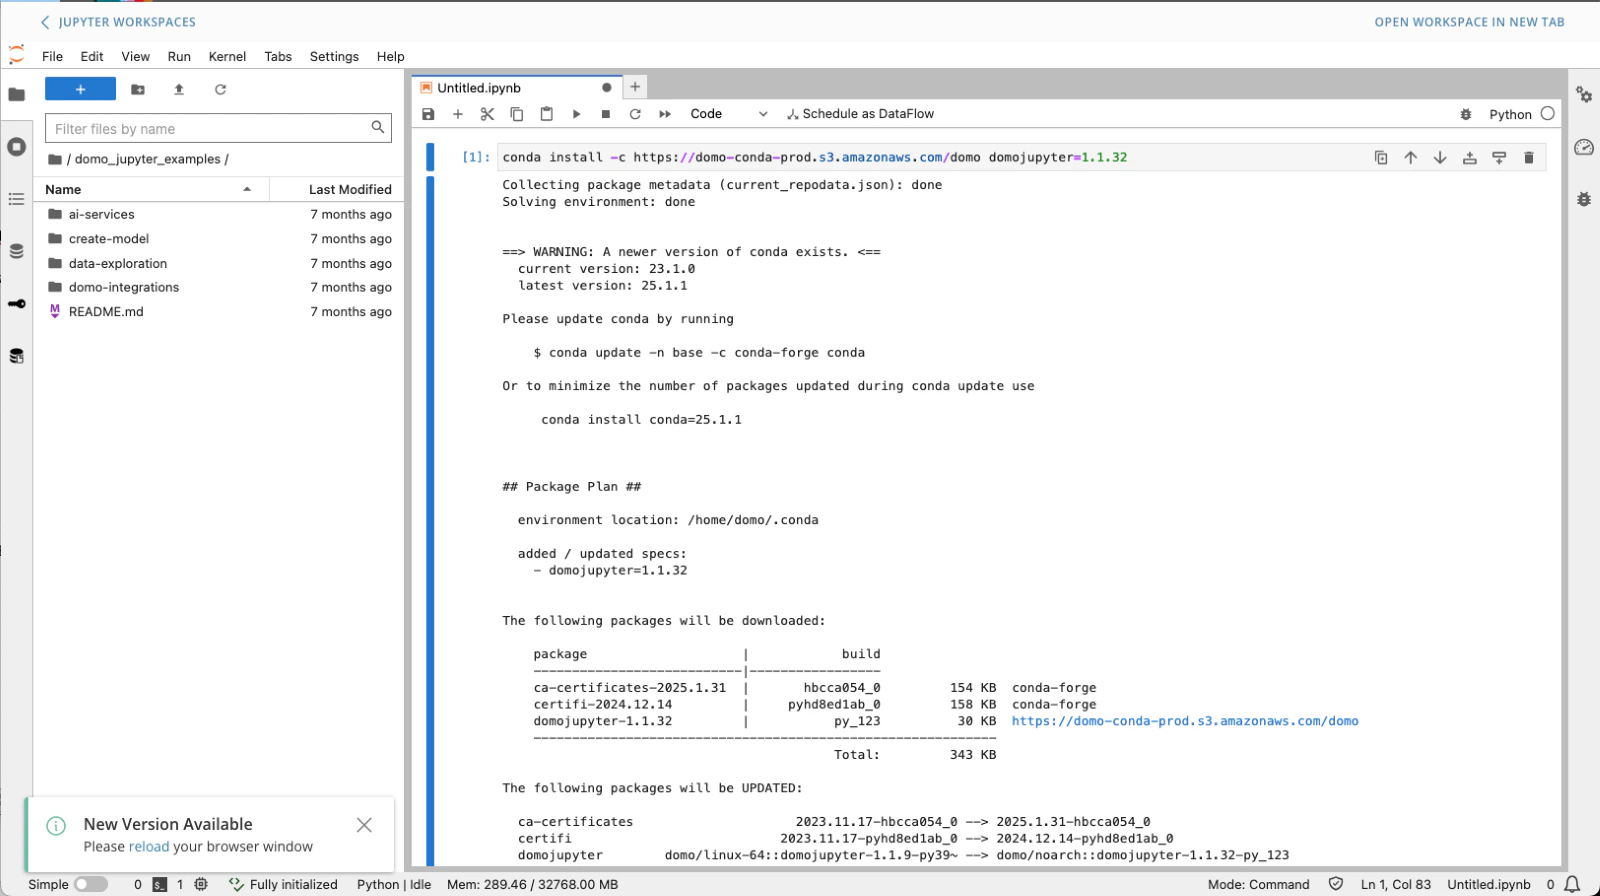
 After obtaining the necessary information, navigate to your Jupyter Notebook and update to the latest version of the **domo-jupyter** library.
```
conda install -c https://domo-conda-prod.s3.amazonaws.com/domo domojupyter=1.1.32
```
After obtaining the necessary information, navigate to your Jupyter Notebook and update to the latest version of the **domo-jupyter** library.
```
conda install -c https://domo-conda-prod.s3.amazonaws.com/domo domojupyter=1.1.32
```
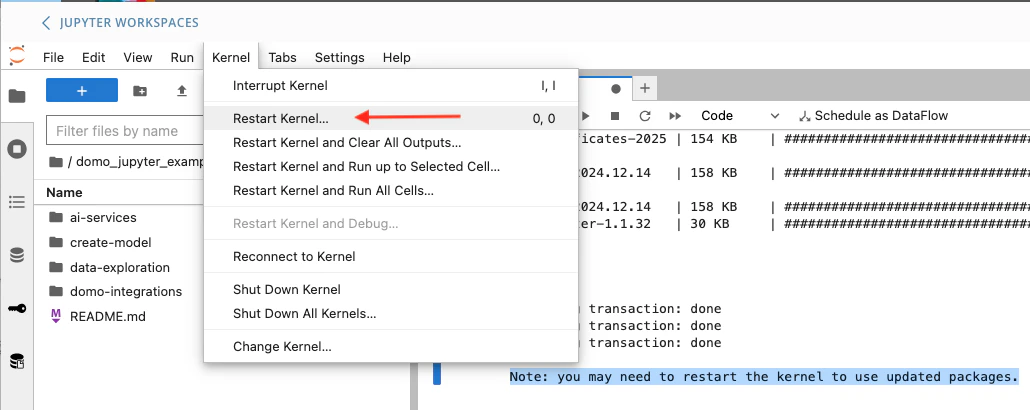
 Restart the kernel after successfully installing the new library by selecting **Kernel**> **Restart Kernel**.
 After they have been installed, you can use the two execution methods in your Notebook.
```
import domojupyter.execution as domo_execution
import json
payload = domo_execution.get_payload()
new_payload = {'newProperty': payload['test'] + 'NEW!'}
# write_response - is required to get the output
domo_execution.write_response(new_payload)
```
## Jupyter Basics
This section contains information about other features of Jupyter Workspaces.
### Reading Data
Data can be read into a Jupyter Notebook using the domojupyter library. This library provides useful functionality to interact with Domo within Jupyter. Before data can be read into a Jupyter Notebook using the domojupyter library, your workspace must have an input data source.
If you are creating a new workspace, see the earlier section, [Create a Workspace.](#create-a-workspace)
If your workspace already exists but doesn't have an input data source, follow the steps below:
1. In Jupyter Workspaces, locate your workspace from the list. You can search and filter by owner.
2. Hover over your workspace. The **Manage Workspace** menu displays.
3. Select the **Manage Workspace** menu and choose **Edit**.
The **Edit Jupyter Workspace** modal displays.
4. In the **Edit Jupyter Workspace** view, select **Add Input DataSet**and choose a data source to be read into a Jupyter Notebook.
5. After choosing a DataSet, select **Save Workspace.**
The workspace has an input DataSet, and data can now be read into a Jupyter Notebook using the domojupyter library. All DataSets used in the workspace are located in **Data** > **DataSets.**
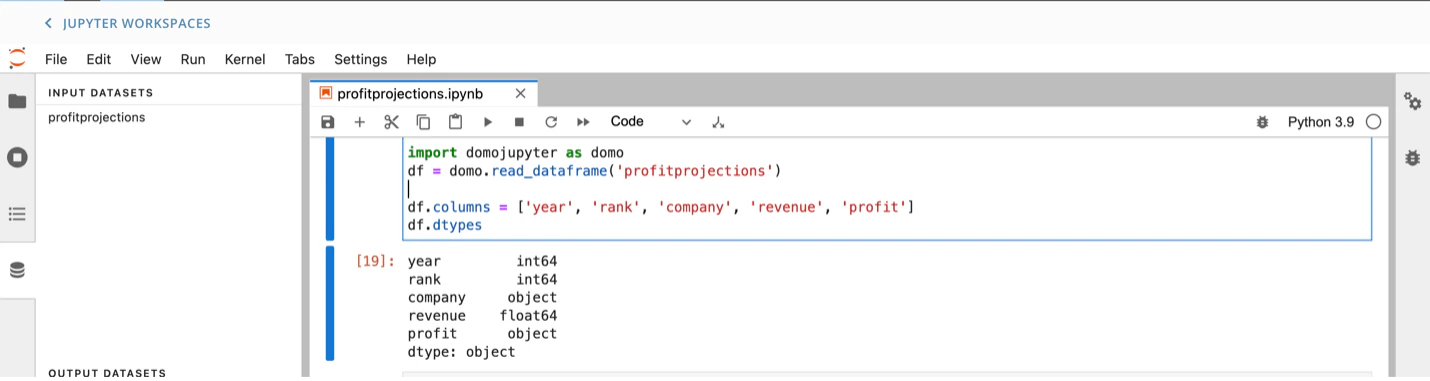
6. Use the `domo.read_dataframe` command to read data from a Domo data source into your Jupyter Notebook for further processing and analysis.
See the example below:
After they have been installed, you can use the two execution methods in your Notebook.
```
import domojupyter.execution as domo_execution
import json
payload = domo_execution.get_payload()
new_payload = {'newProperty': payload['test'] + 'NEW!'}
# write_response - is required to get the output
domo_execution.write_response(new_payload)
```
## Jupyter Basics
This section contains information about other features of Jupyter Workspaces.
### Reading Data
Data can be read into a Jupyter Notebook using the domojupyter library. This library provides useful functionality to interact with Domo within Jupyter. Before data can be read into a Jupyter Notebook using the domojupyter library, your workspace must have an input data source.
If you are creating a new workspace, see the earlier section, [Create a Workspace.](#create-a-workspace)
If your workspace already exists but doesn't have an input data source, follow the steps below:
1. In Jupyter Workspaces, locate your workspace from the list. You can search and filter by owner.
2. Hover over your workspace. The **Manage Workspace** menu displays.
3. Select the **Manage Workspace** menu and choose **Edit**.
The **Edit Jupyter Workspace** modal displays.
4. In the **Edit Jupyter Workspace** view, select **Add Input DataSet**and choose a data source to be read into a Jupyter Notebook.
5. After choosing a DataSet, select **Save Workspace.**
The workspace has an input DataSet, and data can now be read into a Jupyter Notebook using the domojupyter library. All DataSets used in the workspace are located in **Data** > **DataSets.**
6. Use the `domo.read_dataframe` command to read data from a Domo data source into your Jupyter Notebook for further processing and analysis.
See the example below:
 ### Writing Data
Data can be written back to a Domo data source using the domojupyter library. This library provides useful functionality to interact with Domo within Jupyter. Before data can be written into a Jupyter Notebook using the domojupyter library, your workspace must have an output data source.
If you are creating a new workspace, see the earlier section, [Create a Workspace.](#create-a-workspace)
If your workspace already exists but doesn't have an output data source, follow the steps below:
1. In Jupyter Workspaces, locate your workspace from the list. You can search and filter by owner.
2. Hover over your workspace. The **Manage Workspace** menu displays.
3. Select **Manage Workspace** menu and choose **Edit**.
The **Edit Jupyter Workspace** modal displays.
4. In the **Edit Jupyter Workspace** view, select **Add Output DataSet** and choose a data source to be written into a Jupyter Notebook.
5. After choosing a DataSet, select **Save Workspace.**
The workspace has an output DataSet, and data can now be written into a Jupyter Notebook using the domojupyter library. All DataSets used in the workspace are located in **Data** > **DataSets.**
**Note:** A new dataset is created for each added output.
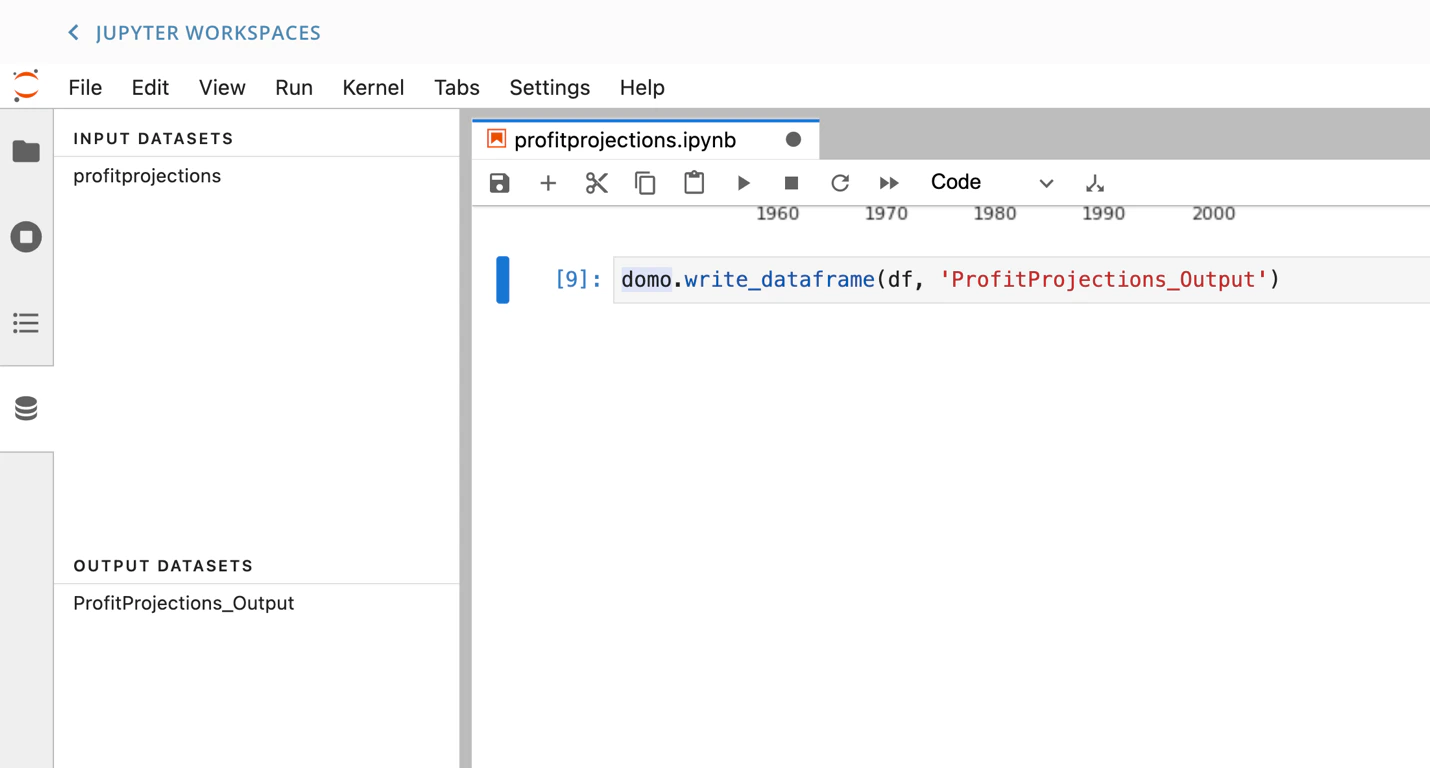
6. Use the `domo.write_dataframe`command to write results back to the Domo Data sources configured for the Jupyter workspace.
See the example below:
### Writing Data
Data can be written back to a Domo data source using the domojupyter library. This library provides useful functionality to interact with Domo within Jupyter. Before data can be written into a Jupyter Notebook using the domojupyter library, your workspace must have an output data source.
If you are creating a new workspace, see the earlier section, [Create a Workspace.](#create-a-workspace)
If your workspace already exists but doesn't have an output data source, follow the steps below:
1. In Jupyter Workspaces, locate your workspace from the list. You can search and filter by owner.
2. Hover over your workspace. The **Manage Workspace** menu displays.
3. Select **Manage Workspace** menu and choose **Edit**.
The **Edit Jupyter Workspace** modal displays.
4. In the **Edit Jupyter Workspace** view, select **Add Output DataSet** and choose a data source to be written into a Jupyter Notebook.
5. After choosing a DataSet, select **Save Workspace.**
The workspace has an output DataSet, and data can now be written into a Jupyter Notebook using the domojupyter library. All DataSets used in the workspace are located in **Data** > **DataSets.**
**Note:** A new dataset is created for each added output.
6. Use the `domo.write_dataframe`command to write results back to the Domo Data sources configured for the Jupyter workspace.
See the example below:
 ### Use Append, Upsert, and Partition
Use the following commands to update a DataSet:
* domo.write\_dataframe(df, output\_dataset)
* domo.write\_dataframe(df, output\_dataset, update\_method="REPLACE")
* domo.write\_dataframe(df, output\_dataset, update\_method="APPEND")
* domo.write\_dataframe(df, output\_dataset, update\_method="UPSERT", update\_key=column\_name)
* domo.write\_dataframe(df, output\_dataset, update\_method="PARTITION", partition\_name='Example Name')
**Note:** If no update\_method is provided, the default functionality is a REPLACE method. If you want to change the update\_method back to REPLACE from another method, you need to explicitly set the update\_method to REPLACE, and Jupyter overrides the last set method. When performing a UPSERT update\_method, the data cannot have duplicate values in the `update\_key` column, or the UPSERT fails.
For information on which update method to use, see our[DataSet Update Methods](http://domo-support.domo.com/s/article/360043430733?language=en_US) article.
### Use Accounts
Third-party accounts can be referenced in a Jupyter Notebook using the domojupyter library. This library provides useful functionality to interact with Domo within Jupyter. Before account keys and values can be accessed, your workspace must have an account.
If you are creating a new workspace, see the earlier section, [Creating a Workspace.](#create-a-workspace)
If your workspace already exists but doesn't have a third-party account attached, follow the steps below:
1. In Jupyter Workspaces, locate your workspace from the list. You can search and filter by owner.
2. Hover over your workspace. The **Manage Workspace** menu displays.
3. Select the **Manage Workspace** menu and choose **Edit**.
The **Edit Jupyter Workspace** modal displays.
4. In the **Edit Jupyter Workspace** view, select **Accounts** > **Add Account**and select a third-party account.
5. After making your selection, select **Save Workspace.**
The workspace has a third-party account set up. Keys and values can now be read into a Jupyter Notebook using the domojupyter library.
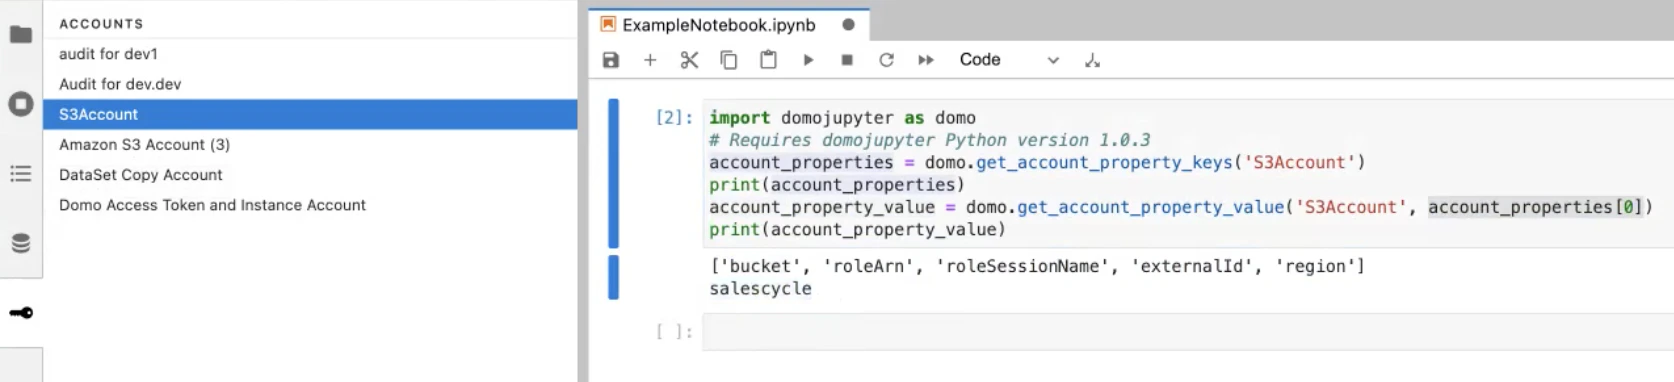
6. The following commands can be used to get account information:
* `domo.get_account_property_value('account')` will return the specific value assigned to a property on your account.
* `domo.get_account_property_value('account',account_properties[0])` will return all properties that exist in an account.
See the example below, where 'S3Account' is the account being referenced:
### Use Append, Upsert, and Partition
Use the following commands to update a DataSet:
* domo.write\_dataframe(df, output\_dataset)
* domo.write\_dataframe(df, output\_dataset, update\_method="REPLACE")
* domo.write\_dataframe(df, output\_dataset, update\_method="APPEND")
* domo.write\_dataframe(df, output\_dataset, update\_method="UPSERT", update\_key=column\_name)
* domo.write\_dataframe(df, output\_dataset, update\_method="PARTITION", partition\_name='Example Name')
**Note:** If no update\_method is provided, the default functionality is a REPLACE method. If you want to change the update\_method back to REPLACE from another method, you need to explicitly set the update\_method to REPLACE, and Jupyter overrides the last set method. When performing a UPSERT update\_method, the data cannot have duplicate values in the `update\_key` column, or the UPSERT fails.
For information on which update method to use, see our[DataSet Update Methods](http://domo-support.domo.com/s/article/360043430733?language=en_US) article.
### Use Accounts
Third-party accounts can be referenced in a Jupyter Notebook using the domojupyter library. This library provides useful functionality to interact with Domo within Jupyter. Before account keys and values can be accessed, your workspace must have an account.
If you are creating a new workspace, see the earlier section, [Creating a Workspace.](#create-a-workspace)
If your workspace already exists but doesn't have a third-party account attached, follow the steps below:
1. In Jupyter Workspaces, locate your workspace from the list. You can search and filter by owner.
2. Hover over your workspace. The **Manage Workspace** menu displays.
3. Select the **Manage Workspace** menu and choose **Edit**.
The **Edit Jupyter Workspace** modal displays.
4. In the **Edit Jupyter Workspace** view, select **Accounts** > **Add Account**and select a third-party account.
5. After making your selection, select **Save Workspace.**
The workspace has a third-party account set up. Keys and values can now be read into a Jupyter Notebook using the domojupyter library.
6. The following commands can be used to get account information:
* `domo.get_account_property_value('account')` will return the specific value assigned to a property on your account.
* `domo.get_account_property_value('account',account_properties[0])` will return all properties that exist in an account.
See the example below, where 'S3Account' is the account being referenced:
 ### Install and Use Libraries
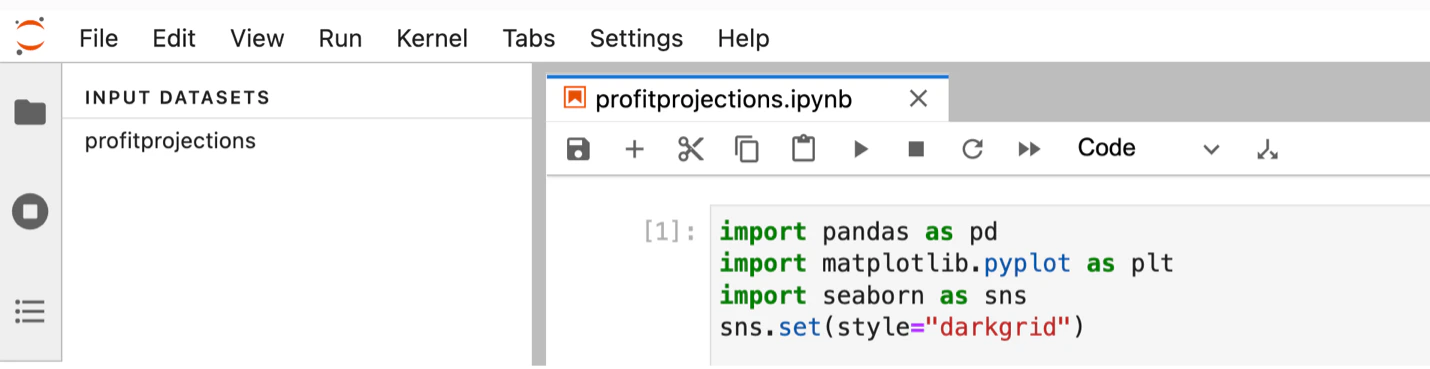
Libraries can be installed in the Jupyter workspace by opening a terminal and executing the appropriate commands. An example command to install the Seaborn library is `conda install seaborn -y`. Once installed, these libraries can be imported and used within the Jupyter Notebooks.
See the example below:
### Install and Use Libraries
Libraries can be installed in the Jupyter workspace by opening a terminal and executing the appropriate commands. An example command to install the Seaborn library is `conda install seaborn -y`. Once installed, these libraries can be imported and used within the Jupyter Notebooks.
See the example below:
 ### Usage Monitoring
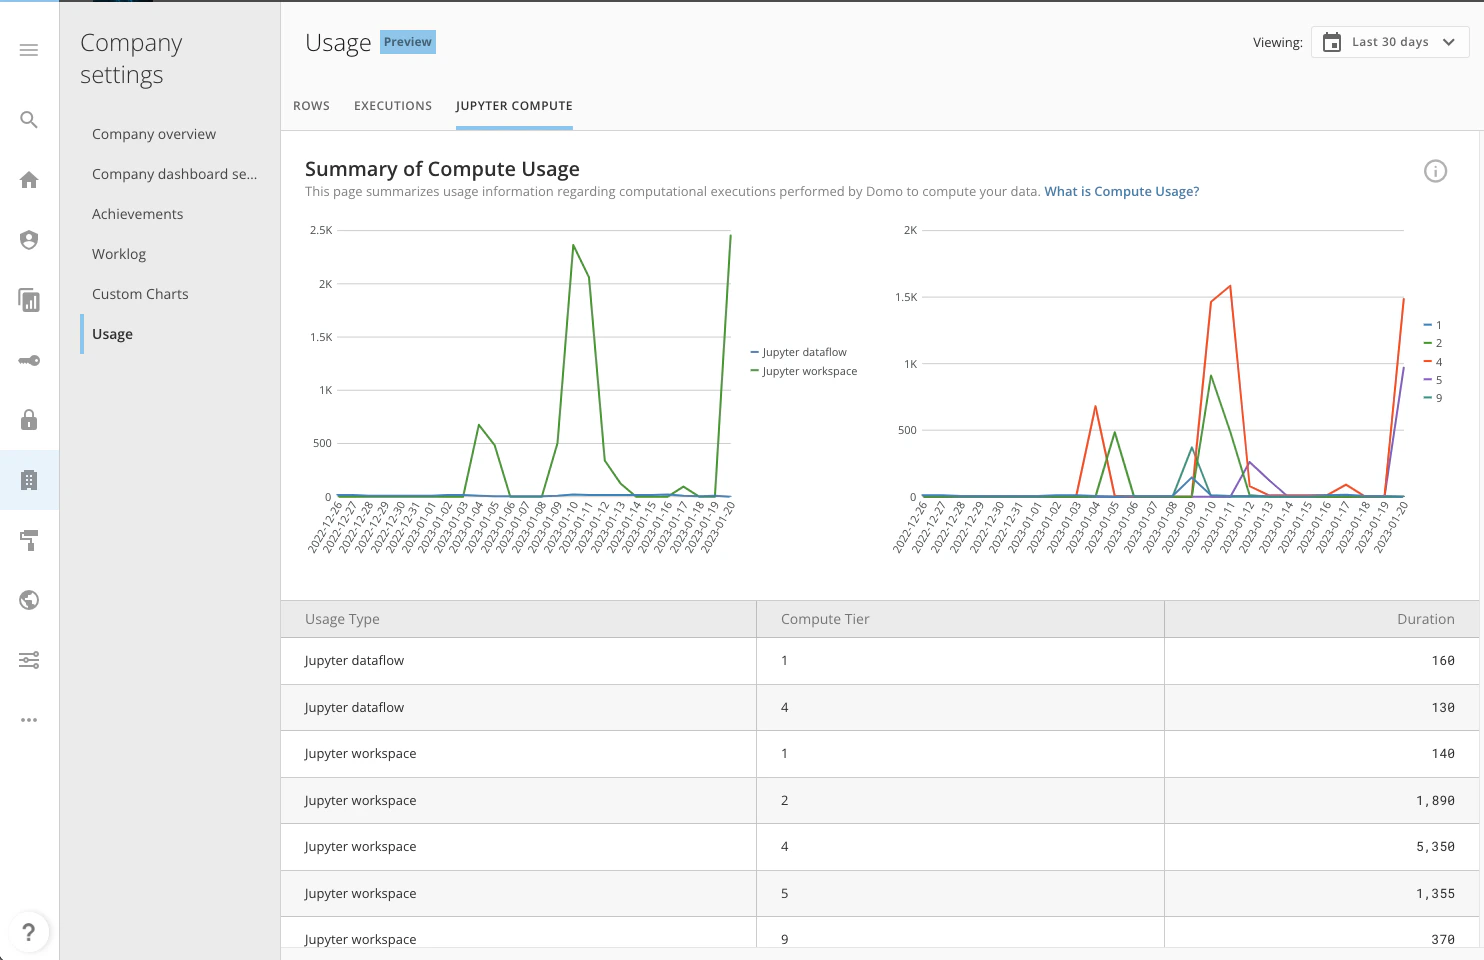
You can monitor Jupyter usage within Domo. As a prerequisite, you need to be assigned either the default Admin role or a custom role with the View Usage Metrics and Manage Jupyter Workspaces grants.
Follow the steps below to create a custom role with usage-based billing access.
1. Clone an existing role such as the default Admin role.
2. Remove any grants from the cloned role that are not needed for a billing admin.
3. Add the View Usage Metrics and Manage Jupyter Workspaces grants to this role.
You can learn more about creating custom roles in our article on [Managing Custom Roles](http://domo-support.domo.com/s/article/360043438973?language=en_US).
After you create the role, follow these steps to view your usage:
1. In the navigation header, go to **More**> **Admin**.\*\*\*\*
2. On the **Admin** screen in the **Company settings** menu, select **Usage**.
3. Go to the **Jupyter Compute** tab.
### Usage Monitoring
You can monitor Jupyter usage within Domo. As a prerequisite, you need to be assigned either the default Admin role or a custom role with the View Usage Metrics and Manage Jupyter Workspaces grants.
Follow the steps below to create a custom role with usage-based billing access.
1. Clone an existing role such as the default Admin role.
2. Remove any grants from the cloned role that are not needed for a billing admin.
3. Add the View Usage Metrics and Manage Jupyter Workspaces grants to this role.
You can learn more about creating custom roles in our article on [Managing Custom Roles](http://domo-support.domo.com/s/article/360043438973?language=en_US).
After you create the role, follow these steps to view your usage:
1. In the navigation header, go to **More**> **Admin**.\*\*\*\*
2. On the **Admin** screen in the **Company settings** menu, select **Usage**.
3. Go to the **Jupyter Compute** tab.
 ## FAQ
Plugins are not currently supported.
Please contact your Customer Success Manager (CSM) or Account Executive (AE) for the most up-to-date information on the trial experience of Jupyter.
Yes, we have a team of experienced data scientists ready to help as needed. Please contact your Account Executive (AE) for more information.
First, you must stop the workspace. You may then change the kernel in the Domo workspace edit view.
Yes. When you hover over a workspace, the
If you want to do any kind of data exploration or analysis (such as load a DataSet, develop data science models or machine learning pipelines, create custom data tables or figures, or write transformed data back into Domo) in a notebook, you need experience with either R or Python.
Domo's Jupyter integration allows users to install third-party libraries. However, Domo does not natively support every third-party library. Some third-party libraries may require more effort on the user's end to install, configure, and troubleshoot.
Domo supports integrating and maintaining git repositories within the Jupyter Workspaces interface. After you complete integration, you can repeatedly push updates (including updated Jupyter notebook files) from Jupyter Workspaces to the GitHub repository you select using standard Git operations. See [Use Jupyter Workspaces with GitHub](/docs/s/article/000005166) for more information.
At this time, we have no plans to deprecate any of our Python versions.
Right now, trial Jupyter customers only have access to four tiers. Customers on consumption should have nine tiers for Jupyter, each with a different CPU allocation.
Jupyter does not have the ability to run continuously.
At this time, we do not have any support for copilot. We are looking into this to determine its feasibility and where it could fit on the roadmap.
Experiencing issues? See the [Jupyter Troubleshooting Guide](/docs/s/article/7440921035671) or contact [support@domo.com](mailto:support@domo.com) for assistance.
## FAQ
Plugins are not currently supported.
Please contact your Customer Success Manager (CSM) or Account Executive (AE) for the most up-to-date information on the trial experience of Jupyter.
Yes, we have a team of experienced data scientists ready to help as needed. Please contact your Account Executive (AE) for more information.
First, you must stop the workspace. You may then change the kernel in the Domo workspace edit view.
Yes. When you hover over a workspace, the
If you want to do any kind of data exploration or analysis (such as load a DataSet, develop data science models or machine learning pipelines, create custom data tables or figures, or write transformed data back into Domo) in a notebook, you need experience with either R or Python.
Domo's Jupyter integration allows users to install third-party libraries. However, Domo does not natively support every third-party library. Some third-party libraries may require more effort on the user's end to install, configure, and troubleshoot.
Domo supports integrating and maintaining git repositories within the Jupyter Workspaces interface. After you complete integration, you can repeatedly push updates (including updated Jupyter notebook files) from Jupyter Workspaces to the GitHub repository you select using standard Git operations. See [Use Jupyter Workspaces with GitHub](/docs/s/article/000005166) for more information.
At this time, we have no plans to deprecate any of our Python versions.
Right now, trial Jupyter customers only have access to four tiers. Customers on consumption should have nine tiers for Jupyter, each with a different CPU allocation.
Jupyter does not have the ability to run continuously.
At this time, we do not have any support for copilot. We are looking into this to determine its feasibility and where it could fit on the roadmap.
Experiencing issues? See the [Jupyter Troubleshooting Guide](/docs/s/article/7440921035671) or contact [support@domo.com](mailto:support@domo.com) for assistance.