> ## Documentation Index
> Fetch the complete documentation index at: https://www.domo.com/docs/llms.txt
> Use this file to discover all available pages before exploring further.
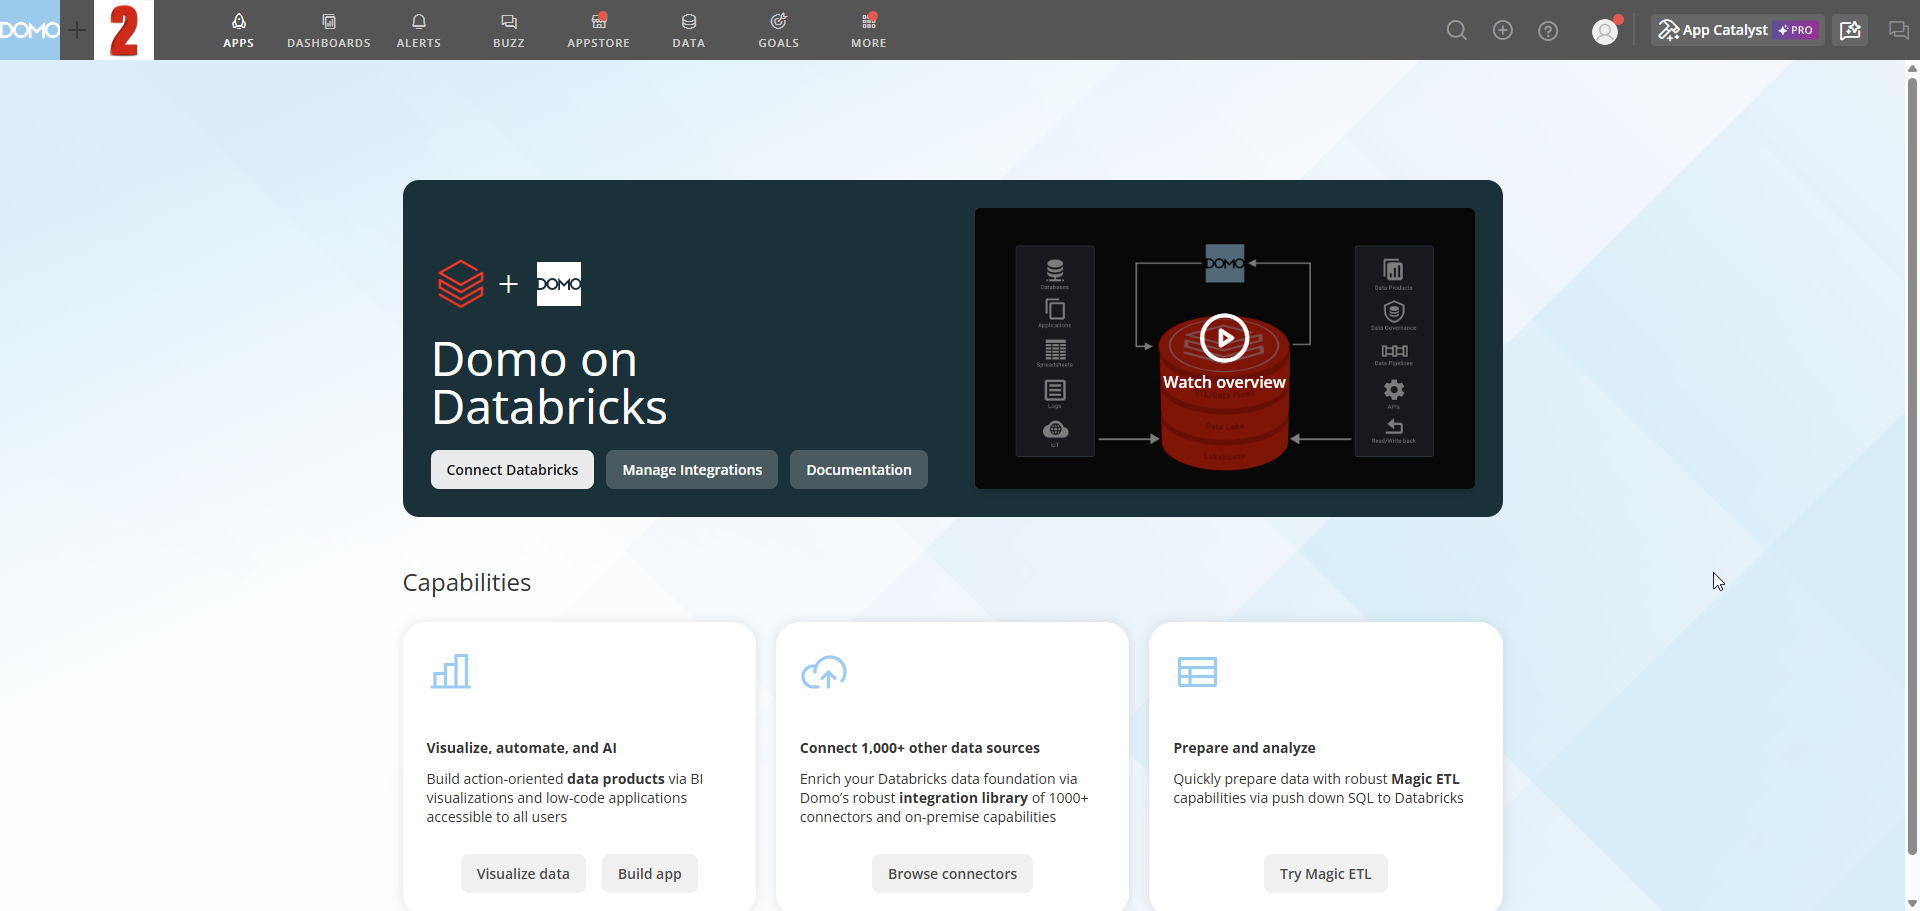
# Domo on Databricks
With Cloud Integrations, you can power your Domo instance using Databricks. Use this guide to set up a Databricks integration for read-only and read/write access.
After setup, you can use Databricks DataSets to create cards, configure alerts, and build Magic ETL DataFlows.
 ***
## Architectural Overview
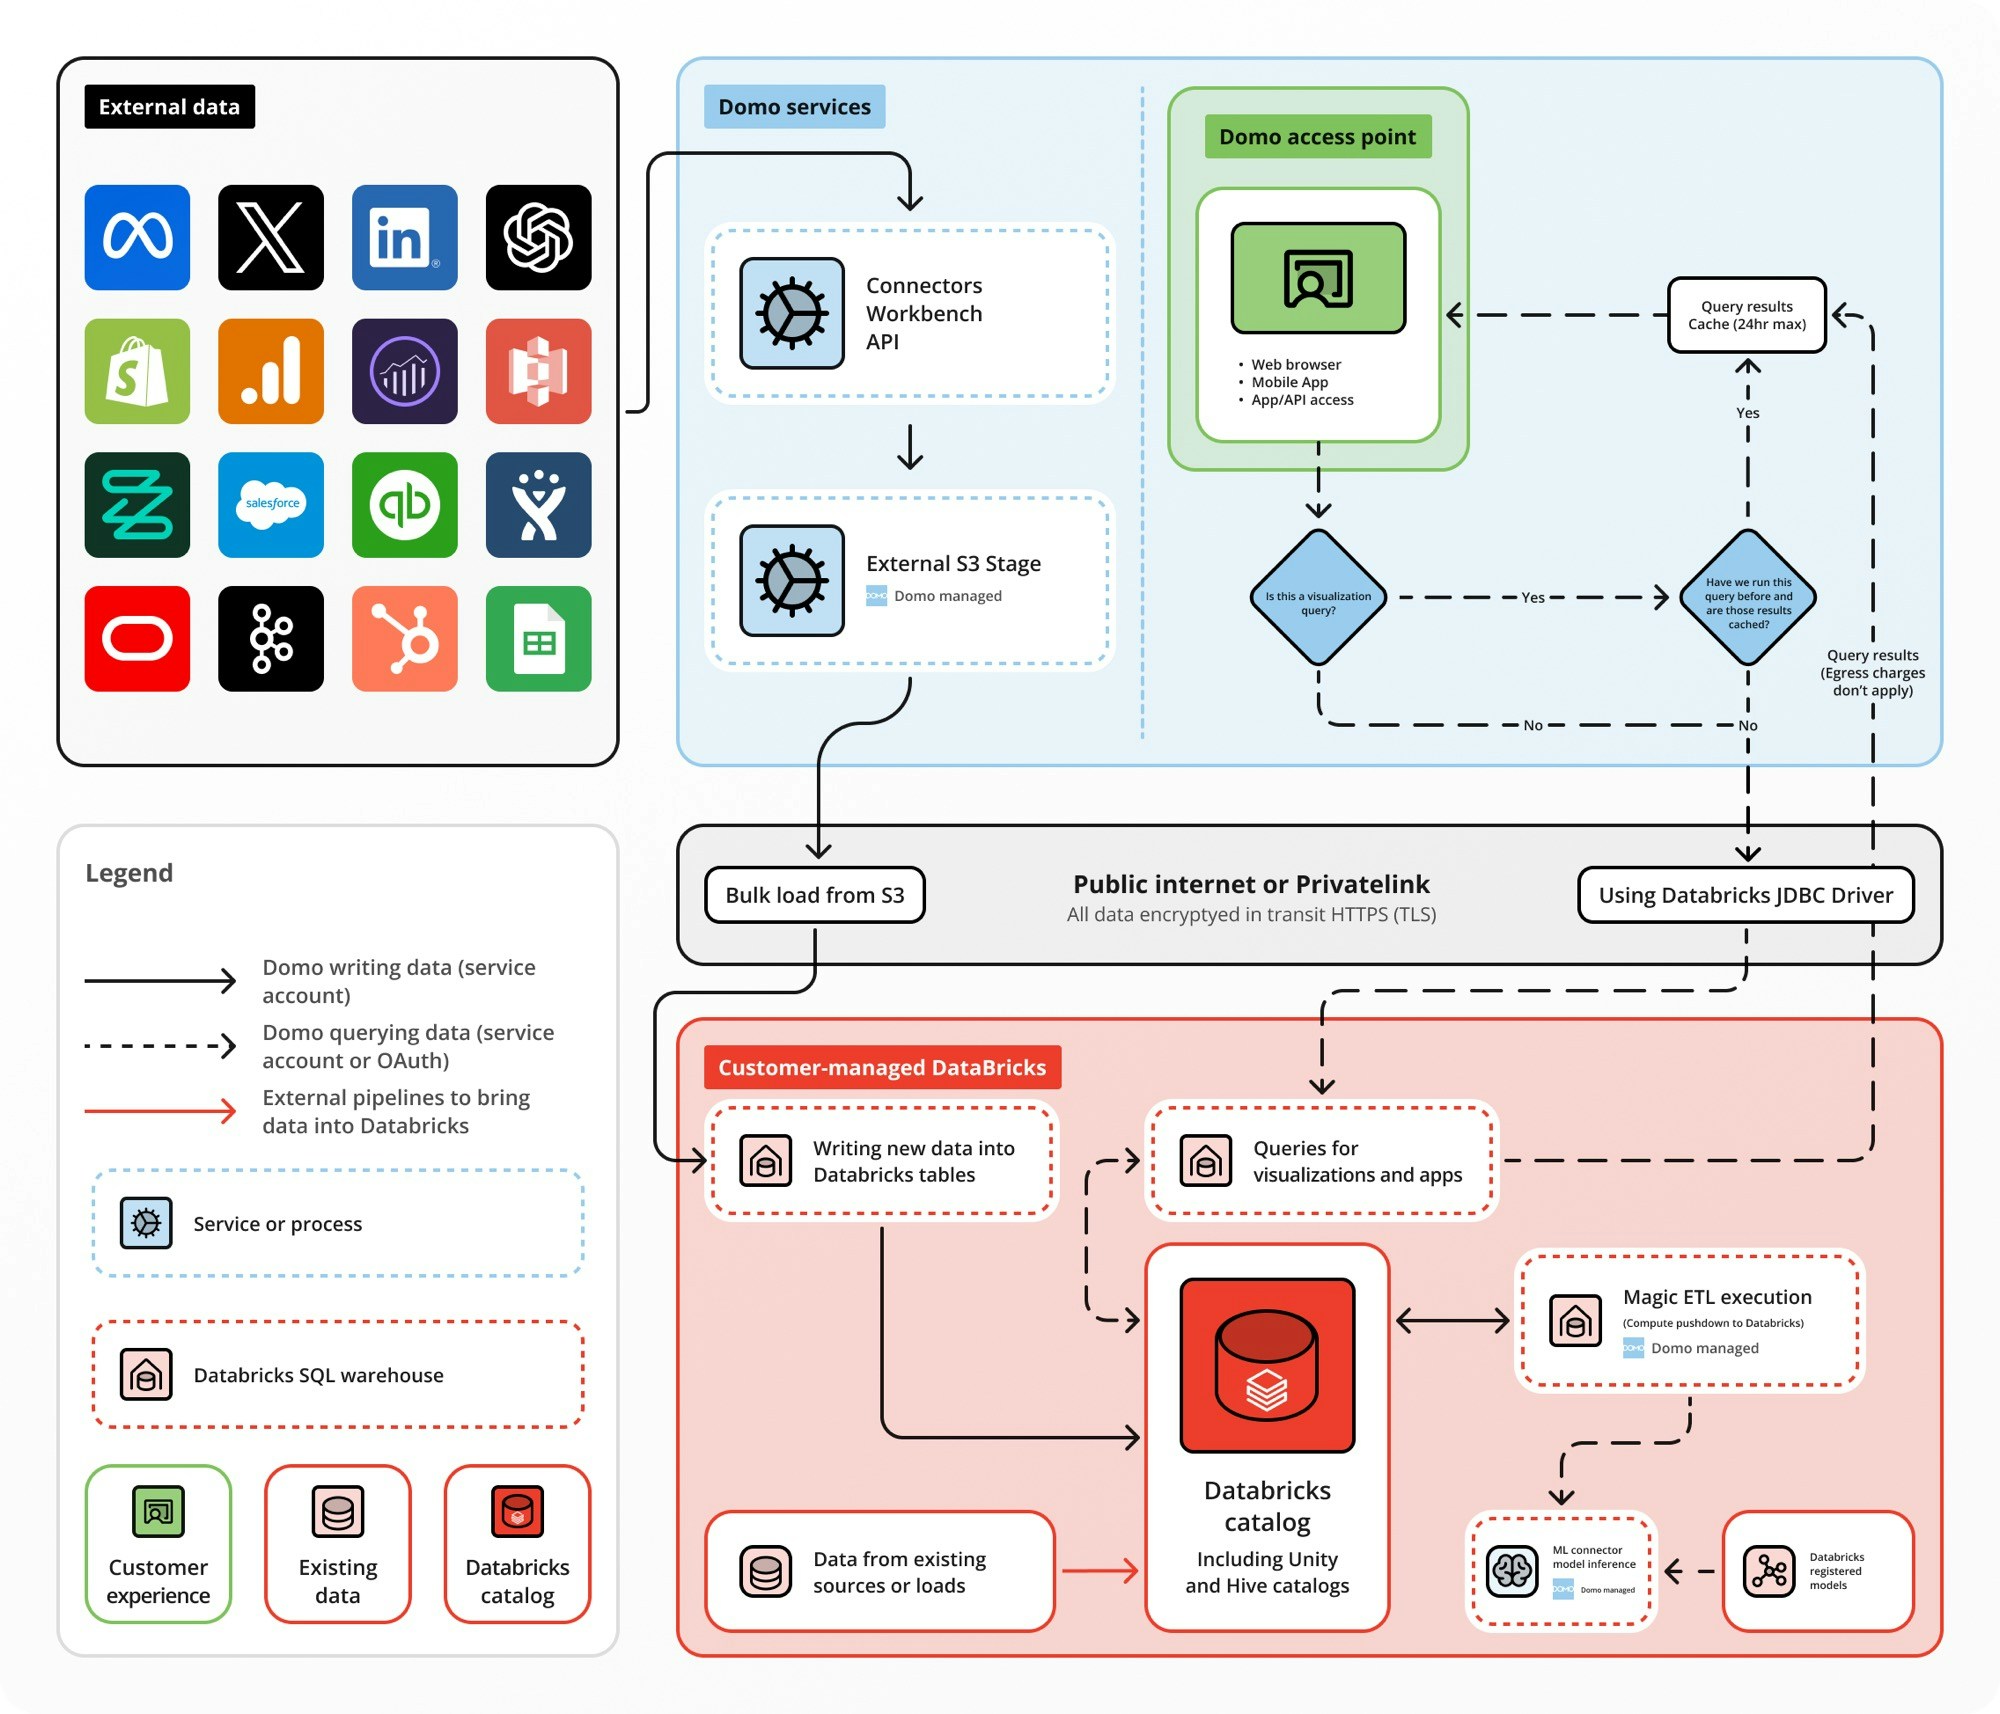
The diagram below shows how Domo connects to Databricks through Cloud Integrations. Domo queries data live from your Databricks environment; no data is copied to Domo storage.
***
## Architectural Overview
The diagram below shows how Domo connects to Databricks through Cloud Integrations. Domo queries data live from your Databricks environment; no data is copied to Domo storage.
 ## Before You Begin
* (Recommended) Create a Databricks service account—Create a new Databricks account specifically for this integration. You can use any account with read access in Databricks, but best practice is a dedicated service account with read access to your default Databricks environment.
* (Recommended) Create a Domo service account—Create a new Domo account specifically for this integration. Your account's custom role must include the **Manage Cloud Accounts** and **Manage DataSet** grants.
* (Conditional) If you are migrating from a federated or connector-based integration, review [Migrate from Federated to Cloud Integrations](/docs/s/article/000005675) before proceeding—Beast Mode formulas written in MySQL syntax may not be compatible with Spark SQL.
For more information about roles and grants, see [Manage User Roles and Grants](/docs/s/article/360043438973).
## Set Up Read-Only Access
1. In the navigation menu, select **Data Warehouse** > **Connect Data** > **Cloud Integrations** > **Databricks**. The Databricks Cloud Integrations list opens.
## Before You Begin
* (Recommended) Create a Databricks service account—Create a new Databricks account specifically for this integration. You can use any account with read access in Databricks, but best practice is a dedicated service account with read access to your default Databricks environment.
* (Recommended) Create a Domo service account—Create a new Domo account specifically for this integration. Your account's custom role must include the **Manage Cloud Accounts** and **Manage DataSet** grants.
* (Conditional) If you are migrating from a federated or connector-based integration, review [Migrate from Federated to Cloud Integrations](/docs/s/article/000005675) before proceeding—Beast Mode formulas written in MySQL syntax may not be compatible with Spark SQL.
For more information about roles and grants, see [Manage User Roles and Grants](/docs/s/article/360043438973).
## Set Up Read-Only Access
1. In the navigation menu, select **Data Warehouse** > **Connect Data** > **Cloud Integrations** > **Databricks**. The Databricks Cloud Integrations list opens.
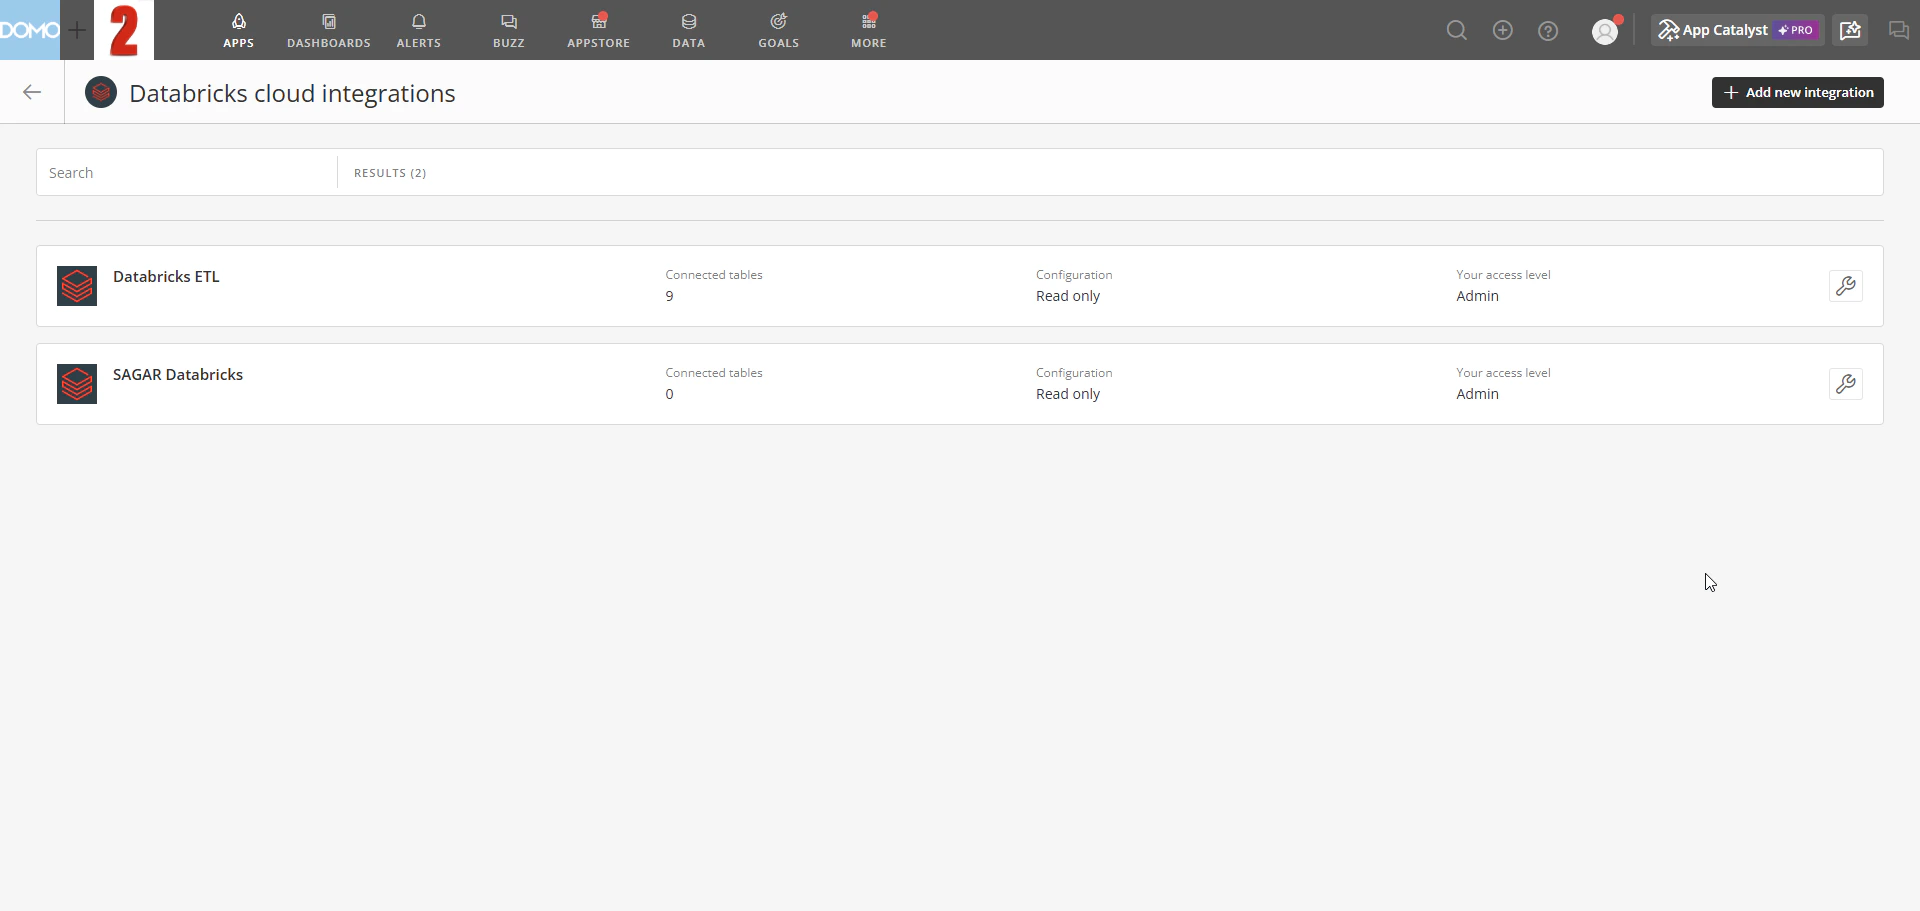 2. Select **+ Add new integration**. The new integration form opens.
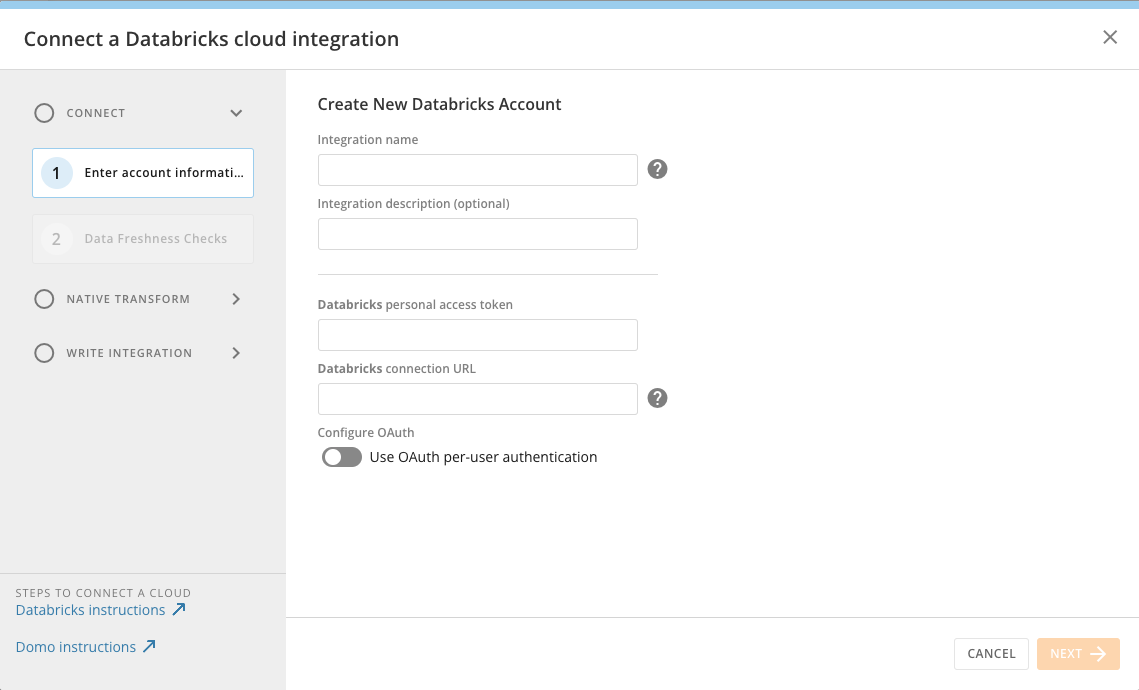
3. Enter a name and optional description in the **Integration name** and **Integration description** fields.
2. Select **+ Add new integration**. The new integration form opens.
3. Enter a name and optional description in the **Integration name** and **Integration description** fields.
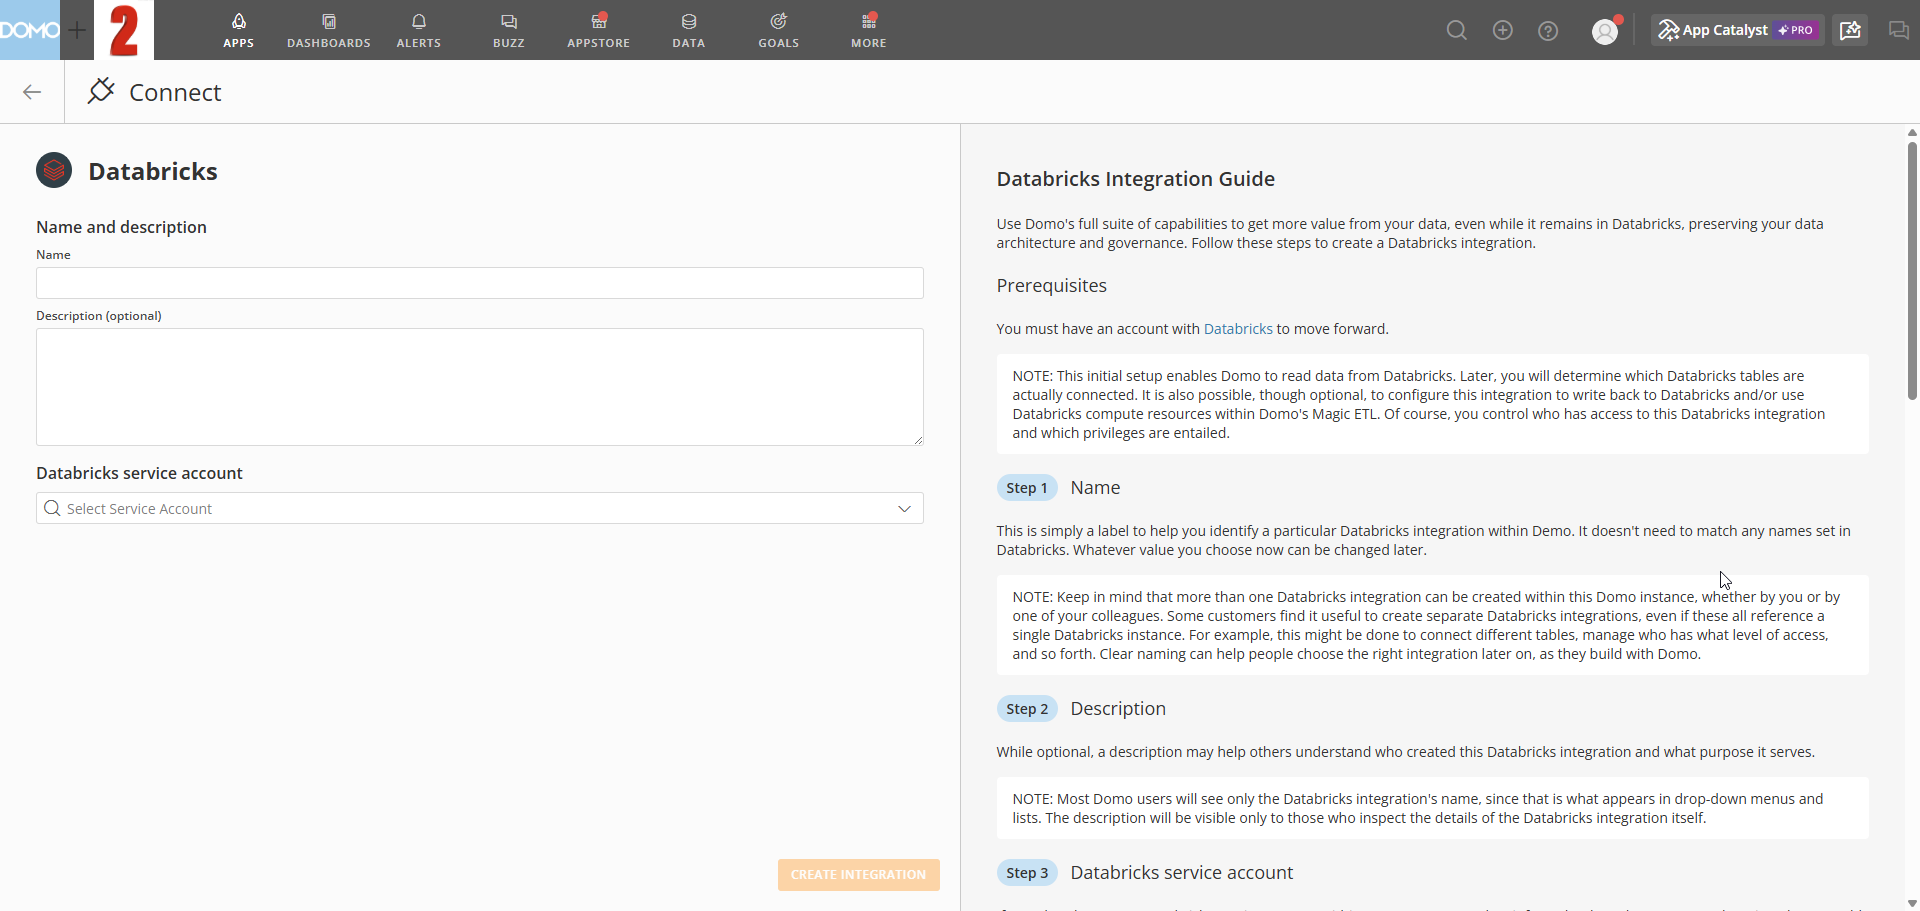 4. Under **Databricks service account**, select an existing account from the dropdown.
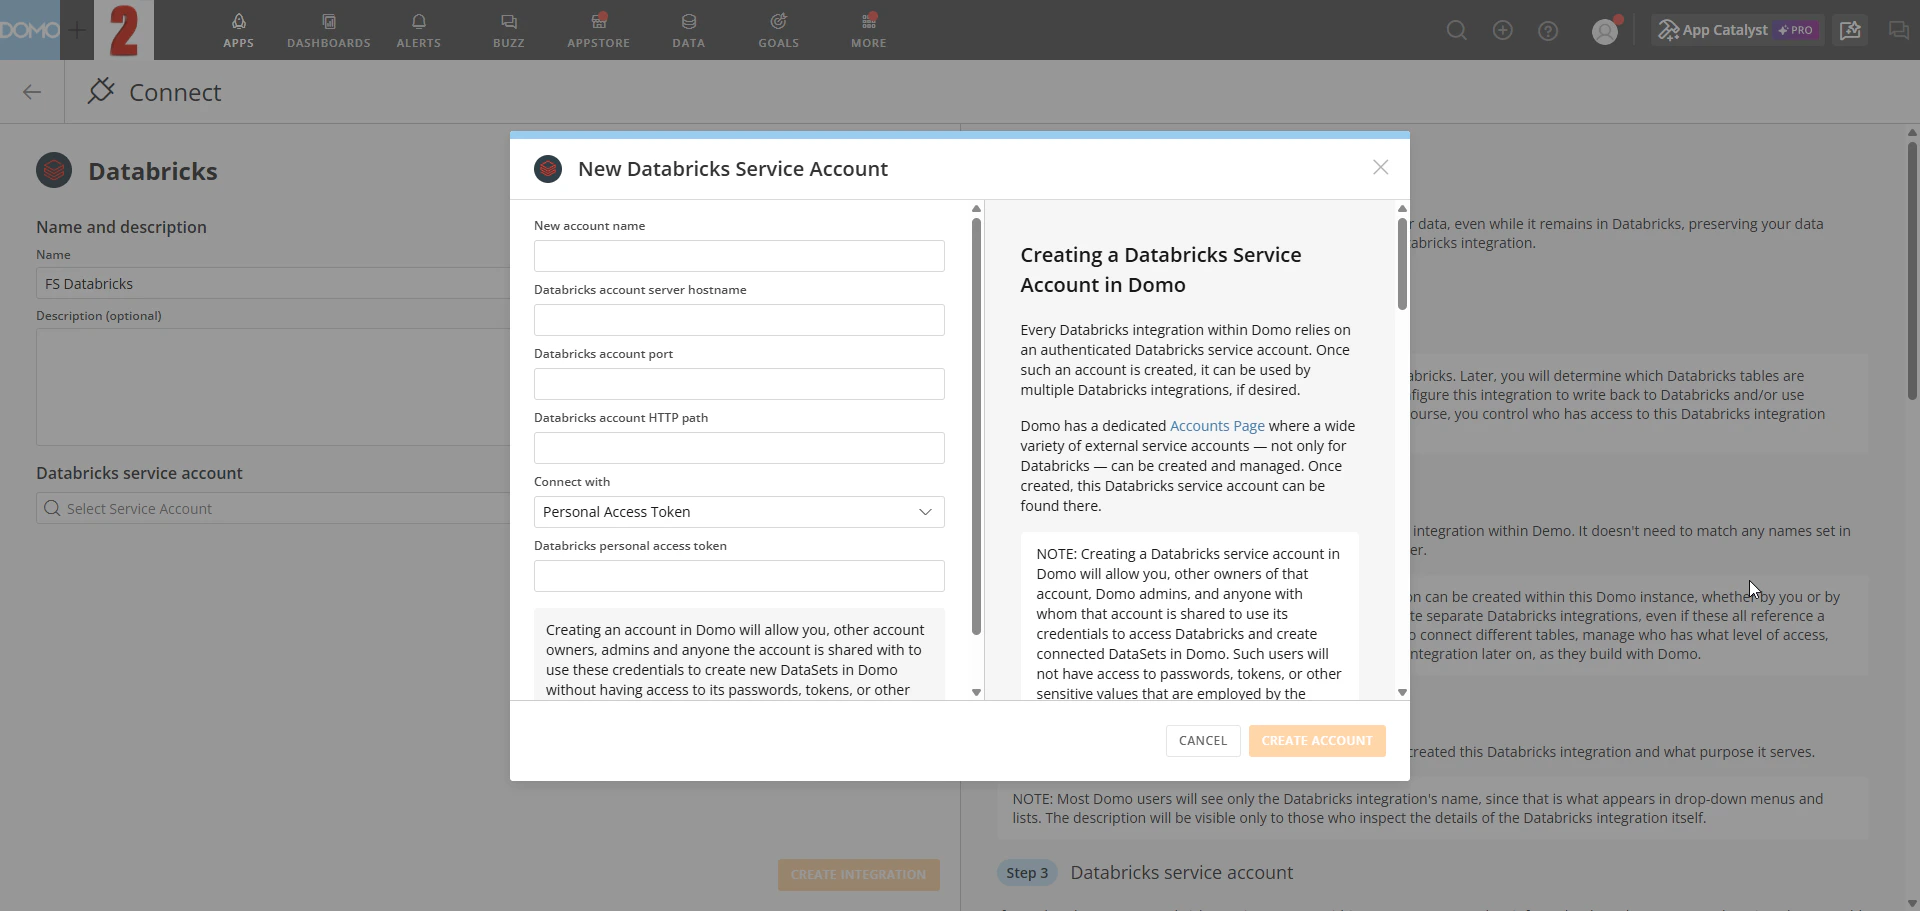
5. (Conditional) To create a new service account, fill in the connection details in the **New Databricks Service Account** modal:
* Enter a name for the account.
* Enter your Databricks server hostname and HTTP path.
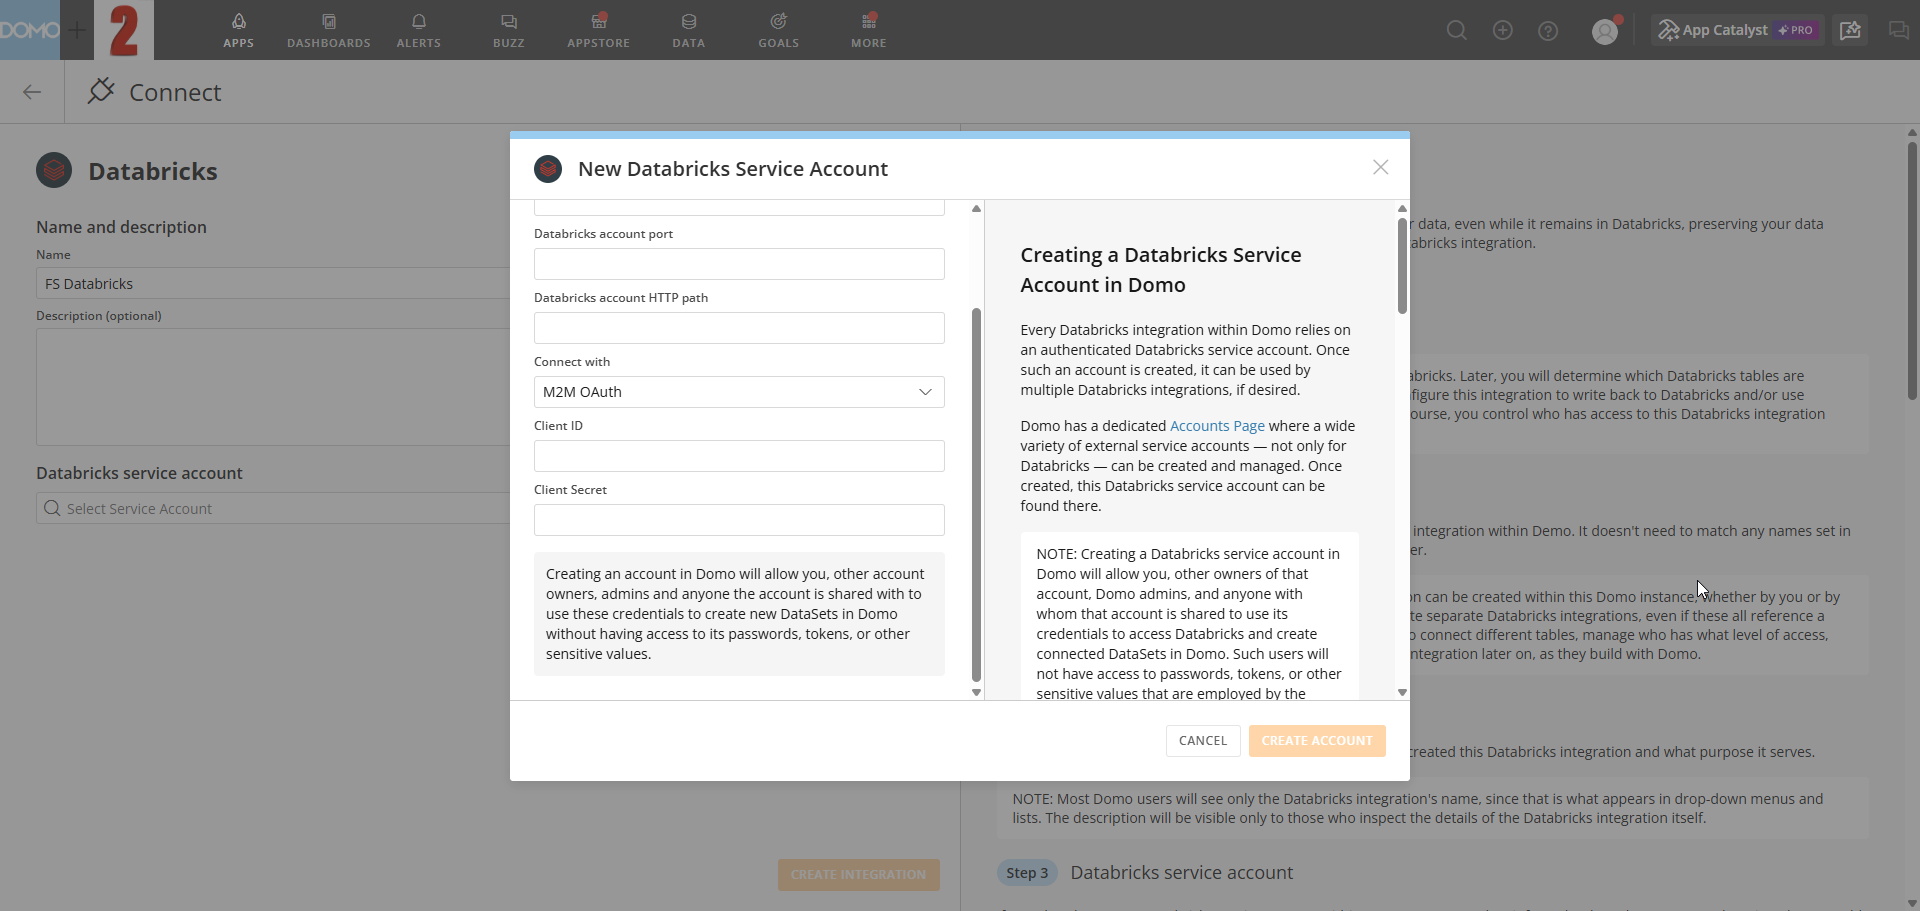
* In the **Connect with** dropdown, select your authentication method:
* **Personal Access Token**—Create a personal access token in your Databricks account and paste it into the **Databricks personal access token** field.
4. Under **Databricks service account**, select an existing account from the dropdown.
5. (Conditional) To create a new service account, fill in the connection details in the **New Databricks Service Account** modal:
* Enter a name for the account.
* Enter your Databricks server hostname and HTTP path.
* In the **Connect with** dropdown, select your authentication method:
* **Personal Access Token**—Create a personal access token in your Databricks account and paste it into the **Databricks personal access token** field.
 **Important:** Copy the token before leaving the page—Databricks does not display it again.
* **M2M OAuth**—Enter your Databricks OAuth application's **Client ID** and **Client Secret** in the **Client ID** and **Client Secret** fields. This authentication method is used by the service account and supports write-back and native transforms, since those operations run under the service account regardless of how it authenticates.
**Important:** Copy the token before leaving the page—Databricks does not display it again.
* **M2M OAuth**—Enter your Databricks OAuth application's **Client ID** and **Client Secret** in the **Client ID** and **Client Secret** fields. This authentication method is used by the service account and supports write-back and native transforms, since those operations run under the service account regardless of how it authenticates.
 **Note:** Do not include protocol identifiers in the connection URL. `jdbc:databricks://` is assumed; `jdbc:spark://` is not supported.
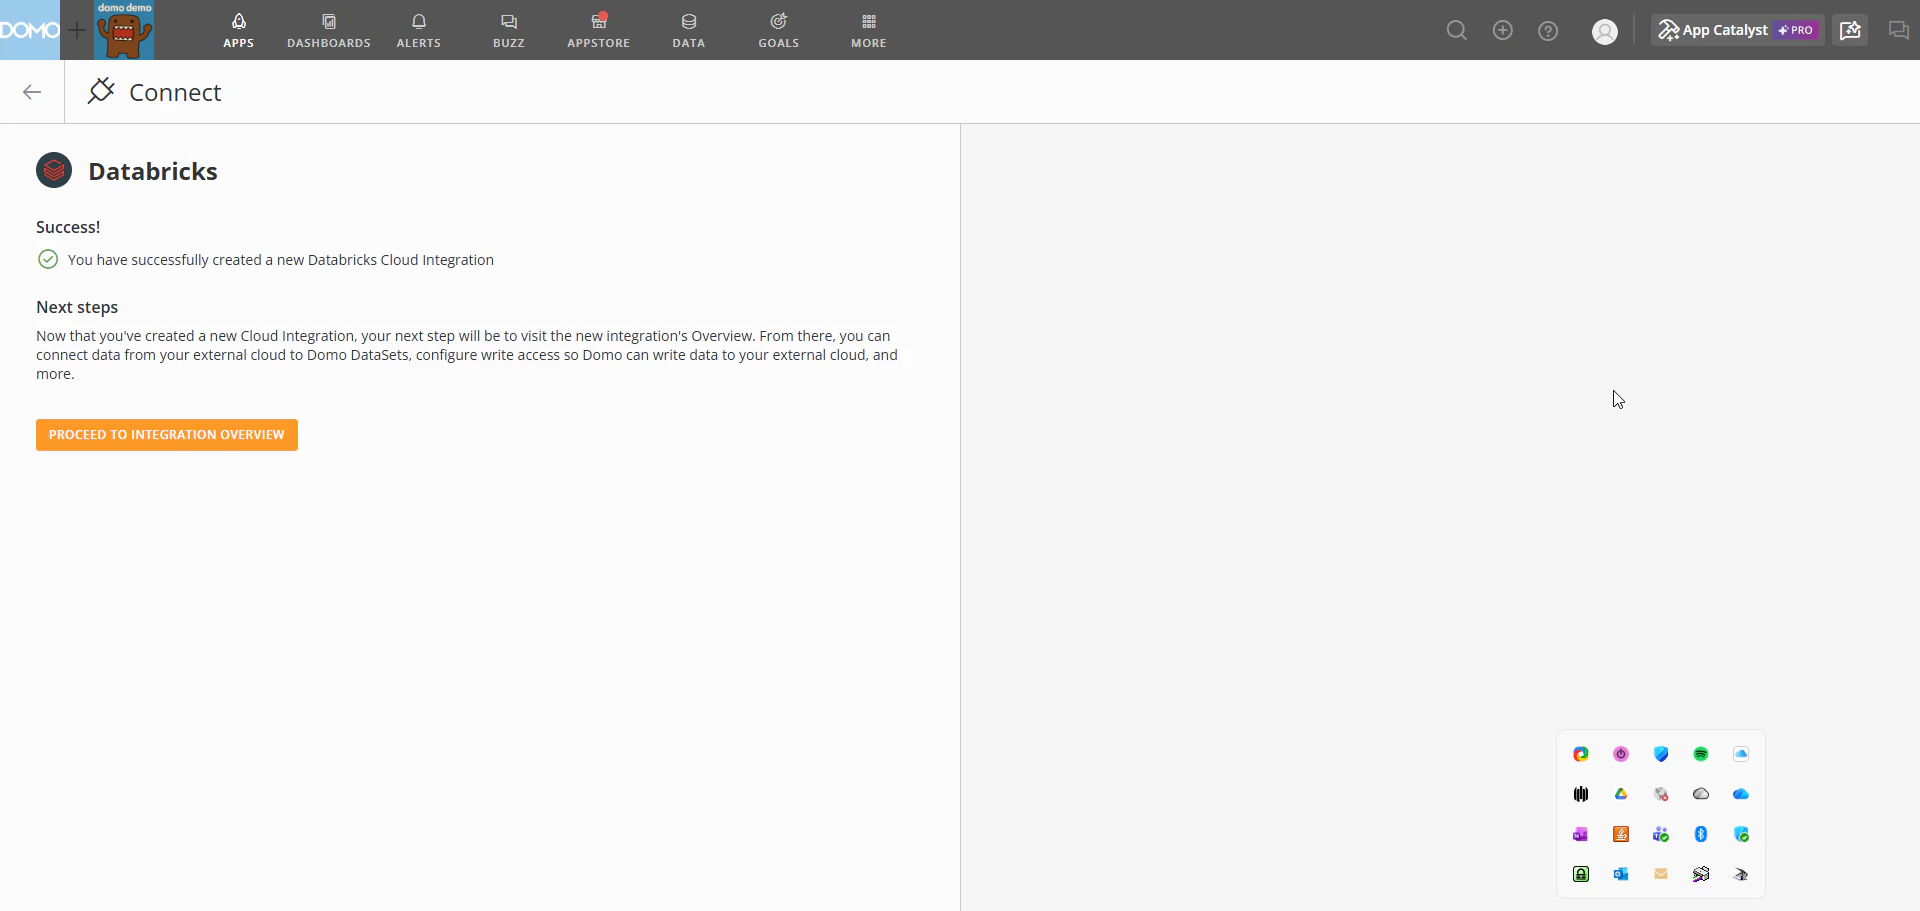
6. Select **Create integration**. On the success screen, select **Navigate to integration overview** to proceed.
**Note:** Do not include protocol identifiers in the connection URL. `jdbc:databricks://` is assumed; `jdbc:spark://` is not supported.
6. Select **Create integration**. On the success screen, select **Navigate to integration overview** to proceed.
 7. Configure your data freshness settings. Learn about
[advanced scheduling](/docs/s/article/4412849158167#use-advanced-scheduling-for-data-freshness) for data freshness.
8. Select an existing configuration from the dropdown, or select **Add OAuth Config...** to create a new one.
9. (Conditional) To create a new configuration:
1. In Databricks, navigate to **Account Console** > **Settings** > **App connections** and add a new app connection for Domo. Enable a custom OAuth application for your Domo instance. For details, see the [Databricks OAuth documentation](https://docs.databricks.com/en/integrations/enable-disable-oauth.html).
2. Add the Domo redirect URLs shown in the modal to your Databricks OAuth app.
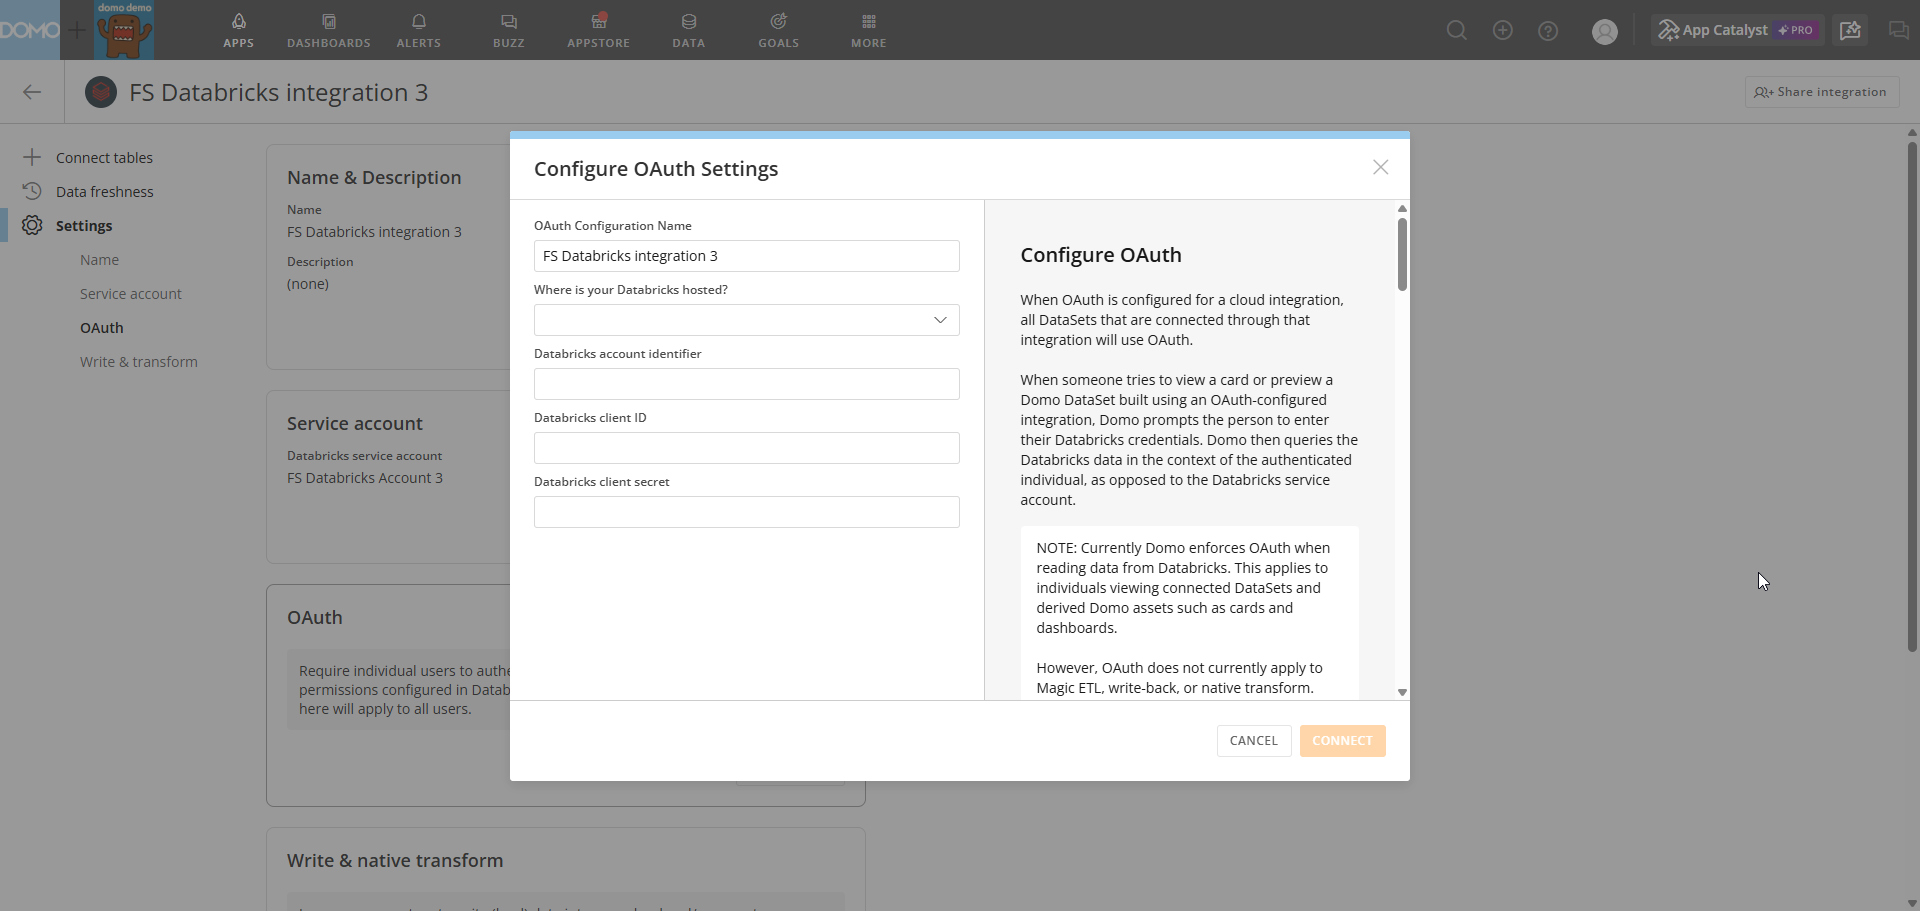
3. Back in Domo, enter the **OAuth configuration name**, your **Databricks account identifier**, **Client ID**, and **Client Secret**.
7. Configure your data freshness settings. Learn about
[advanced scheduling](/docs/s/article/4412849158167#use-advanced-scheduling-for-data-freshness) for data freshness.
8. Select an existing configuration from the dropdown, or select **Add OAuth Config...** to create a new one.
9. (Conditional) To create a new configuration:
1. In Databricks, navigate to **Account Console** > **Settings** > **App connections** and add a new app connection for Domo. Enable a custom OAuth application for your Domo instance. For details, see the [Databricks OAuth documentation](https://docs.databricks.com/en/integrations/enable-disable-oauth.html).
2. Add the Domo redirect URLs shown in the modal to your Databricks OAuth app.
3. Back in Domo, enter the **OAuth configuration name**, your **Databricks account identifier**, **Client ID**, and **Client Secret**.
 10. Select **Save**.
 11. Search for and select Databricks schemas and tables you want to use to create DataSets in Domo.
12. Select
**Create DataSets**.
11. Search for and select Databricks schemas and tables you want to use to create DataSets in Domo.
12. Select
**Create DataSets**.
 ## Add Databricks Tables to Domo
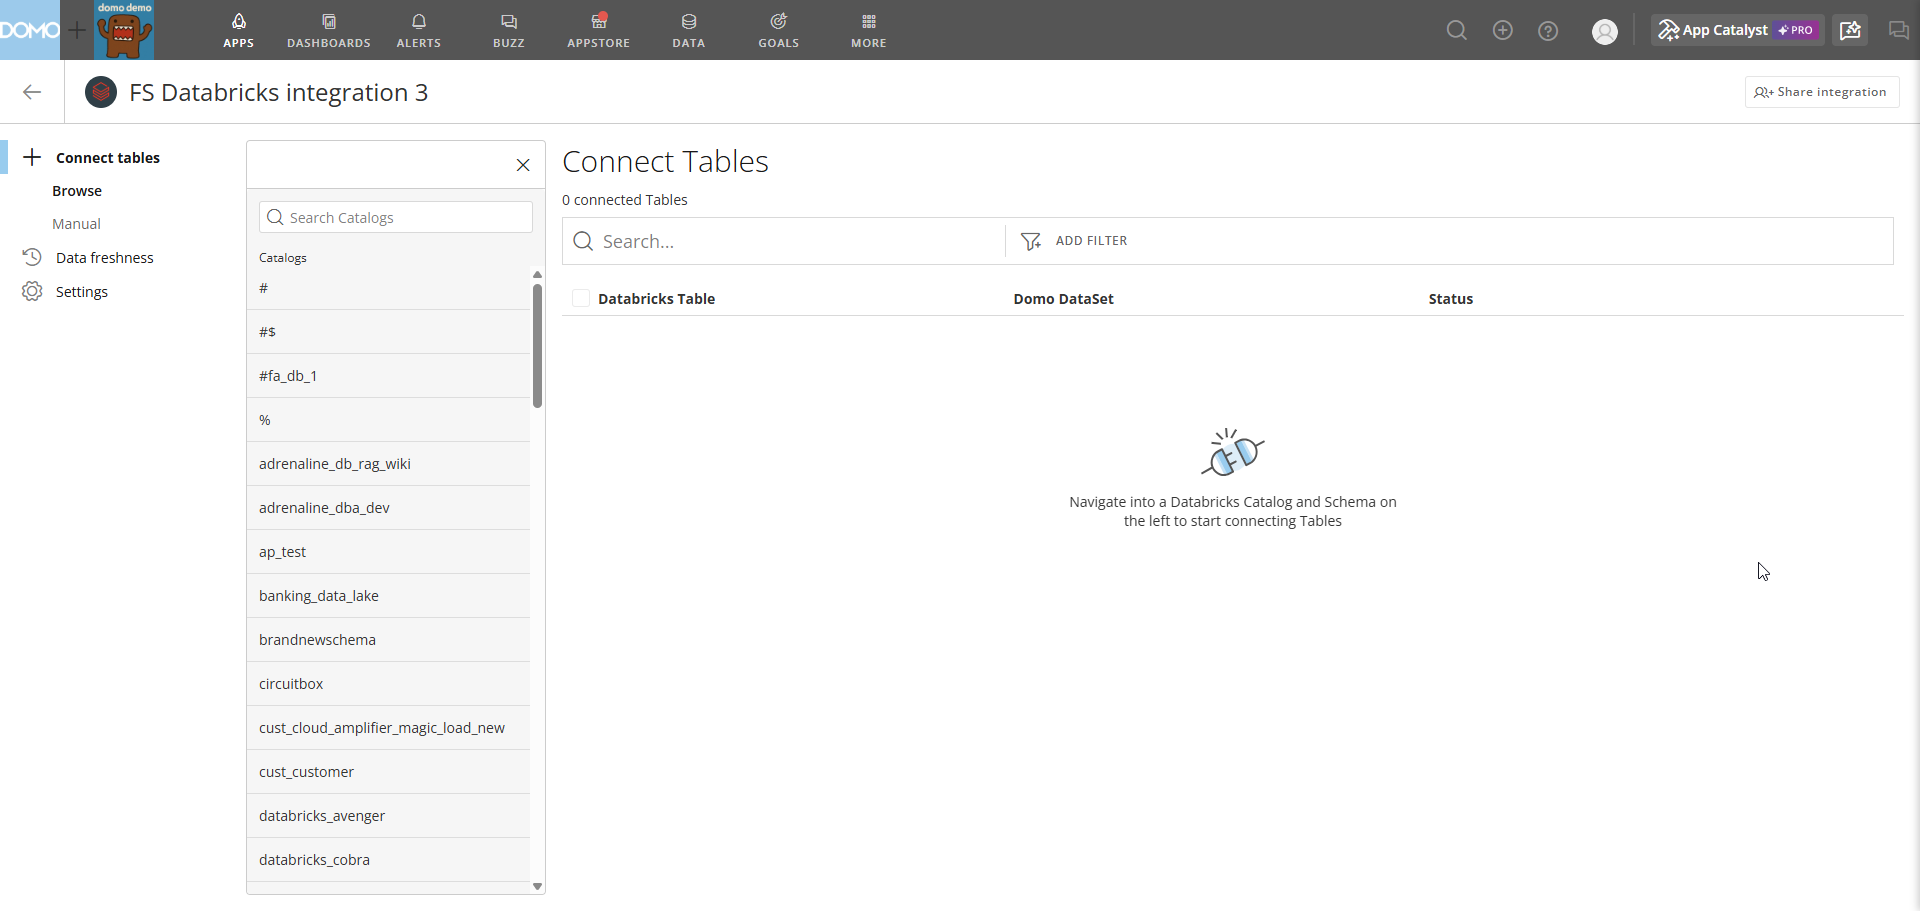
After creating your integration, connect Databricks tables as DataSets in Domo. For step-by-step instructions, see [Connect tables in Cloud Integrations](/docs/s/article/Connect-Tables-in-Cloud-Integrations).
## Add Databricks Tables to Domo
After creating your integration, connect Databricks tables as DataSets in Domo. For step-by-step instructions, see [Connect tables in Cloud Integrations](/docs/s/article/Connect-Tables-in-Cloud-Integrations).
 ## Configure OAuth
(Optional) Configure OAuth to require users to sign in with their own Databricks credentials when they view cards or DataSets connected through that integration. OAuth does not currently apply to Magic ETL, write-back, or native transforms.
**Note:** This refers to per-user OAuth configured here for card and DataSet viewing. It does not apply to M2M OAuth used to authenticate the service account itself. If your service account authenticates via M2M OAuth, write-back and native transforms continue to work normally, since those operations always run under the service account.
1. From the Databricks Cloud Integrations list, select the **wrench** icon on the integration you want to configure, then select **Settings**.
2. In the **Settings** panel, under **OAuth**, select **Set up OAuth**. The **Configure OAuth Settings** modal opens.
## Configure OAuth
(Optional) Configure OAuth to require users to sign in with their own Databricks credentials when they view cards or DataSets connected through that integration. OAuth does not currently apply to Magic ETL, write-back, or native transforms.
**Note:** This refers to per-user OAuth configured here for card and DataSet viewing. It does not apply to M2M OAuth used to authenticate the service account itself. If your service account authenticates via M2M OAuth, write-back and native transforms continue to work normally, since those operations always run under the service account.
1. From the Databricks Cloud Integrations list, select the **wrench** icon on the integration you want to configure, then select **Settings**.
2. In the **Settings** panel, under **OAuth**, select **Set up OAuth**. The **Configure OAuth Settings** modal opens.
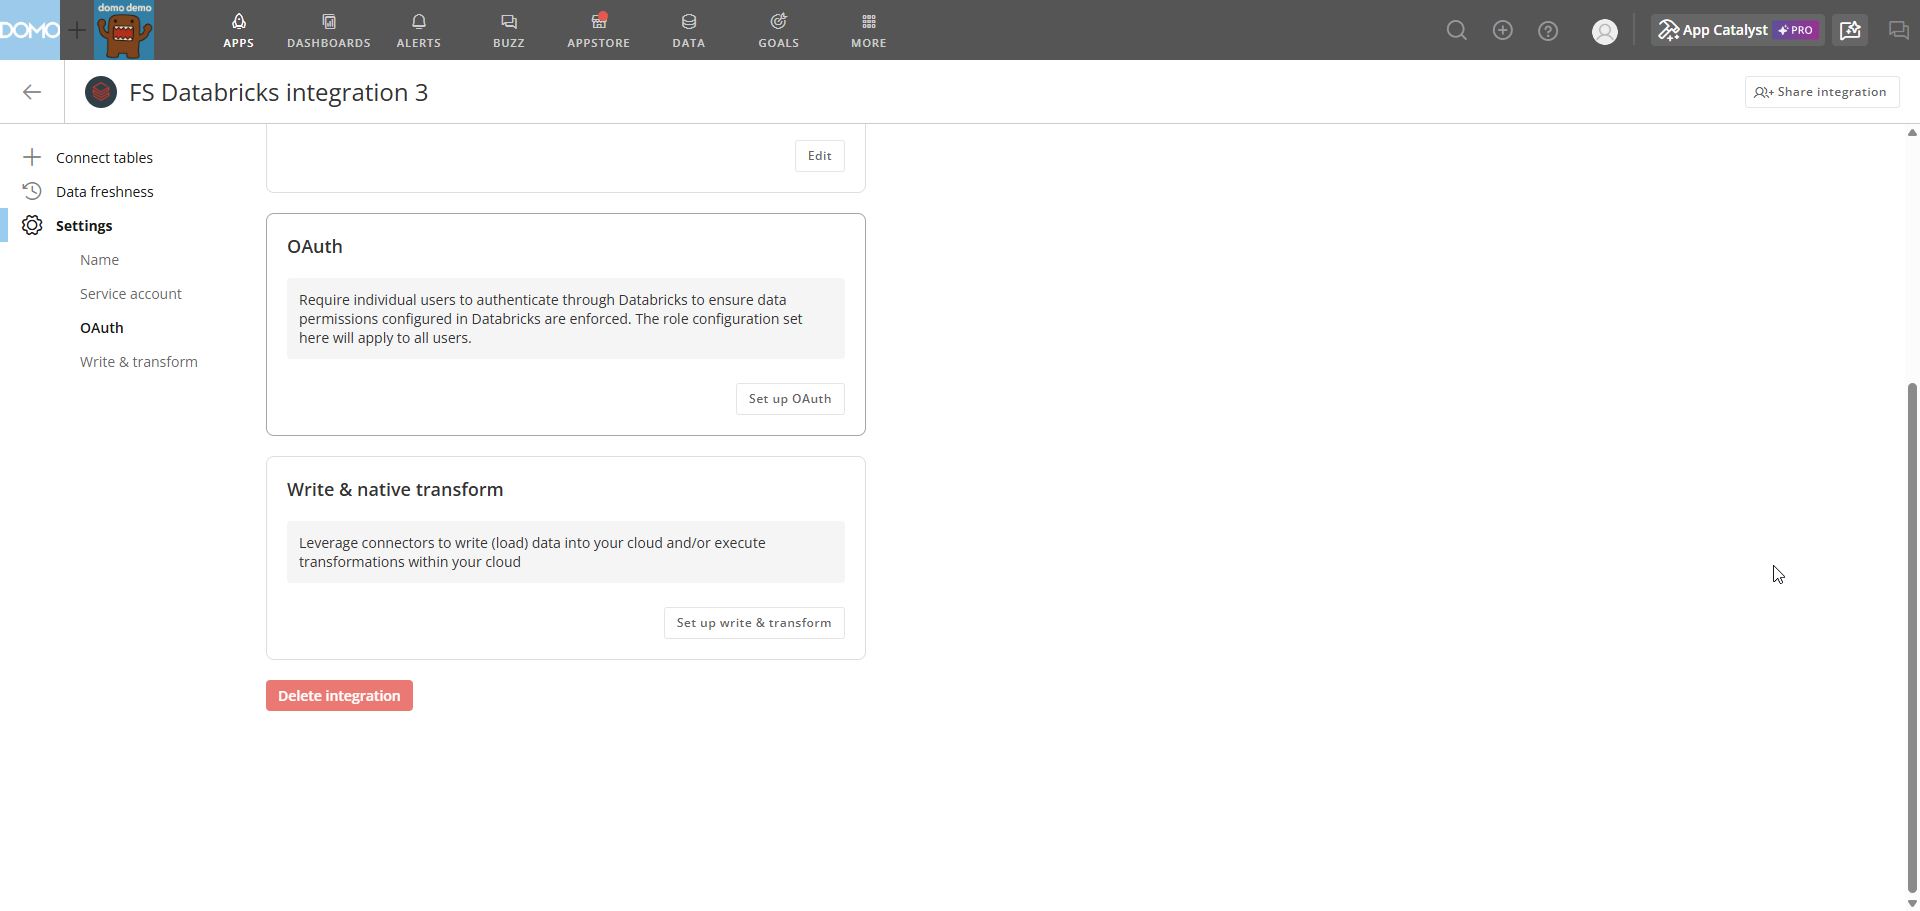 3. Select an existing configuration from the dropdown, or select **Add OAuth Config...** to create a new one.
4. (Conditional) To create a new configuration:
1. In Databricks, navigate to **Account Console** > **Settings** > **App connections** and add a new app connection for Domo. Enable a custom OAuth application for your Domo instance. For details, see the [Databricks OAuth documentation](https://docs.databricks.com/en/integrations/enable-disable-oauth.html).
2. Add the Domo redirect URLs shown in the modal to your Databricks OAuth app.
3. Back in Domo, enter the **OAuth configuration name**, your **Databricks account identifier**, **Client ID**, and **Client Secret**.
5. Select **Save**.
## Set Up Write & Native Transform
Enable write-back, native transforms, or both on an existing Databricks integration. You must complete the read-only setup before proceeding.
1. From the Databricks Cloud Integrations list, select the **wrench** icon on the integration you want to configure, then select **Settings**.
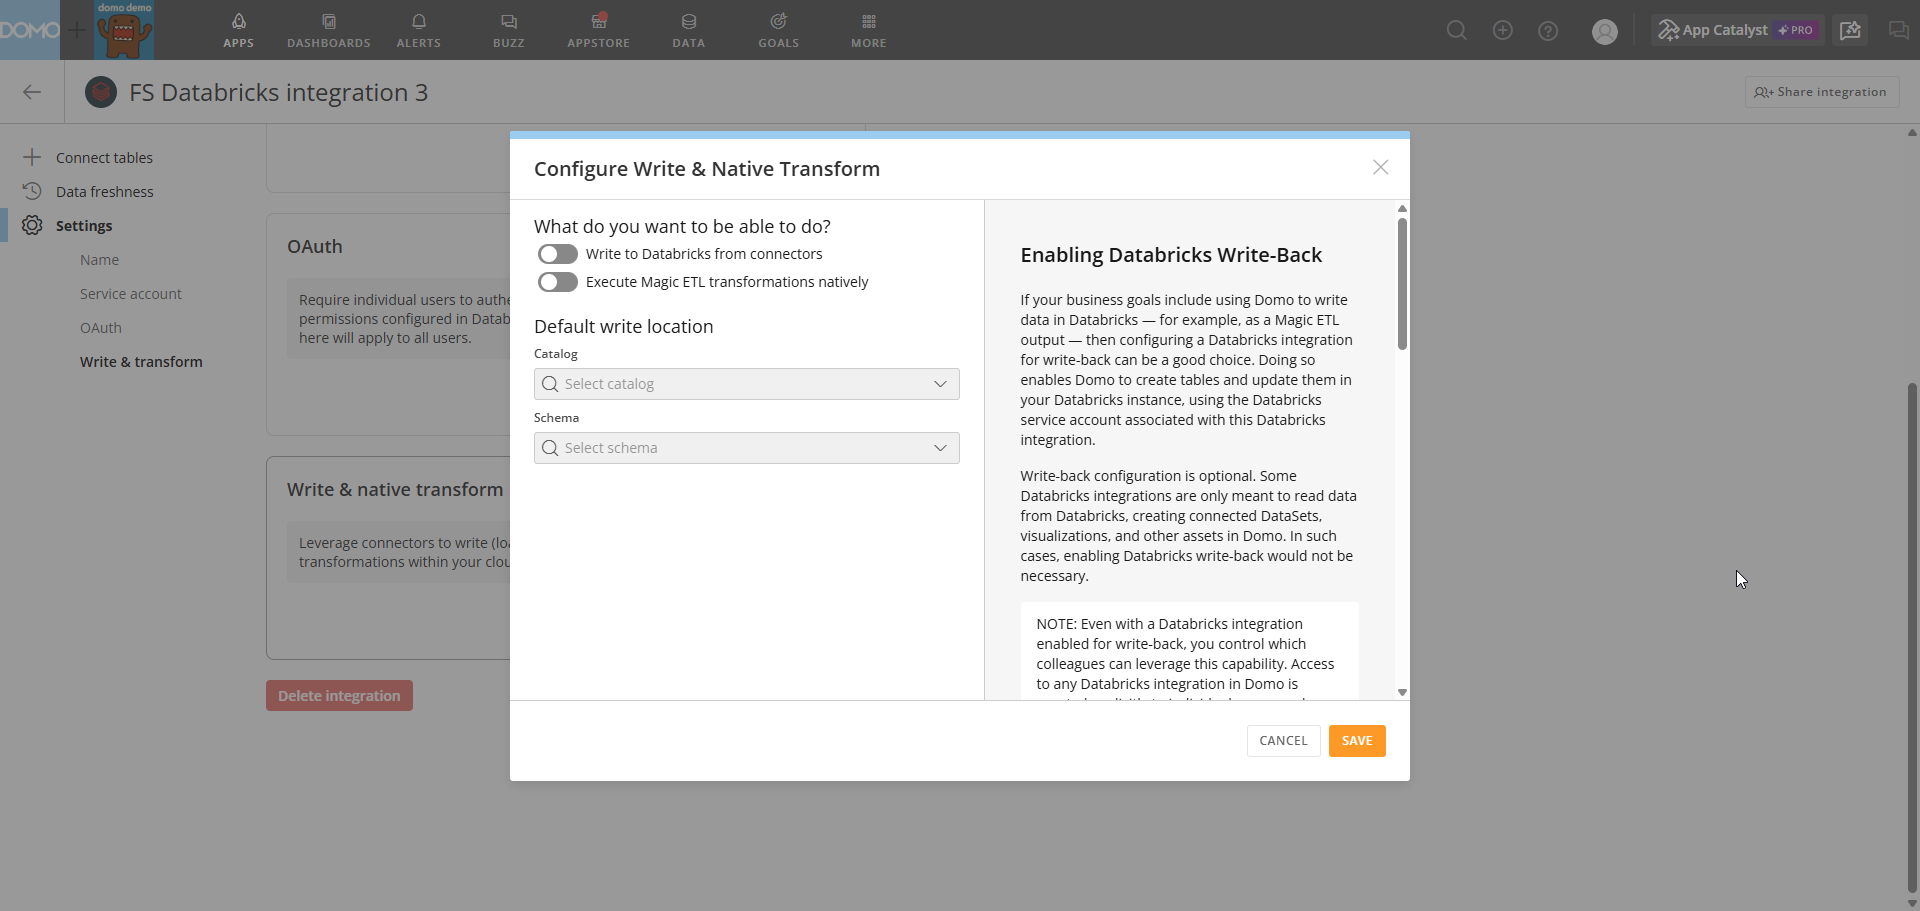
2. In the **Settings** panel, under **Write & native transform**, select **Set up write & transform**. The **Configure Write & Native Transform** modal opens.
3. Under **What do you want to be able to do?**, select one or both capabilities:
* **Write to Databricks from connectors**—enables Domo to write data back to Databricks.
* **Execute Magic ETL transformations natively**—enables Magic ETL DataFlows to run transformations directly within your Databricks environment.
4. Under **Default write location**, select your target **Catalog** and **Schema** from the dropdowns. This is the Databricks location where Domo writes data during write-back operations and native transform executions.
3. Select an existing configuration from the dropdown, or select **Add OAuth Config...** to create a new one.
4. (Conditional) To create a new configuration:
1. In Databricks, navigate to **Account Console** > **Settings** > **App connections** and add a new app connection for Domo. Enable a custom OAuth application for your Domo instance. For details, see the [Databricks OAuth documentation](https://docs.databricks.com/en/integrations/enable-disable-oauth.html).
2. Add the Domo redirect URLs shown in the modal to your Databricks OAuth app.
3. Back in Domo, enter the **OAuth configuration name**, your **Databricks account identifier**, **Client ID**, and **Client Secret**.
5. Select **Save**.
## Set Up Write & Native Transform
Enable write-back, native transforms, or both on an existing Databricks integration. You must complete the read-only setup before proceeding.
1. From the Databricks Cloud Integrations list, select the **wrench** icon on the integration you want to configure, then select **Settings**.
2. In the **Settings** panel, under **Write & native transform**, select **Set up write & transform**. The **Configure Write & Native Transform** modal opens.
3. Under **What do you want to be able to do?**, select one or both capabilities:
* **Write to Databricks from connectors**—enables Domo to write data back to Databricks.
* **Execute Magic ETL transformations natively**—enables Magic ETL DataFlows to run transformations directly within your Databricks environment.
4. Under **Default write location**, select your target **Catalog** and **Schema** from the dropdowns. This is the Databricks location where Domo writes data during write-back operations and native transform executions.
 5. Select **Save** to complete the setup.
## Troubleshoot
If authentication fails when configuring your integration:
* Verify that your personal access token or M2M OAuth credentials (Client ID and Client Secret) are correct and have not expired.
* Confirm that the Databricks service account has read access to your default Databricks environment.
If the Databricks connection URL is not accepted:
* Confirm that you are not including a protocol identifier. `jdbc:databricks://` is assumed; `jdbc:spark://` is not supported.
* Confirm you are using the correct server hostname and HTTP path from **SQL Warehouses** > *your warehouse name* > **Connection details** in Databricks.
If your catalog or schema does not appear in the dropdowns during write & native transform setup:
* Confirm that the Databricks service account has the necessary permissions to access the target catalog and schema.
* Try refreshing the integration settings and repeating the setup steps.
When a DataFlow uses a Databricks-sourced DataSet, Domo queries the data live from Databricks when the DataFlow runs. Domo checks Databricks-sourced DataSets for updates at the configured freshness interval using the `lastModified` field returned by Databricks's `DESCRIBE DETAIL` command. If Domo detects an update, it triggers any DataFlows that use that table.
**Note:** Change detection via `DESCRIBE DETAIL` applies to tables only. Databricks views do not support this check, so Domo treats views as updated on every freshness check cycle — meaning any DataFlow using a Databricks view will be triggered every interval regardless of whether the underlying data changed.
## Next Steps
* [Cloud Integrations overview](/docs/s/article/4412849158167)—Learn how Cloud Integrations works and which integrations are supported.
* [Magic ETL DataFlows](/docs/s/article/360055259234)—Build and run DataFlows using your Databricks-sourced DataSets.
* [Migrate from Federated to Cloud Integrations](/docs/s/article/000005675)—Guidance for migrating existing integrations.
5. Select **Save** to complete the setup.
## Troubleshoot
If authentication fails when configuring your integration:
* Verify that your personal access token or M2M OAuth credentials (Client ID and Client Secret) are correct and have not expired.
* Confirm that the Databricks service account has read access to your default Databricks environment.
If the Databricks connection URL is not accepted:
* Confirm that you are not including a protocol identifier. `jdbc:databricks://` is assumed; `jdbc:spark://` is not supported.
* Confirm you are using the correct server hostname and HTTP path from **SQL Warehouses** > *your warehouse name* > **Connection details** in Databricks.
If your catalog or schema does not appear in the dropdowns during write & native transform setup:
* Confirm that the Databricks service account has the necessary permissions to access the target catalog and schema.
* Try refreshing the integration settings and repeating the setup steps.
When a DataFlow uses a Databricks-sourced DataSet, Domo queries the data live from Databricks when the DataFlow runs. Domo checks Databricks-sourced DataSets for updates at the configured freshness interval using the `lastModified` field returned by Databricks's `DESCRIBE DETAIL` command. If Domo detects an update, it triggers any DataFlows that use that table.
**Note:** Change detection via `DESCRIBE DETAIL` applies to tables only. Databricks views do not support this check, so Domo treats views as updated on every freshness check cycle — meaning any DataFlow using a Databricks view will be triggered every interval regardless of whether the underlying data changed.
## Next Steps
* [Cloud Integrations overview](/docs/s/article/4412849158167)—Learn how Cloud Integrations works and which integrations are supported.
* [Magic ETL DataFlows](/docs/s/article/360055259234)—Build and run DataFlows using your Databricks-sourced DataSets.
* [Migrate from Federated to Cloud Integrations](/docs/s/article/000005675)—Guidance for migrating existing integrations.