> ## Documentation Index
> Fetch the complete documentation index at: https://www.domo.com/docs/llms.txt
> Use this file to discover all available pages before exploring further.
# Domo Add-ins for Microsoft Office 365 | Manual Installation Guide for Enterprise
## Intro
As a Microsoft 365 administrator for your company, you can deploy the new Domo add-ins for Microsoft 365 products from the administrative center. Users in your organization can then access the Domo add-ins directly from their Microsoft 365 desktop apps. You can also remove the Domo add-in if needed.
We highly recommend that you download the Domo for Office Add-ins from Microsoft Appsource. These instructions are below. If you cannot access Microsoft Appsource, the rest of this guide provides instructions for how to manually install the add-ins.
### Install Domo for Office Add-ins from Microsoft Appsource.
Follow these links to download the Domo for Office Add-ins from Microsoft Appsource:
* [Domo for Office](https://appsource.microsoft.com/en-US/product/office/WA200005264?exp=ubp8) (Excel, PowerPoint, and Word)
* [Domo for Outlook](https://appsource.microsoft.com/en-US/product/office/WA200005307?exp=ubp8\&tab=Overview)
The Outlook add-in is supported by both Android and iOS mobile devices.
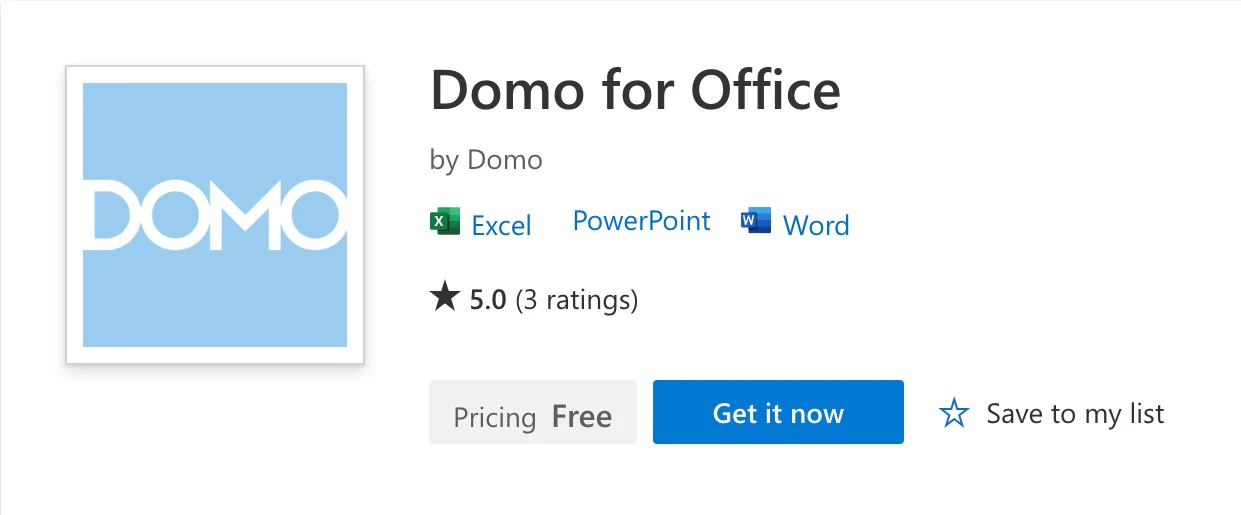 Updates to the Domo for Office add-ins should automatically apply to your installation. If you do not see these updates, you may need to clear your Microsoft 365 add-in's cache. For instructions on how to do this, see [Microsoft's documentation](https://learn.microsoft.com/en-us/office/dev/add-ins/testing/clear-cache).
## Prerequisites
The following are required to install the Domo add-ins:
* Access to the Microsoft 365 admin center and the ability to publish custom add-ins.
* Links to the Microsoft 365 admin manifest files located in Do mo, which are pro vided below.
#### Links to Add-in Manifest Files by Product
**Excel**
[https://extensions.domo.com/office365/addins/manifest/excel-extensions-domo-manifest.xml](https://extensions.domo.com/office365/addins/manifest/excel-extensions-domo-manifest.xml)
**Outlook**
[https://extensions.domo.com/office365/addins/manifest/outlook-extensions-domo-manifest.xml](https://extensions.domo.com/office365/addins/manifest/outlook-extensions-domo-manifest.xml)
**PowerPoint**
[https://extensions.domo.com/office365/addins/manifest/ppt-extensions-domo-manifest.xml](https://extensions.domo.com/office365/addins/manifest/ppt-extensions-domo-manifest.xml)
**Word**
[https://extensions.domo.com/office365/addins/manifest/word-extensions-domo-manifest.xml](https://extensions.domo.com/office365/addins/manifest/word-extensions-domo-manifest.xml)
## Deploy Add-ins to Your Organization
1. Sign in to the [Microsoft 365 admin center](https://admin.microsoft.com/).
2. From the left navigation menu in the admin center, go to **Settings** > **Integrated Apps**.
Updates to the Domo for Office add-ins should automatically apply to your installation. If you do not see these updates, you may need to clear your Microsoft 365 add-in's cache. For instructions on how to do this, see [Microsoft's documentation](https://learn.microsoft.com/en-us/office/dev/add-ins/testing/clear-cache).
## Prerequisites
The following are required to install the Domo add-ins:
* Access to the Microsoft 365 admin center and the ability to publish custom add-ins.
* Links to the Microsoft 365 admin manifest files located in Do mo, which are pro vided below.
#### Links to Add-in Manifest Files by Product
**Excel**
[https://extensions.domo.com/office365/addins/manifest/excel-extensions-domo-manifest.xml](https://extensions.domo.com/office365/addins/manifest/excel-extensions-domo-manifest.xml)
**Outlook**
[https://extensions.domo.com/office365/addins/manifest/outlook-extensions-domo-manifest.xml](https://extensions.domo.com/office365/addins/manifest/outlook-extensions-domo-manifest.xml)
**PowerPoint**
[https://extensions.domo.com/office365/addins/manifest/ppt-extensions-domo-manifest.xml](https://extensions.domo.com/office365/addins/manifest/ppt-extensions-domo-manifest.xml)
**Word**
[https://extensions.domo.com/office365/addins/manifest/word-extensions-domo-manifest.xml](https://extensions.domo.com/office365/addins/manifest/word-extensions-domo-manifest.xml)
## Deploy Add-ins to Your Organization
1. Sign in to the [Microsoft 365 admin center](https://admin.microsoft.com/).
2. From the left navigation menu in the admin center, go to **Settings** > **Integrated Apps**.
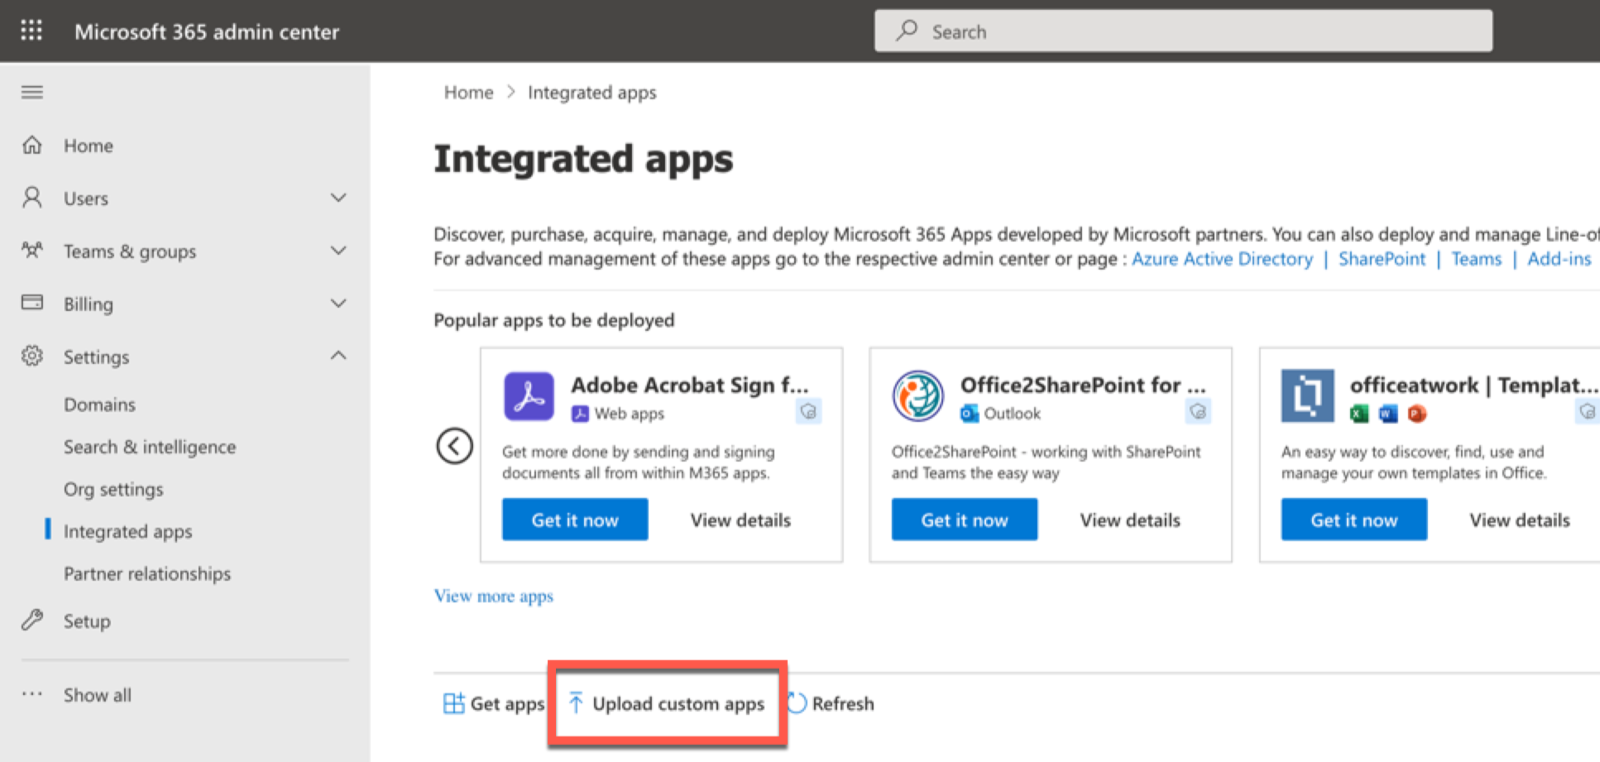
 3. Select **Upload custom apps**.
The **Deploy New App** modal displays.
3. Select **Upload custom apps**.
The **Deploy New App** modal displays.
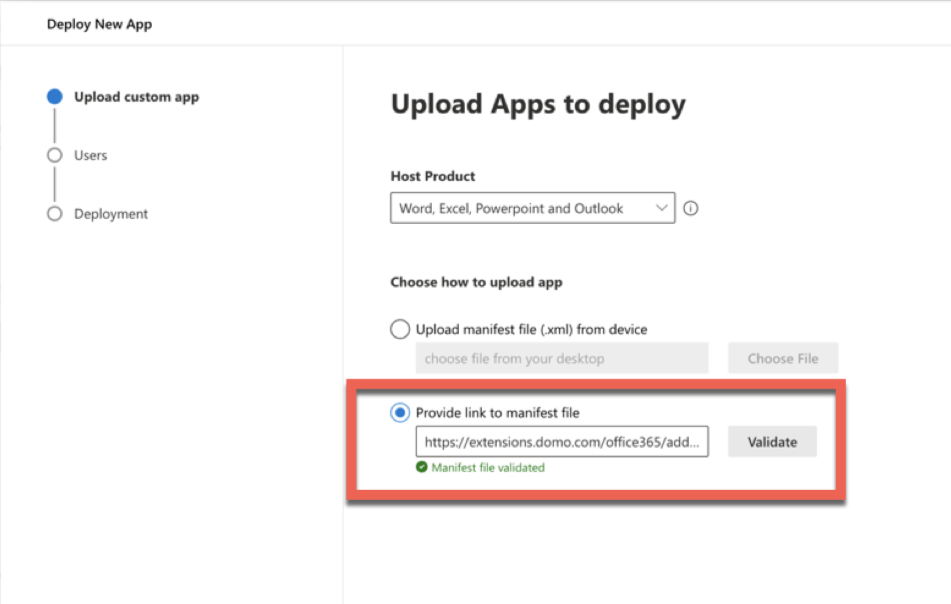
 4. Under **Upload Apps to deploy**, select the down arrow to open the **Host Product** menu.
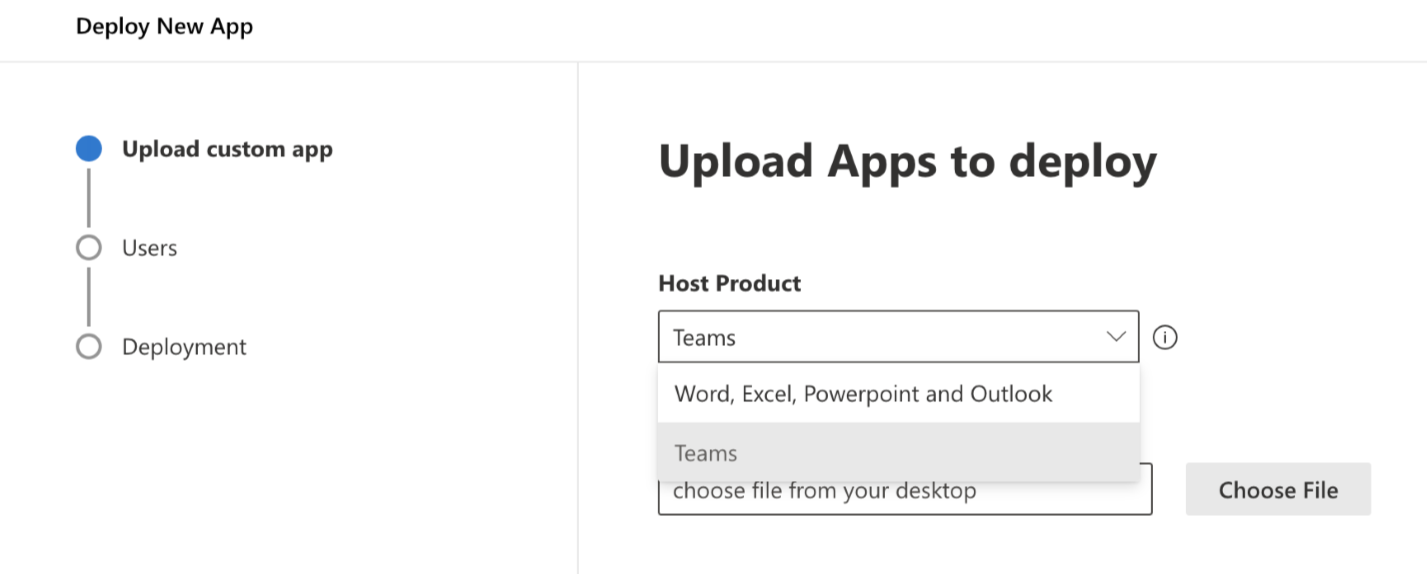 5. In the Host Product menu, select **Word, Excel, Powerpoint and Outlook**.
6. Under **Choose how to upload app**, select **Provide link to manifest file.**
5. In the Host Product menu, select **Word, Excel, Powerpoint and Outlook**.
6. Under **Choose how to upload app**, select **Provide link to manifest file.**
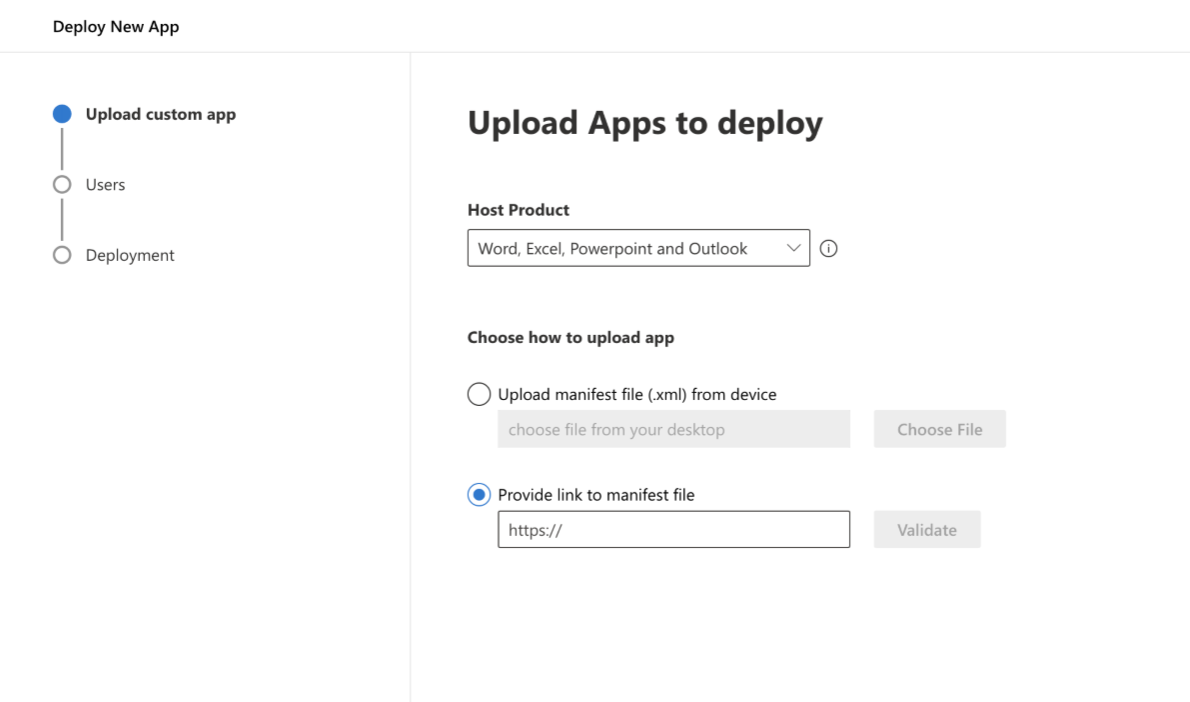 7. In the **Provide link to manifest file** field, paste the link for your chosen product from the [Prerequisites](#Prerequisites) section of this guide.
**Note:** If you want to deploy Domo add-ins to more than one product, you must follow the instructions in this article to deploy to each product individually.
8. After pasting the correct product link, select **Validate** to the right of the field.
If the file is validated, a comment displays below the field.
7. In the **Provide link to manifest file** field, paste the link for your chosen product from the [Prerequisites](#Prerequisites) section of this guide.
**Note:** If you want to deploy Domo add-ins to more than one product, you must follow the instructions in this article to deploy to each product individually.
8. After pasting the correct product link, select **Validate** to the right of the field.
If the file is validated, a comment displays below the field.
 9. Select **Next** at the bottom of the modal.
10. Fill out the **Users** section of the modal, then select **Next**.
9. Select **Next** at the bottom of the modal.
10. Fill out the **Users** section of the modal, then select **Next**.
 11. In the **Deployment** section of the modal, verify that the correct Microsoft 365 product displays on the **Accept permissions requests** and **Finish** pages. In the example image below, the product is Word.
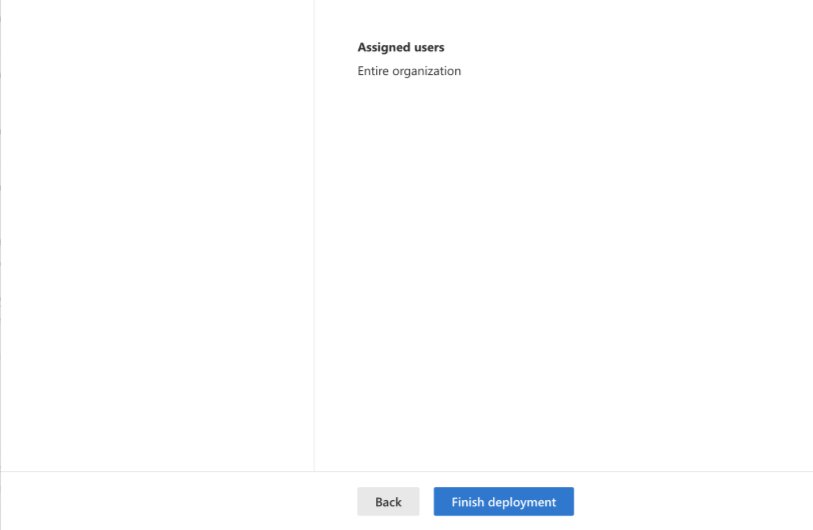
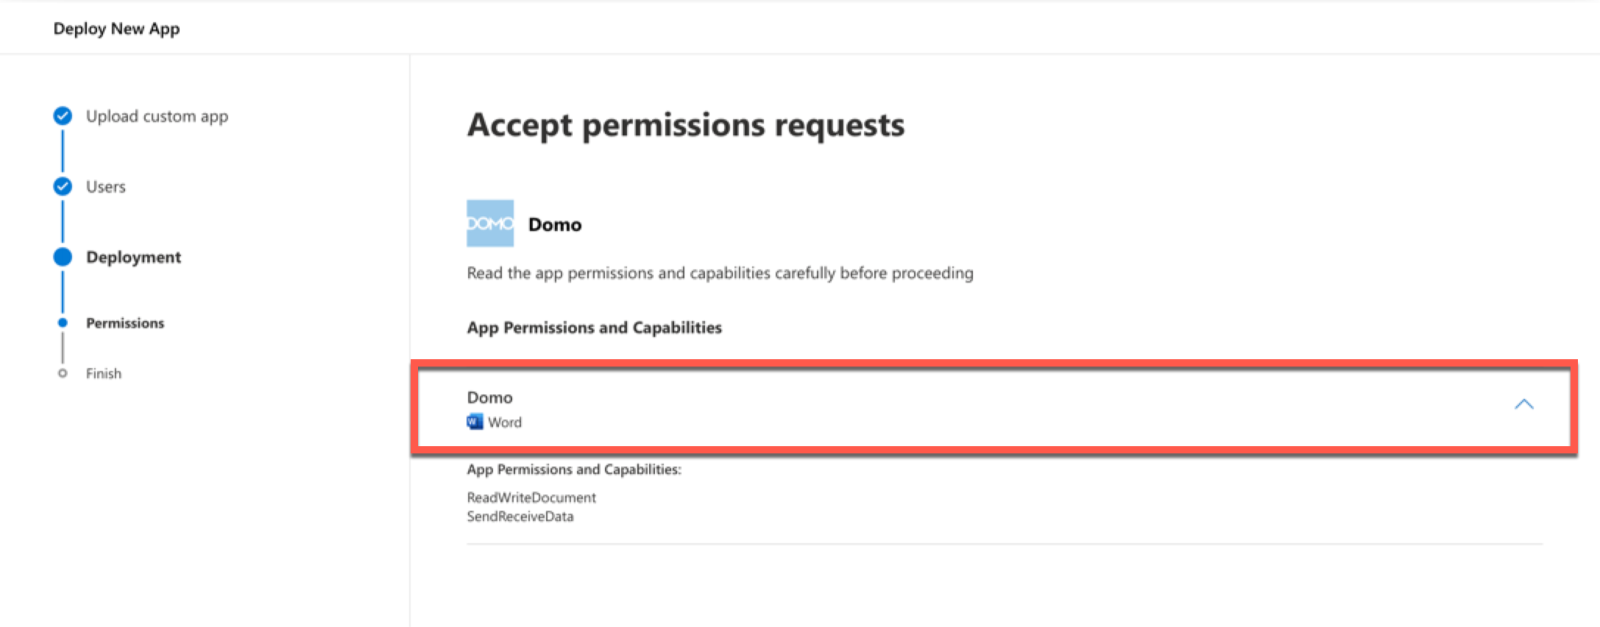 12. On the **Finish** page of the Deploy New App modal, select **Finish deployment**.
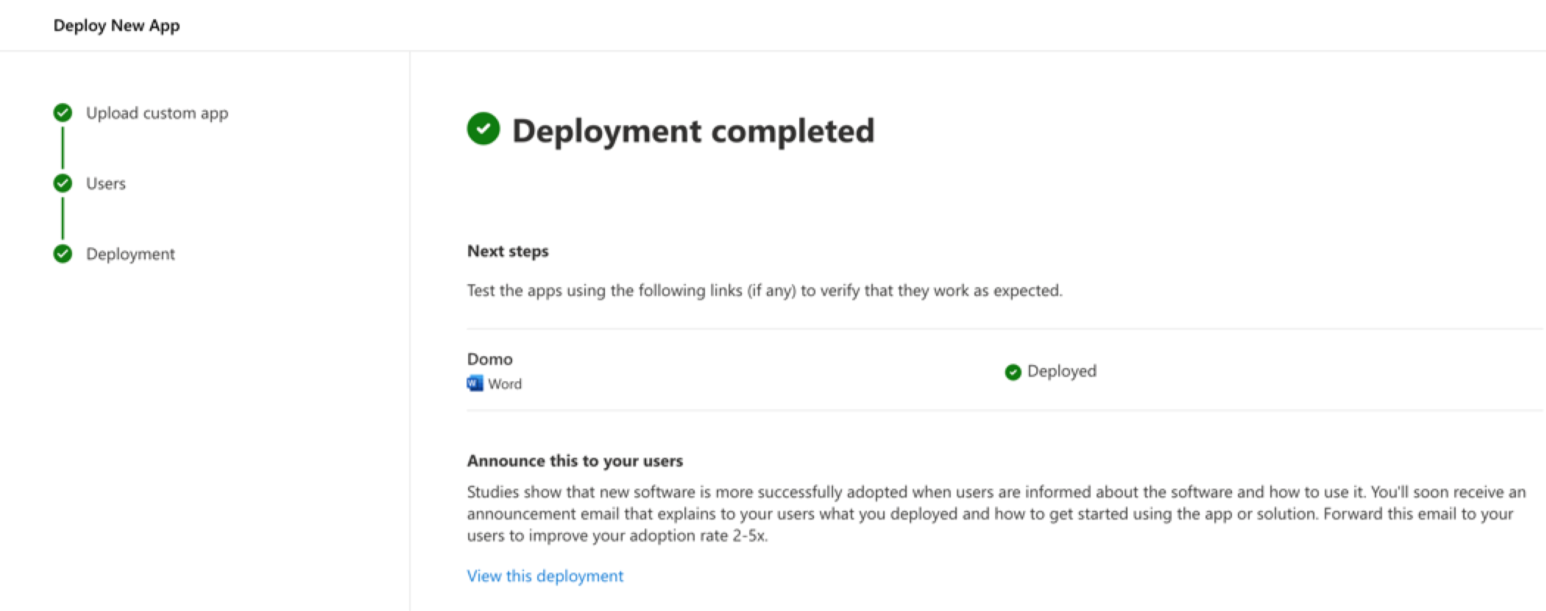
 13. Verify that deployment has completed.
 14. Repeat this process for each Microsoft 365 product you want to deploy Domo add-ins to.
## Access Admin Managed Add-ins
After you deploy Domo add-ins to Microsoft 365 desktop apps, users in your organization must follow this process to access the add-ins:
1. Open the Microsoft 365 app that you want to work in.
2. Go to **Get Add-ins**.
* If you are using Excel, PowerPoint, or Word:
1. Go to the **Insert** tab of the ribbon at the top of the document.
2. Select **Get Add-ins**.
* If you are using Outlook:
1. Select the
14. Repeat this process for each Microsoft 365 product you want to deploy Domo add-ins to.
## Access Admin Managed Add-ins
After you deploy Domo add-ins to Microsoft 365 desktop apps, users in your organization must follow this process to access the add-ins:
1. Open the Microsoft 365 app that you want to work in.
2. Go to **Get Add-ins**.
* If you are using Excel, PowerPoint, or Word:
1. Go to the **Insert** tab of the ribbon at the top of the document.
2. Select **Get Add-ins**.
* If you are using Outlook:
1. Select the  meatball menu from the toolbar at the top of the app.
2. Select **Get Add-ins**.
3. Select **Admin Managed**.
4. Select the **Domo** add-in, then select **Add**.
Users can now view the Domo tab in the ribbon or the toolbar at the top of their Microsoft 365 app. For detailed instructions on using the Domo add-in for various tasks, see the [Domo Add-ins for Microsoft 365 Desktop Apps User Guide](https://domo-support.domo.com/s/article/000005143).
## Remove Domo Add-ins
You may need to remove the Domo add-in. To do this, follow the steps below.
1. Sign in to the [Microsoft 365 admin center](https://admin.microsoft.com/).
2. From the left navigation menu in the admin center, go to **Settings** > **Integrated Apps**.
3. In the list of your integrated apps, locate the add-in you want to remove.
meatball menu from the toolbar at the top of the app.
2. Select **Get Add-ins**.
3. Select **Admin Managed**.
4. Select the **Domo** add-in, then select **Add**.
Users can now view the Domo tab in the ribbon or the toolbar at the top of their Microsoft 365 app. For detailed instructions on using the Domo add-in for various tasks, see the [Domo Add-ins for Microsoft 365 Desktop Apps User Guide](https://domo-support.domo.com/s/article/000005143).
## Remove Domo Add-ins
You may need to remove the Domo add-in. To do this, follow the steps below.
1. Sign in to the [Microsoft 365 admin center](https://admin.microsoft.com/).
2. From the left navigation menu in the admin center, go to **Settings** > **Integrated Apps**.
3. In the list of your integrated apps, locate the add-in you want to remove.
 4. Select the
  kebab menu to the left of the Microsoft 365 app name in the **Host products** column.
5. Select **Remove**.
The Domo add-in for the selected Microsoft 365 app is no longer deployed.
kebab menu to the left of the Microsoft 365 app name in the **Host products** column.
5. Select **Remove**.
The Domo add-in for the selected Microsoft 365 app is no longer deployed.